Halloween is right around the corner! So it’s time to start with props. I started with a prop of Book from Hocus Pocus. I used the following blog post from 102 Wicked Things to Do as a launching point to create my book. I found it on Pinterest.

For the most part I followed most of the steps from the blog, but I made some of my own modifications.
- I bought a basic hollowed out book and painted the cover white to cover up the art work. Then I used clay to make the ridges for where the “skin” will get sewn together.
 2. Then I used brown packing paper from a Chewey order and glued it to the book with Modge Podge. I painted the book dark brown, and using more crumpled packing paper added layers of paint.


3. I glued on the eye and added more packing paper for the eye lid, adding more layers of paint. I sliced through the paper at the ridges for the “skin” so it could be sewn together. I painted the split open paper with dark red to represent blood.


4. I sewed the paper back together, through the clay. I used wood stain wipes as a final coat to smooth out the paint layers.
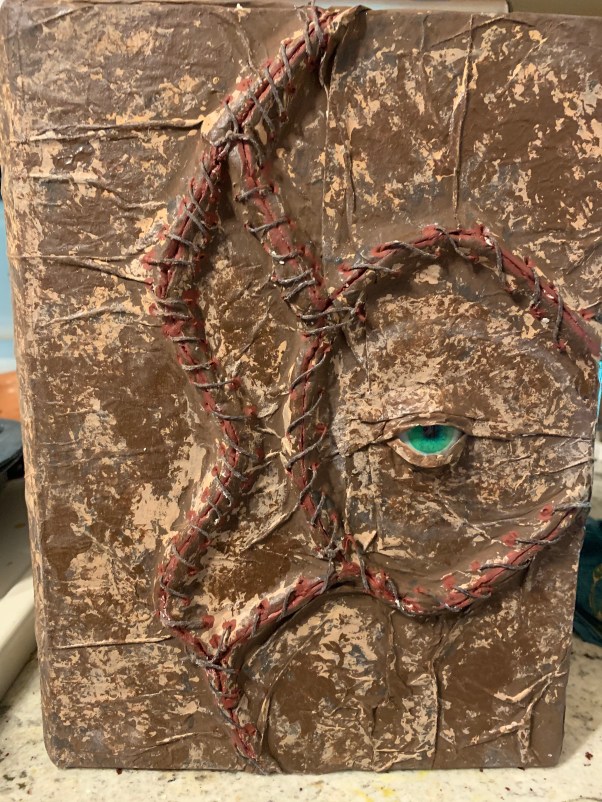
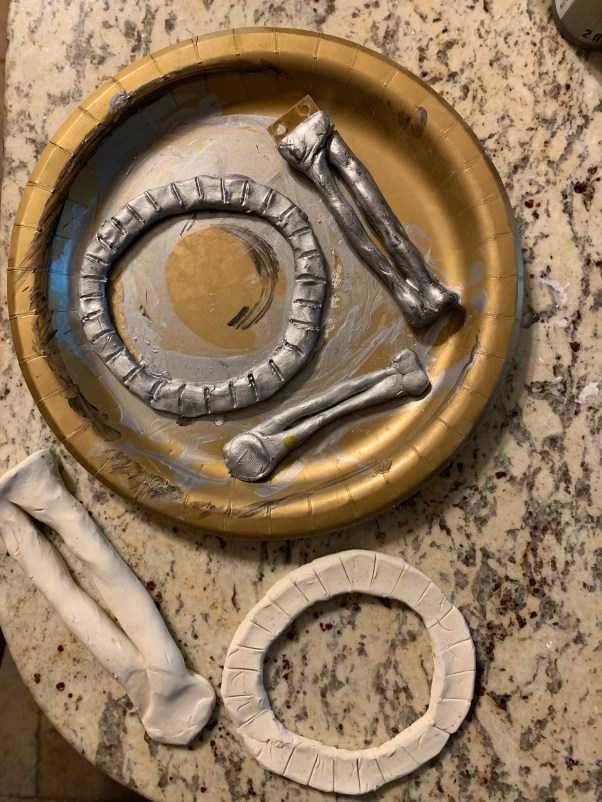
5. The hardest part for me was making the little sculptures. I didn’t make the mold like the blog suggested, I just created 4 separate snakes for the corners and 2 snakes for the binding. I also created the ring, hand, and forearm. I used a forearm instead of a braid. I thought it made more sense for the arm. I baked the sculptures and painted them with various layers of metallic silvers and grays. Oh yeah and a plastic ruler was used too. After gluing everything on the book I did a final cover in Modge Podge, because the book was a little sticky and the Modge Podge helped to smooth it out.


Of course they all didn’t turn out well. Some were too big or small. The first hinge I super glued, was super glued so it wouldn’t open and close.
6. I went a little further than the blog post instructions. I covered the hole in the book with heavy stock paper. Next I took some spell pages that I bought on Etsy. I also bought some aged paper stock to print them on. I also found a cool image for my cover page and I added a gold border to it. Unfortunately the book isn’t quite 8 1/2 x 11, so I needed to trim the paper a little. I used rubber cement to glue the pages in. I finished off the pages by burning the edges. I taped the cover page with metallic gold paint.


That’s brilliant!
LikeLike