Some additional props I made this year are the upside down portal and a Chrissy. For Chrissy, I found a cool YouTube video of someone making her from an old Halloween Spirit prop. But the prop is discontinued and I could only find it on sale for $350 – $400 and I wasn’t willing to spend that much.
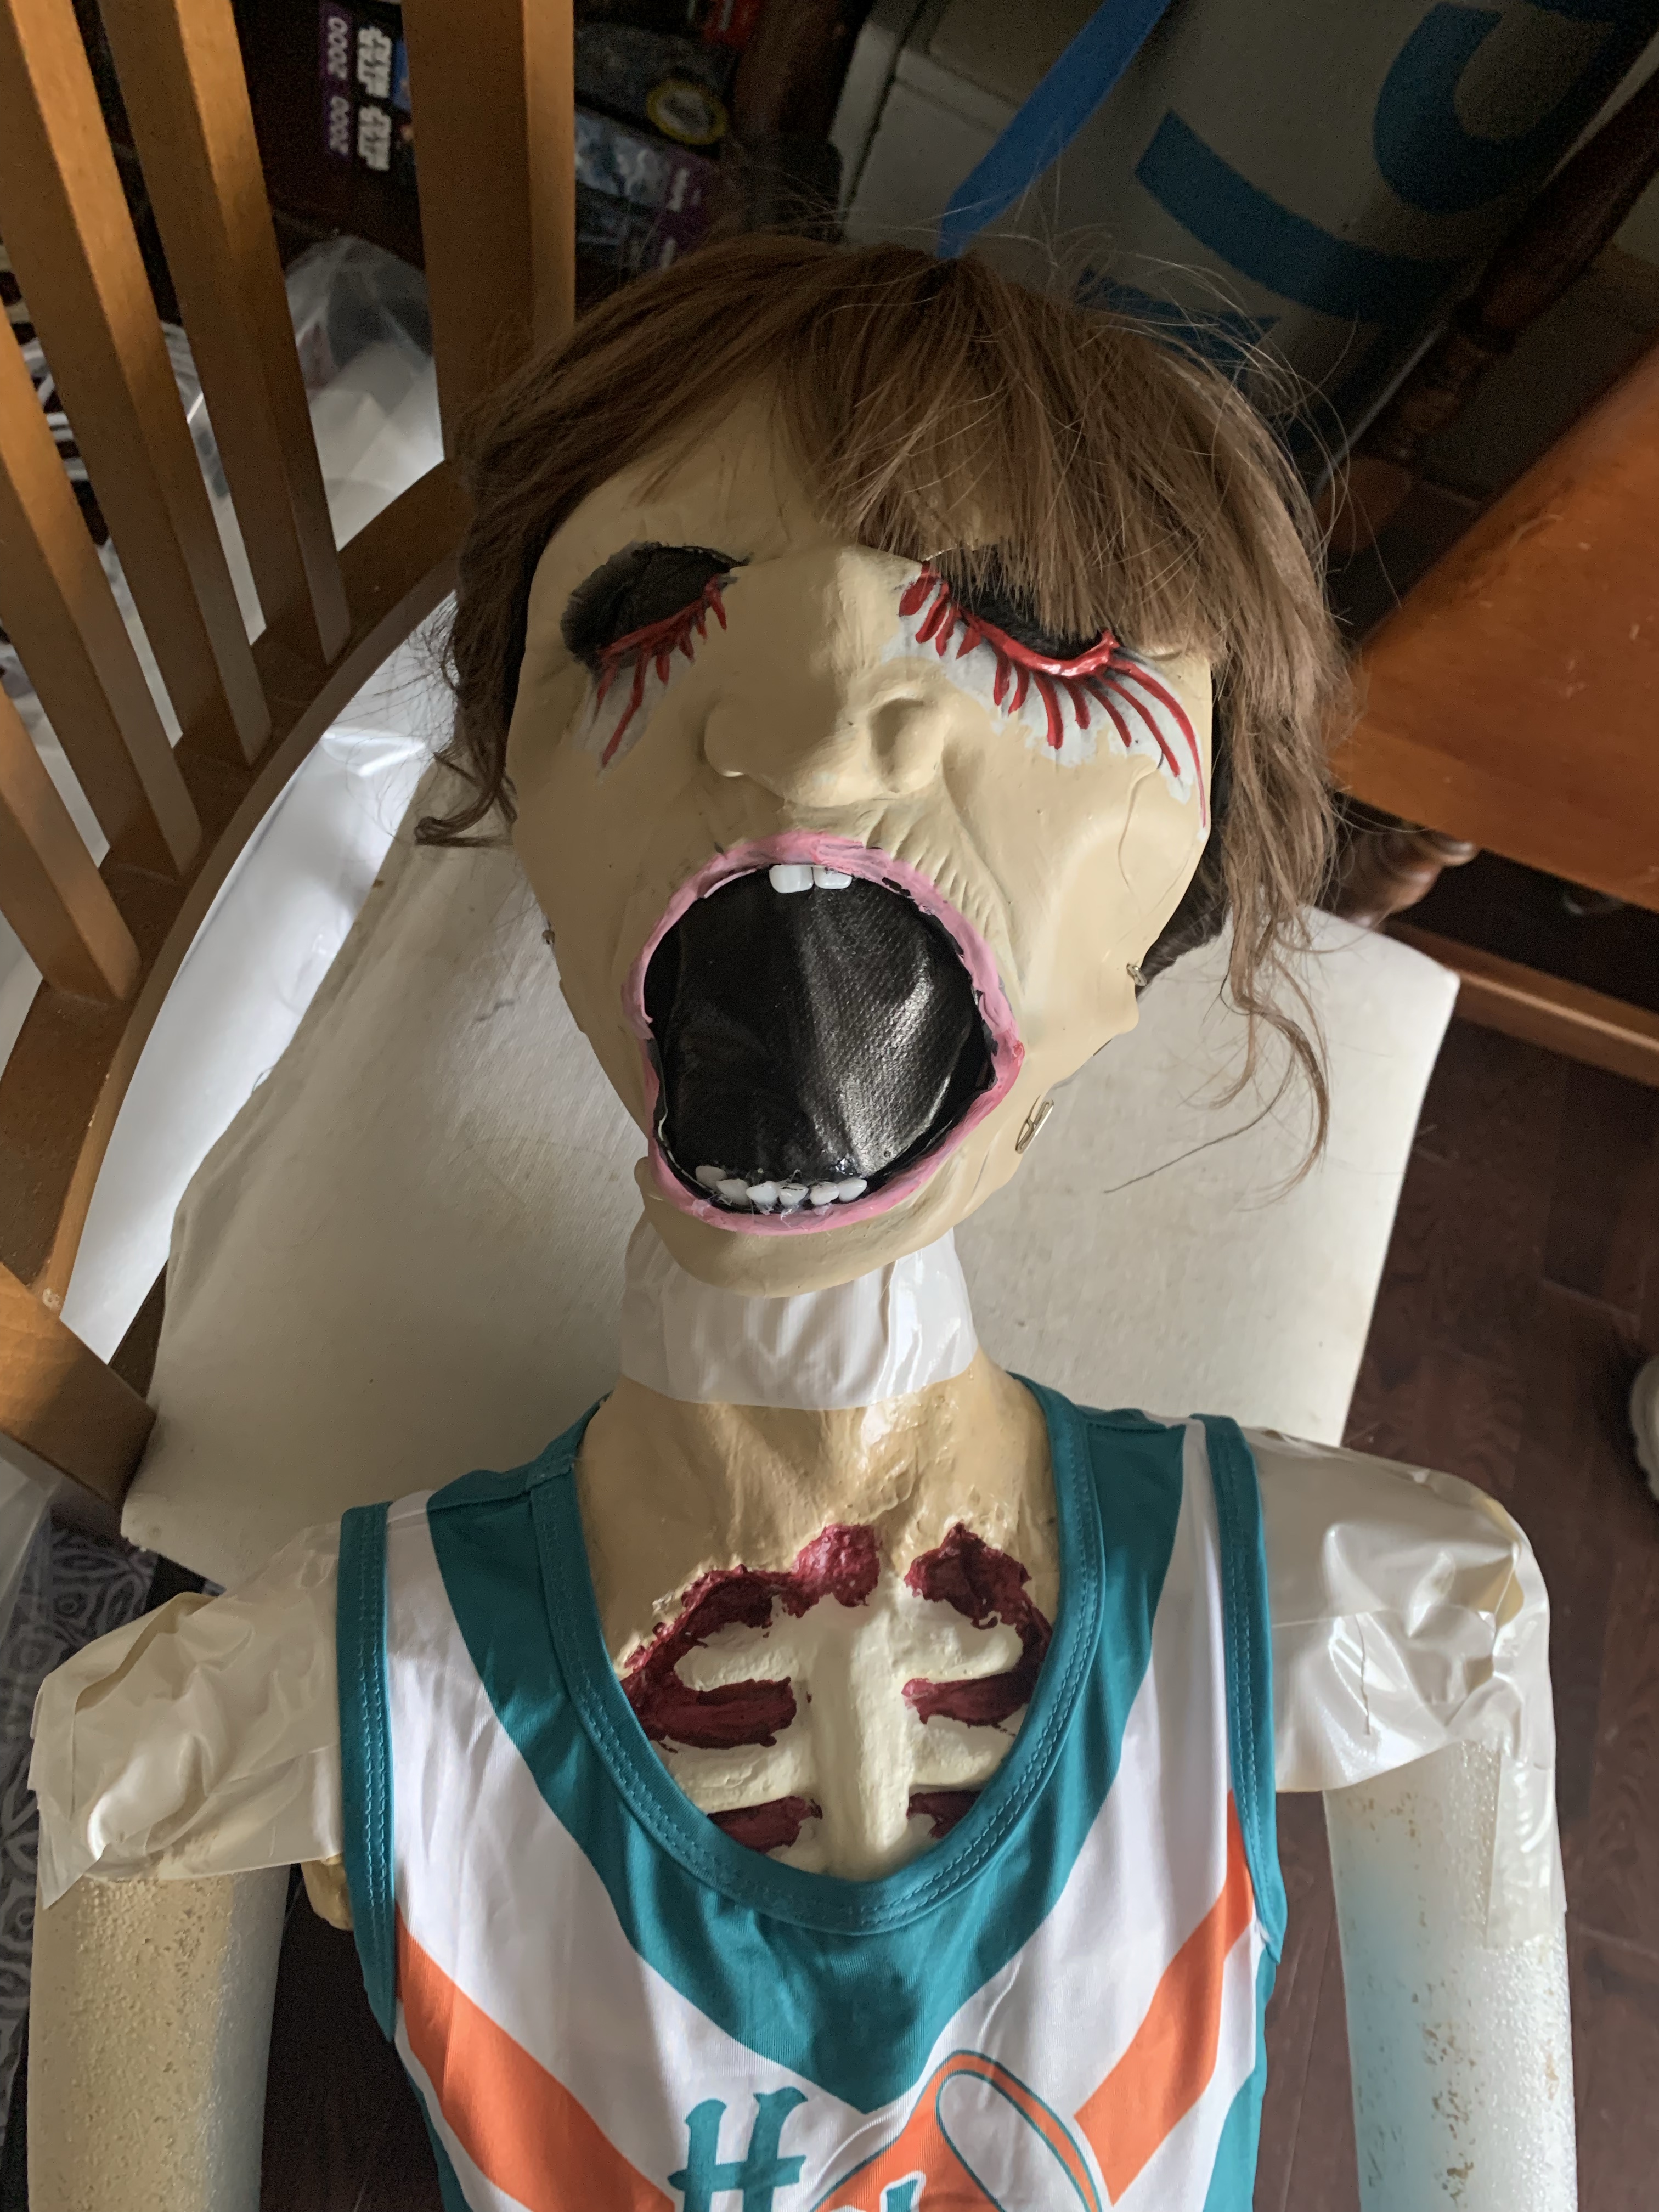
So for my budget Chrissy I started with a Styrofoam head that I already had and Billy Butcherson’s body. I used this screaming nun mask as the template for her face (I searched lots of masks and this is the best I could find for my purpose). I bought a bunch of pool noodles for her limbs, and used some heavy wire from Lowes to bend and form the noodles. I also bought some teeth for her mouth.
The biggest adjustment was the mask. I cut out the eyes and mouth. Then I painted the mask. I used landscaping fabric to fill the void of the eyes and mouth. Then I pinned the mask to the Styrofoam head. I cut the heads neck at an angle to make the head a little crooked. I added some teeth and the wig to her head. BTW, this wig is great, maybe the color doesn’t match Chrissy 100%, but the hair style does.
Oh yeah, I also bought her hands, but they didn’t arrive on time so I had to order replacement hands. They weren’t quite what I wanted. I couldn’t find any female hands. I even tried to make my own hands, but that turned into a big mess. In the end, I just used wire in the hands to break the fingers, and I painted them because the were too pink.
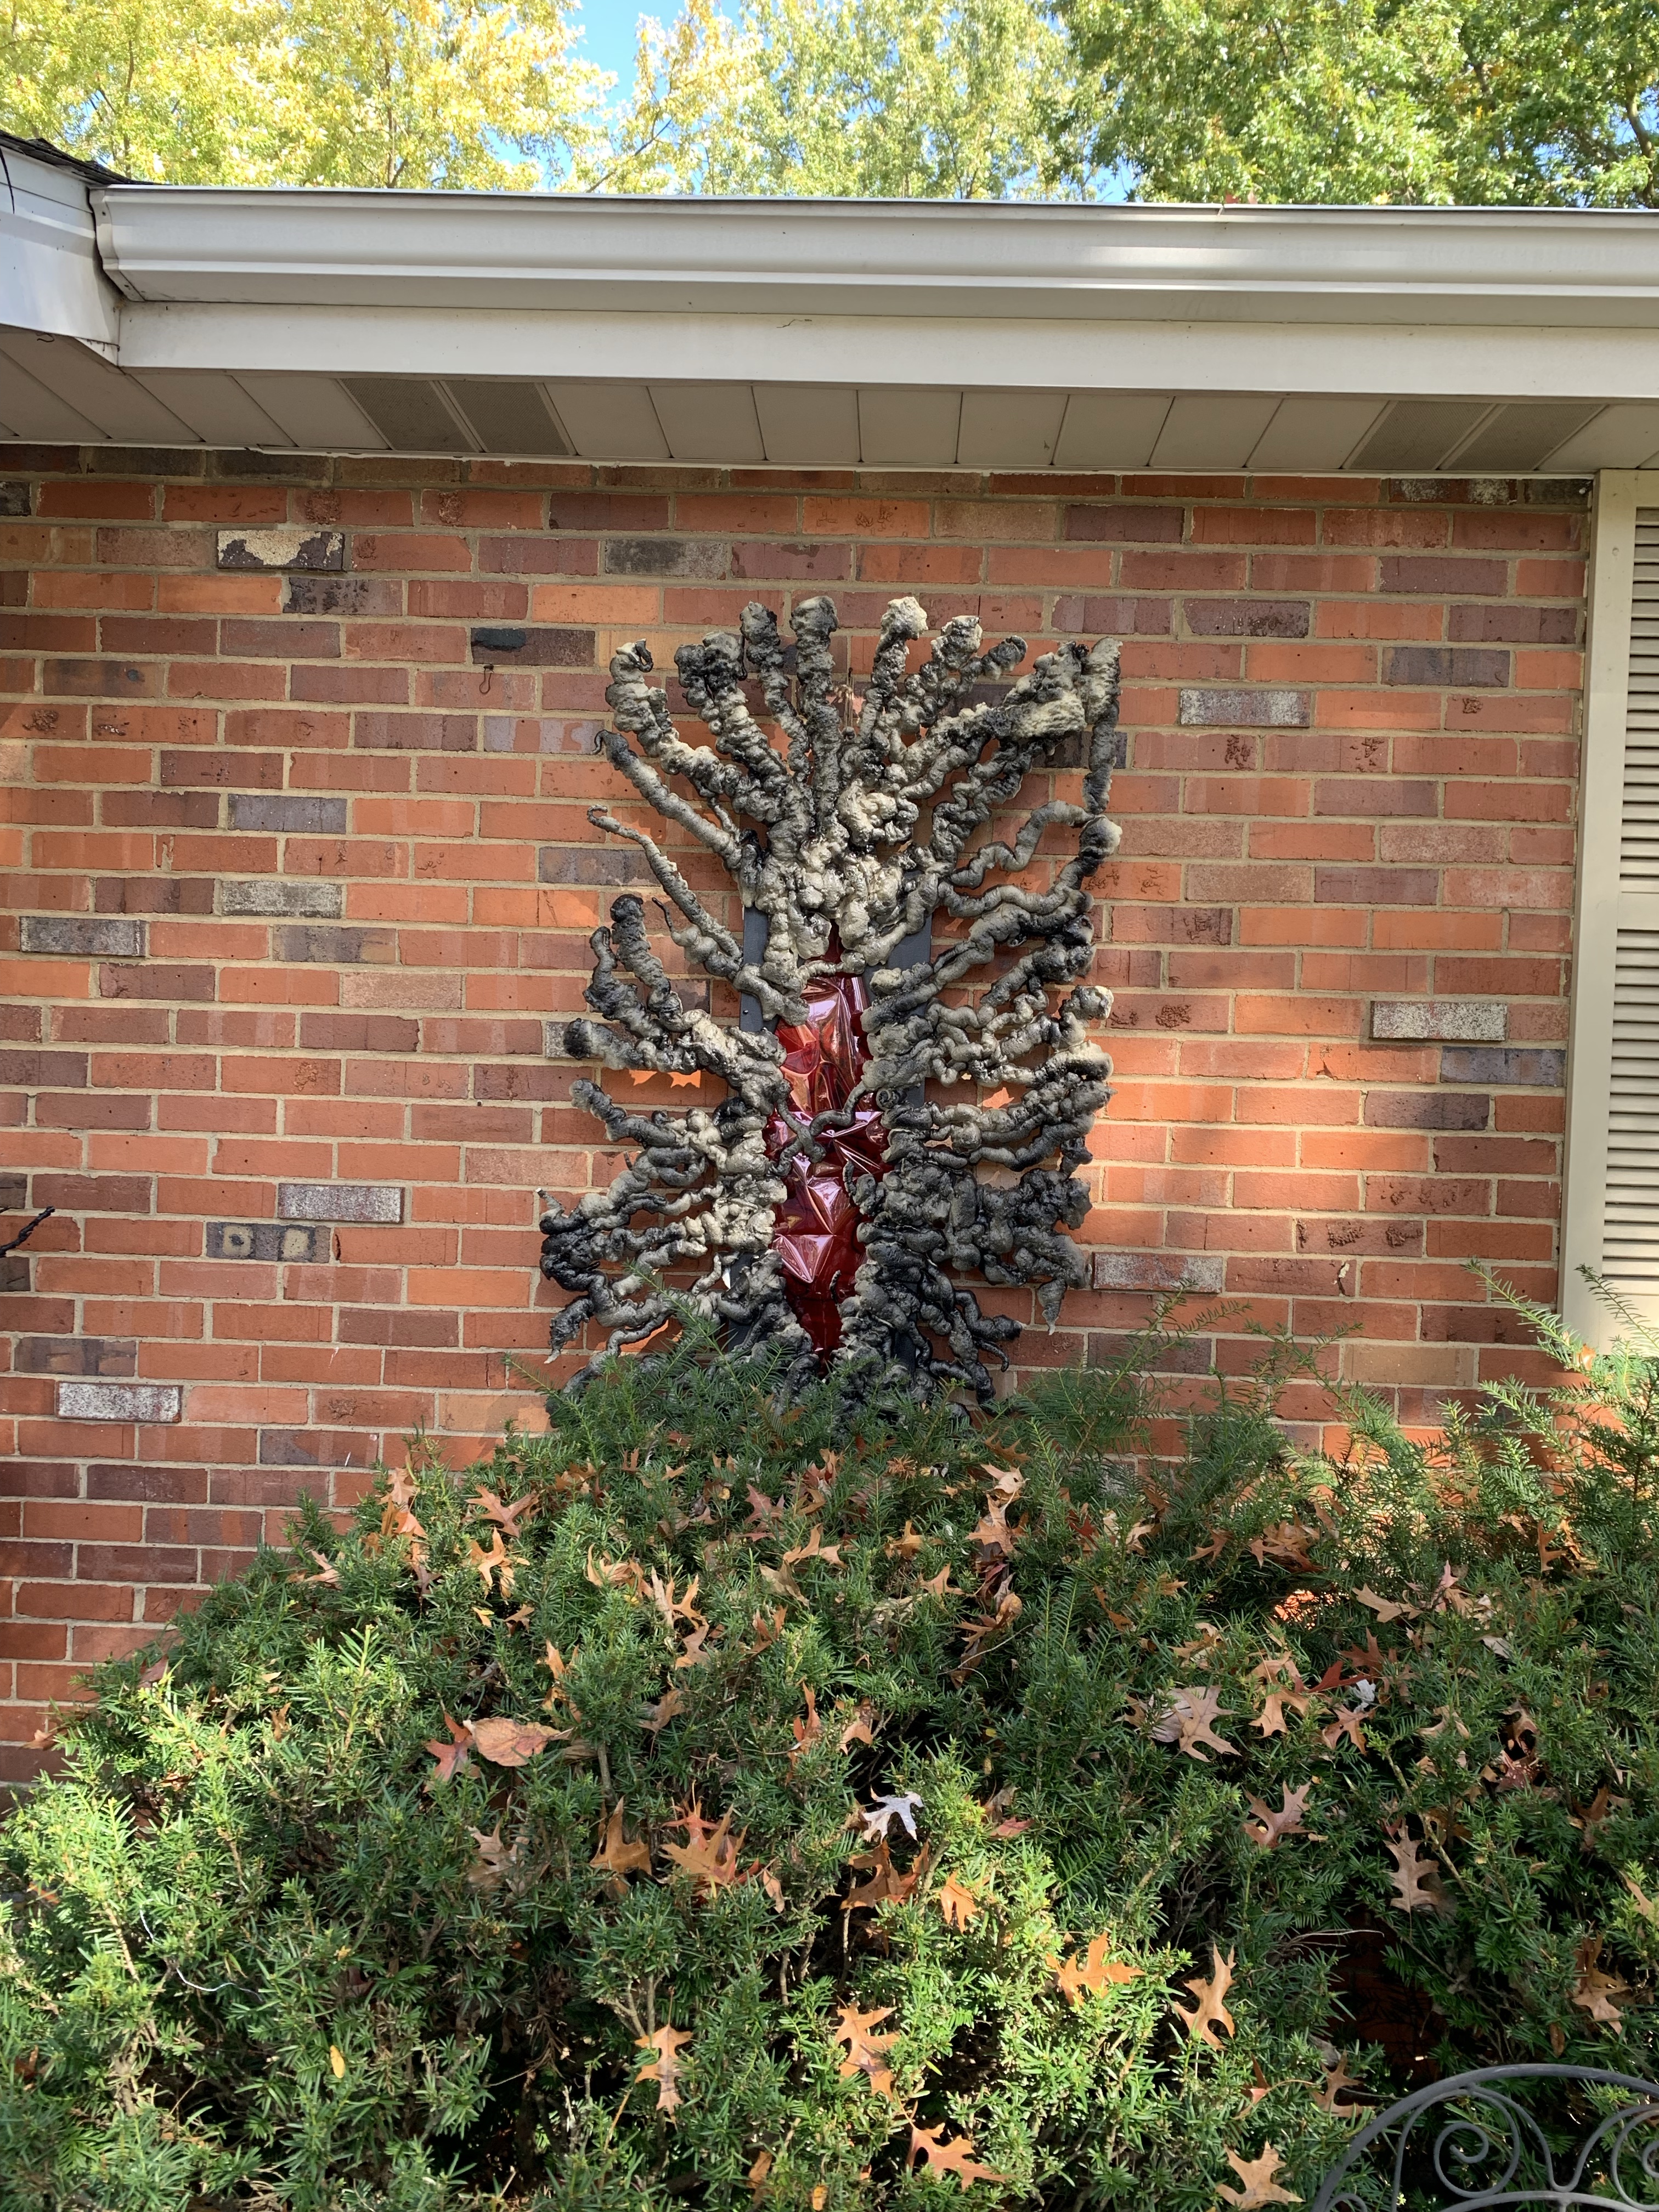
Next up was the portal to the upside down. I used a painting canvas, spray foam, red film, and lights. I cut a gash in the canvas and painted the canvas all black. Then I laid the canvas out on plastic and sprayed the expanding foam coming out of the opening. I also had a couple go across the opening. Then a spray painted black. Once dry I flipped it over, carefully to add the red film and lights. I just used tape because I was afraid of hurting the foam. Then I attached a wire to hang it on the wall.
Oh yeah, and I bought these because they were awesome and I couldn’t make them myself.
I lied. My Stranger Things decorations were not done. I found a new Facebook group called DIY Halloween Decorations and Props and I have been getting tons of inspiration from these talented people. I decided to add to my Stranger Things decorations.
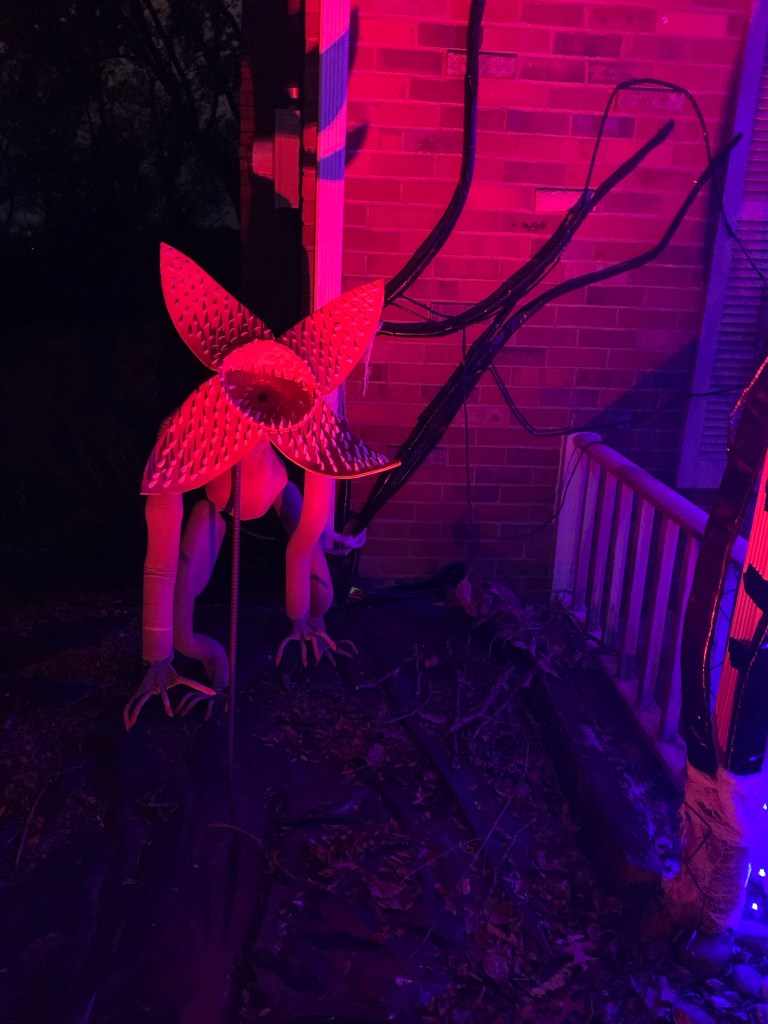
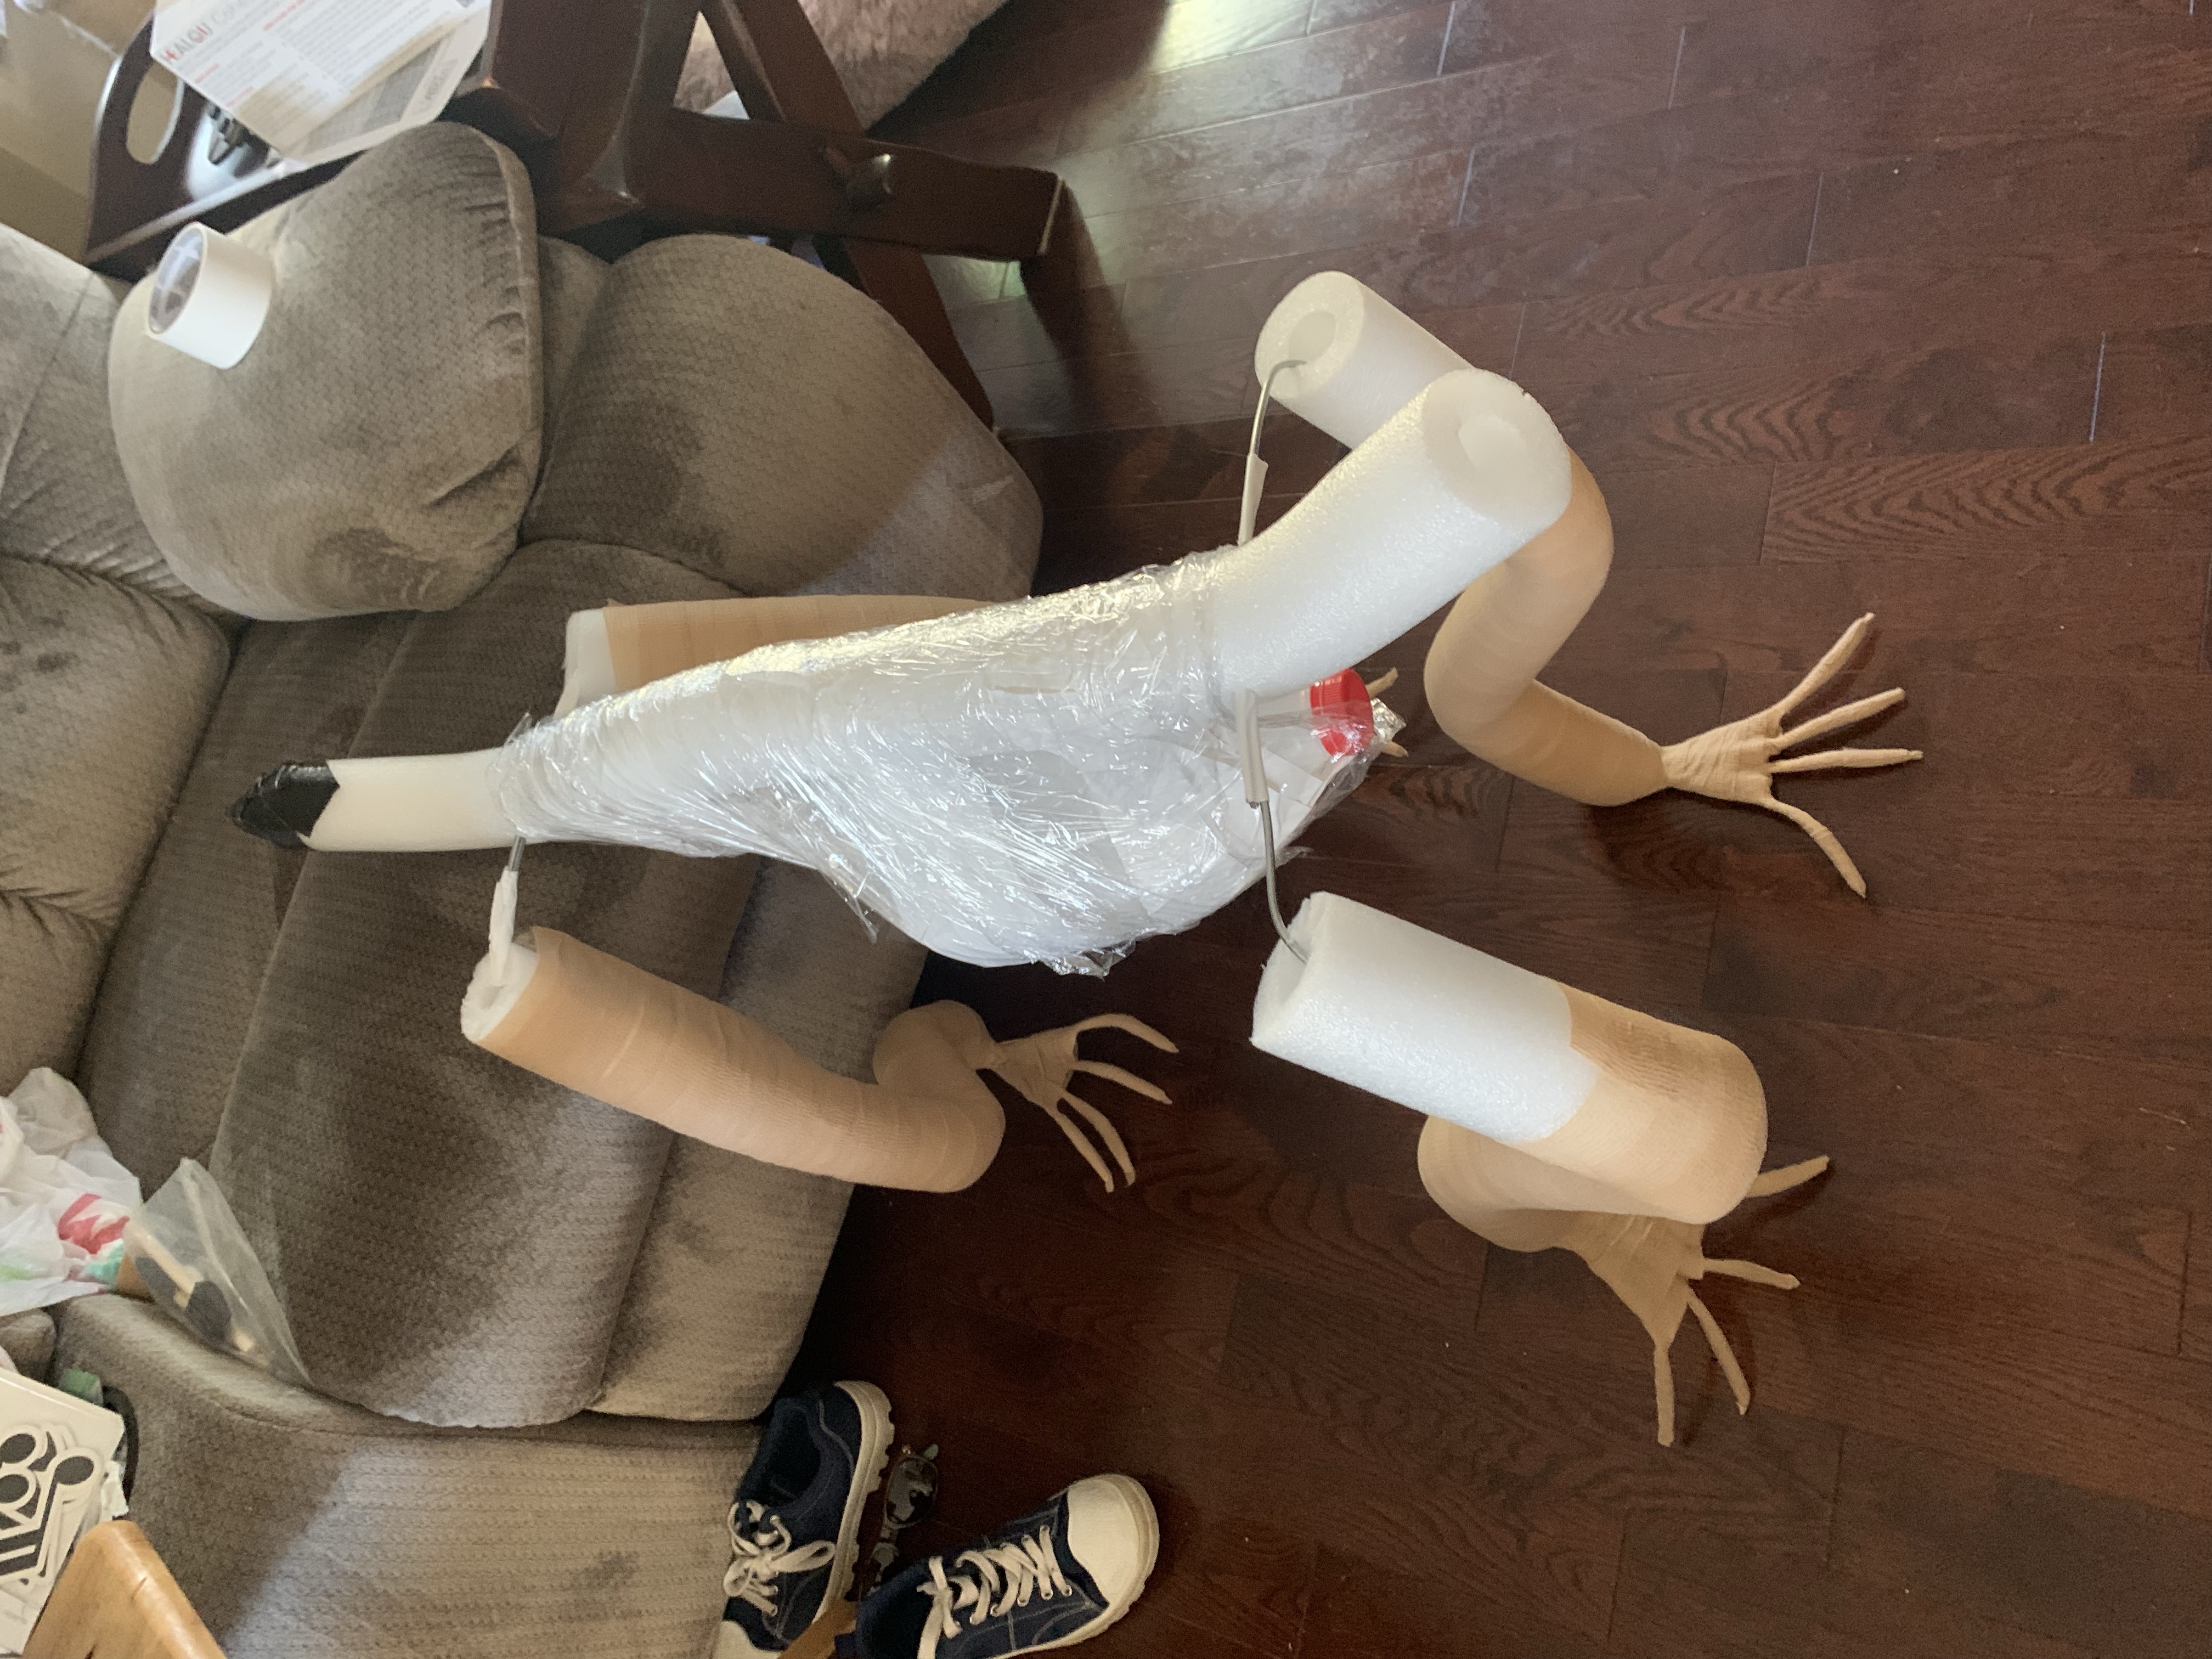
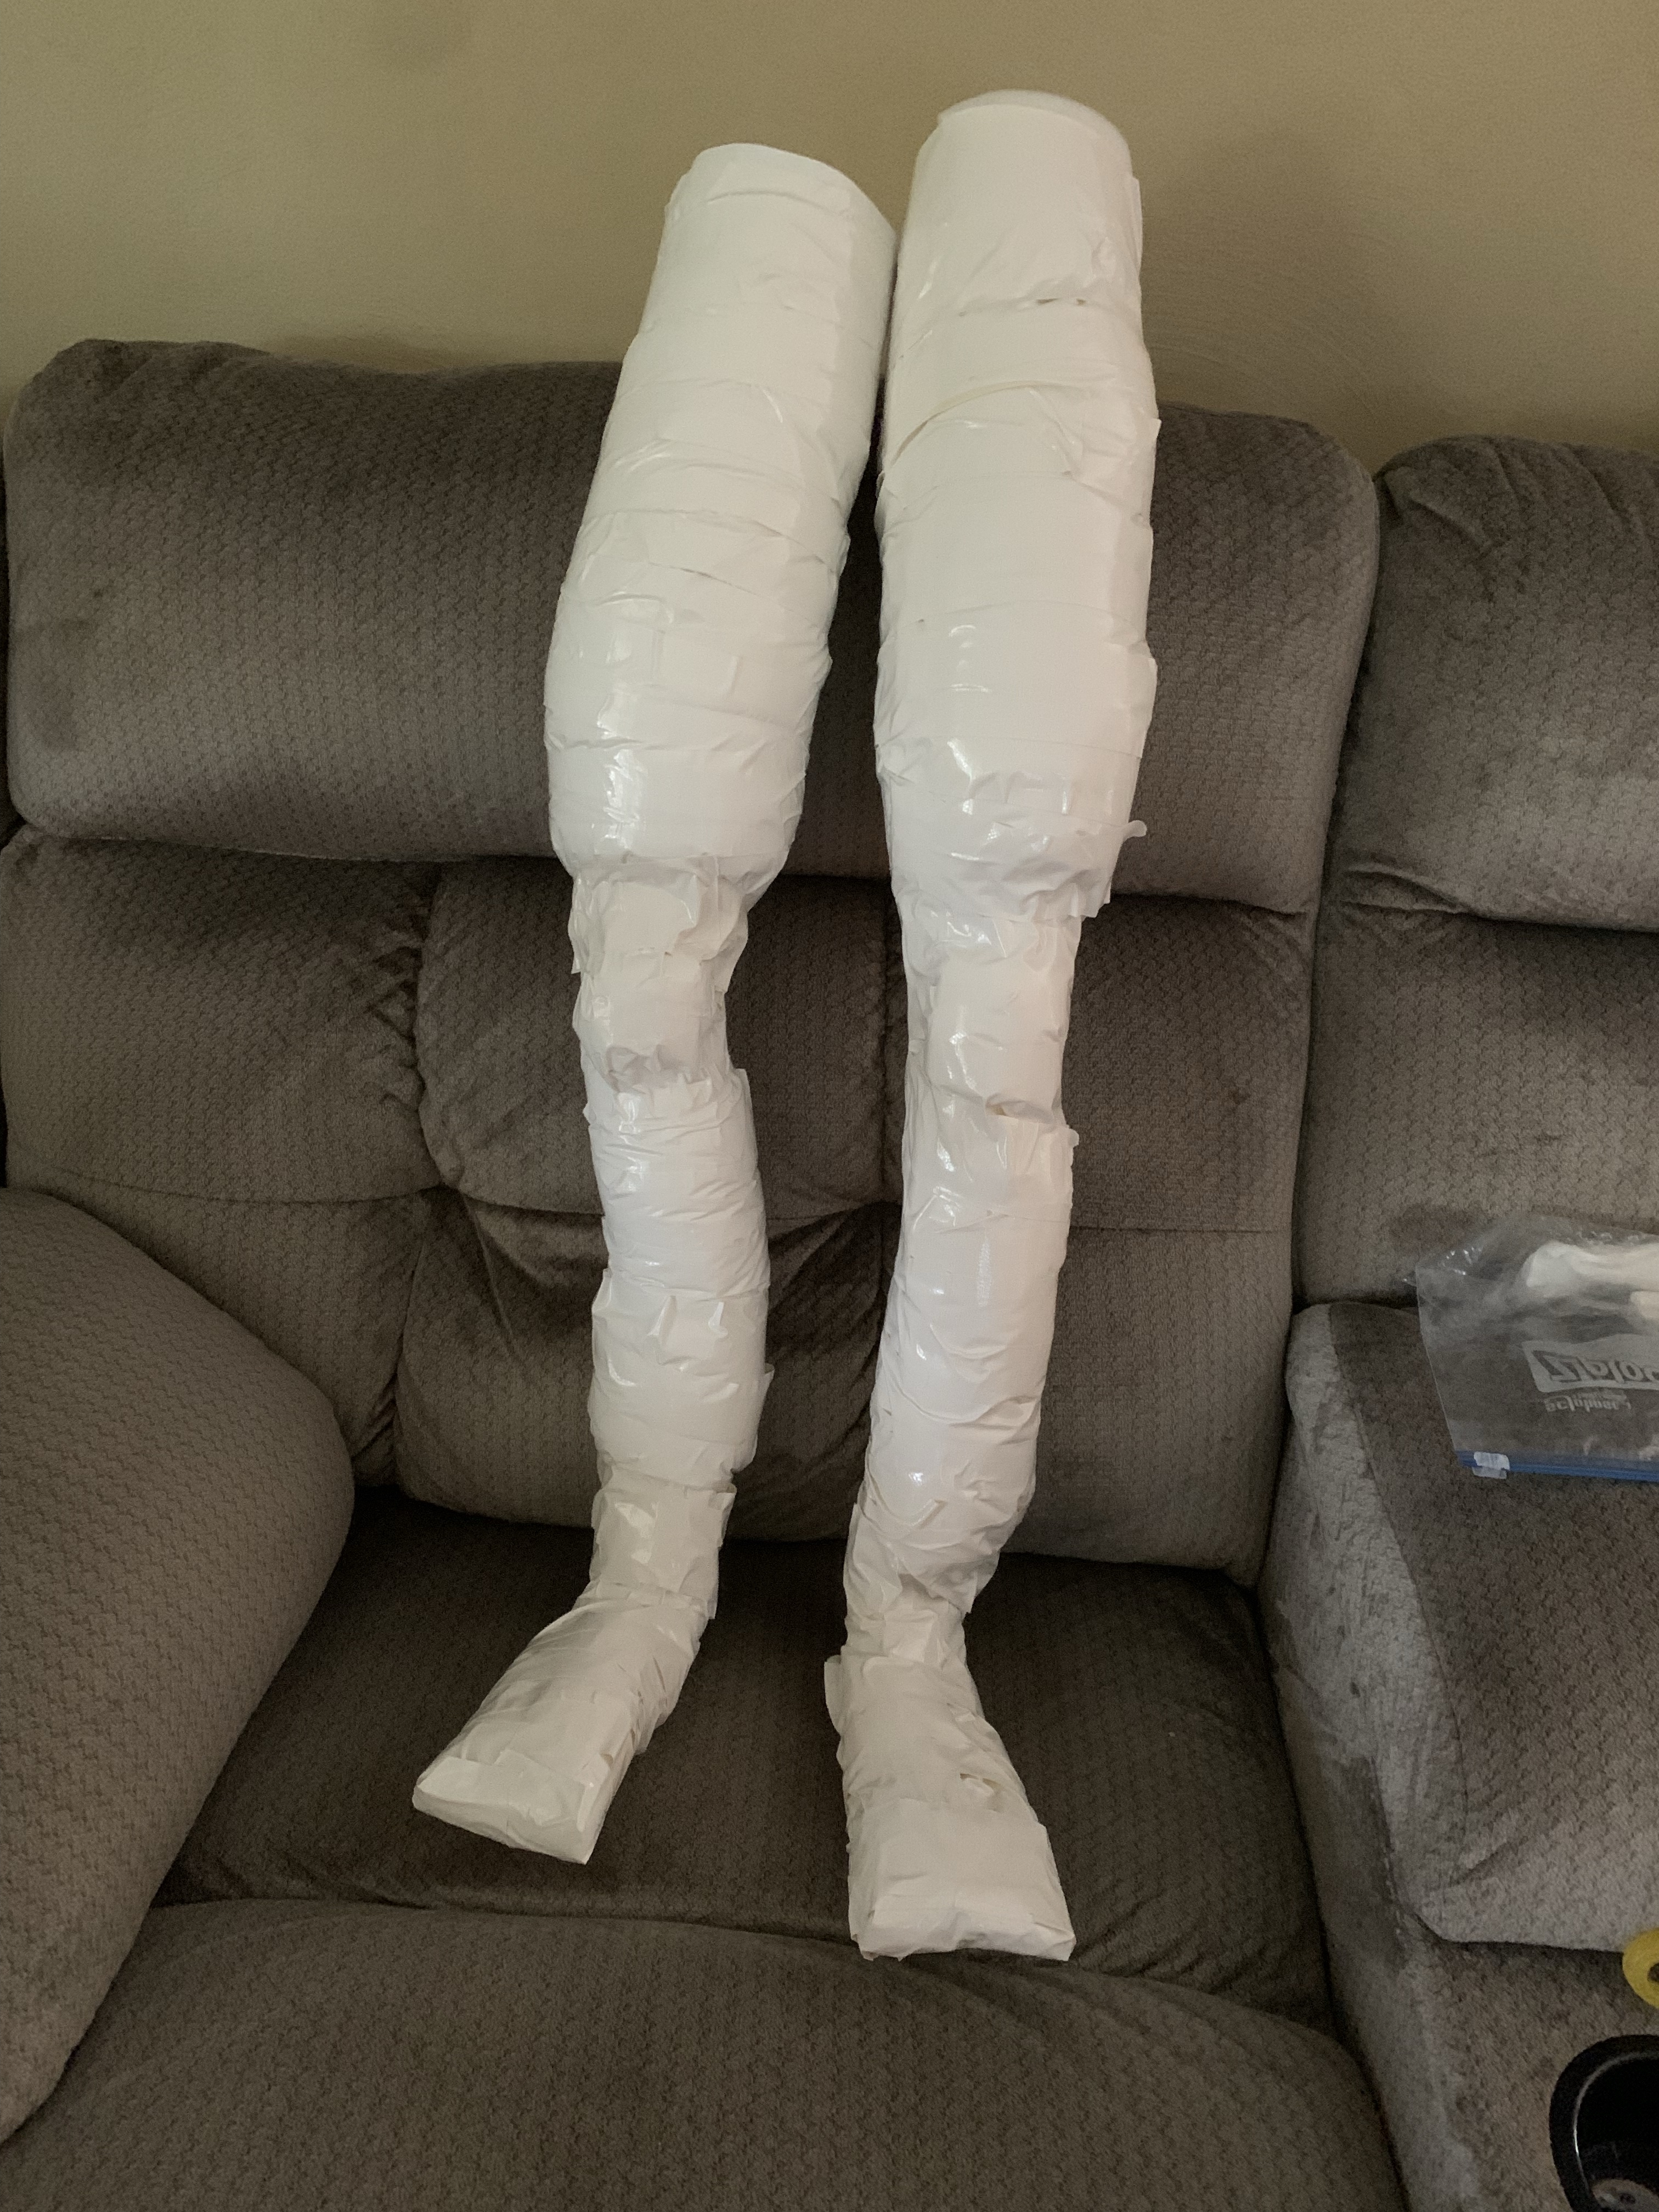
Several members of the group made the demo dogs. one used the Home Depot Wolf skeleton as a base, some used bottles and pool noodles, some molded their heads, some one used a yoga mat. So I had a lot of ideas to work from and I decided to use pool noodles wit heavy wire running through. Then I used some one litter bottles to fill out the thigh muscles and a milk gallon jug to fill out the chest.
I added additional wire for the feet and then I wrapped everything with self sticking bandages. I tried to paint the bandages, but they just soak up the paint. Then I used some spray paint on then, but that didn’t add too much color to him.
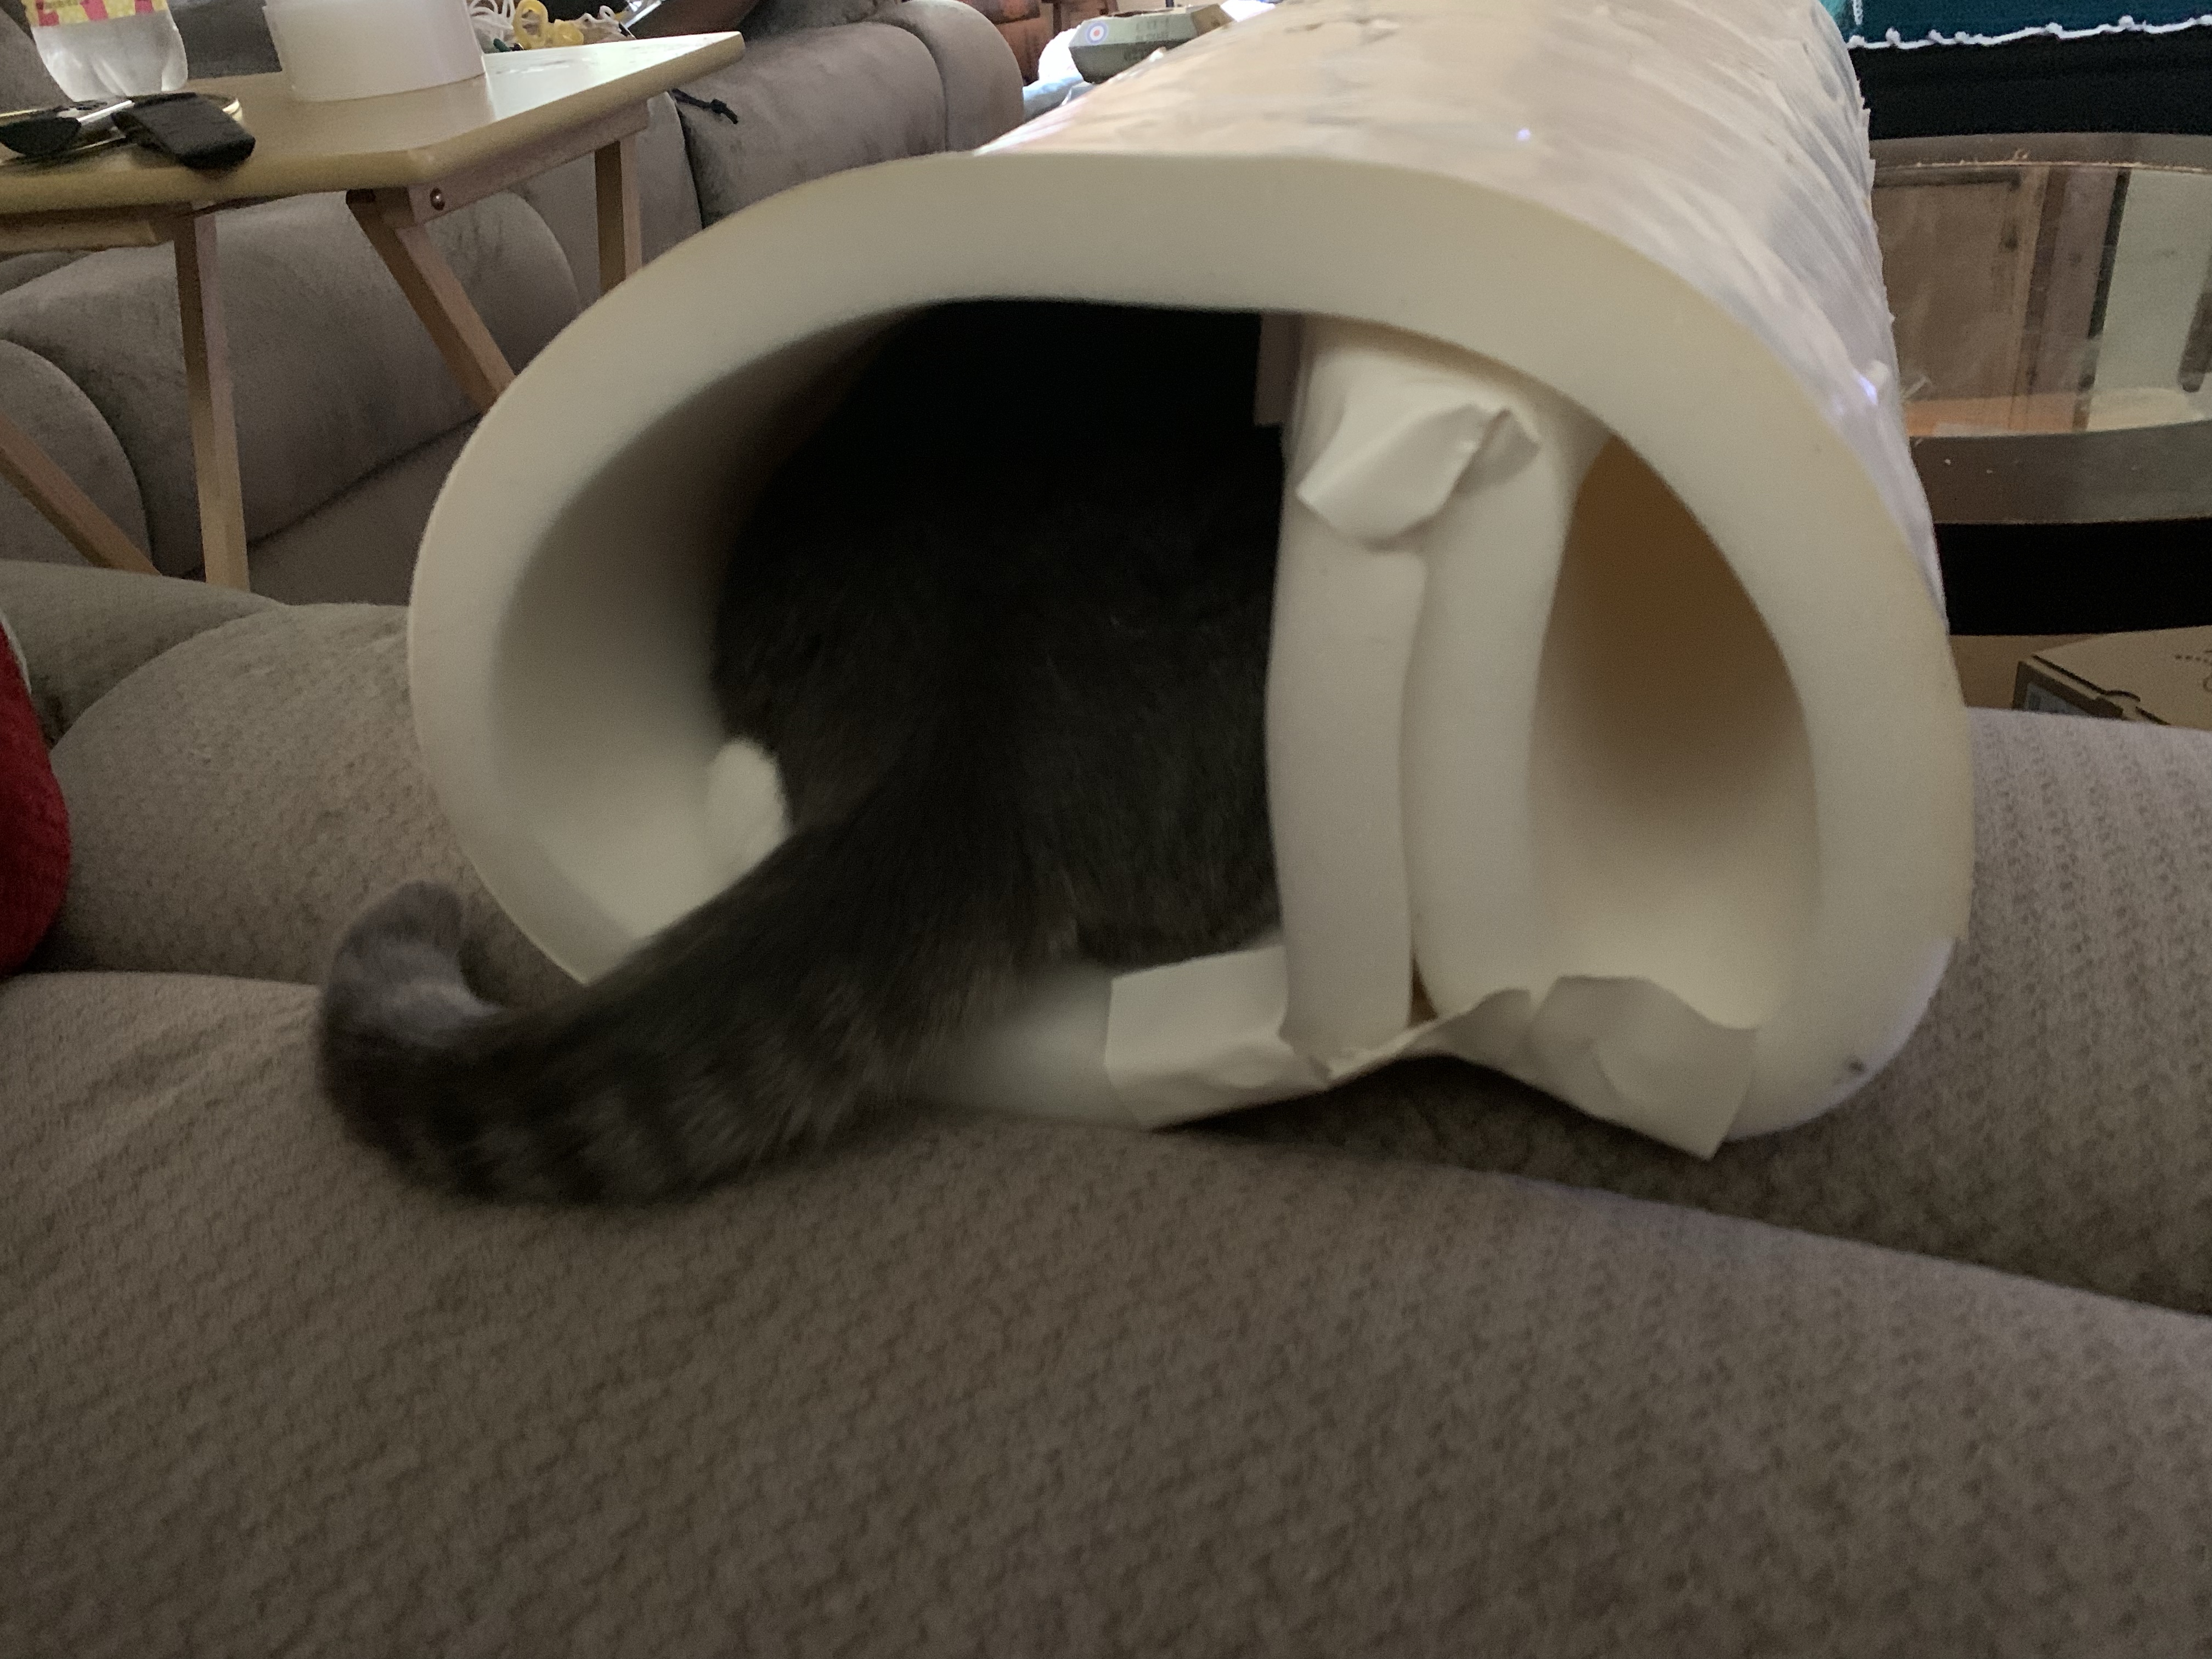
The hardest part was the head. I decided to use foam clay in a bowl to create the inner mouth. Then I measured the bowl on poster board, measured out the circumference for five petals and made a template for the petals on poster board. I made cut out five petals from EVA foam. Once the clay had dried, I pulled it away from the bowl. This was my first time working with foam clay. It’s pretty funky. I think I need a lot more practice, especially if I want to use it for sculpting. Then when I glued the petals to the bowl shape, only 4 fit. I guess the foam had shrunk, so my demo dog only has 4 petals for his head.
I painted the inside of the mouth red, the EVA foam also absorbs the paint, so it took about 4 coats of paint. Then I painted the outside of the head beige to match with the body. The teeth were made from fake nails that were cut into claw shapes. I used these for the claws also. Then it was a matter of hot gluing everything.
So next year I definitively want to improve his head, and maybe build out his body a little more. But he’s still pretty cool and cheaper than buying the wolf skeleton.
Oh, I also made a Chrissy and an Upside Down portal, so more to come.
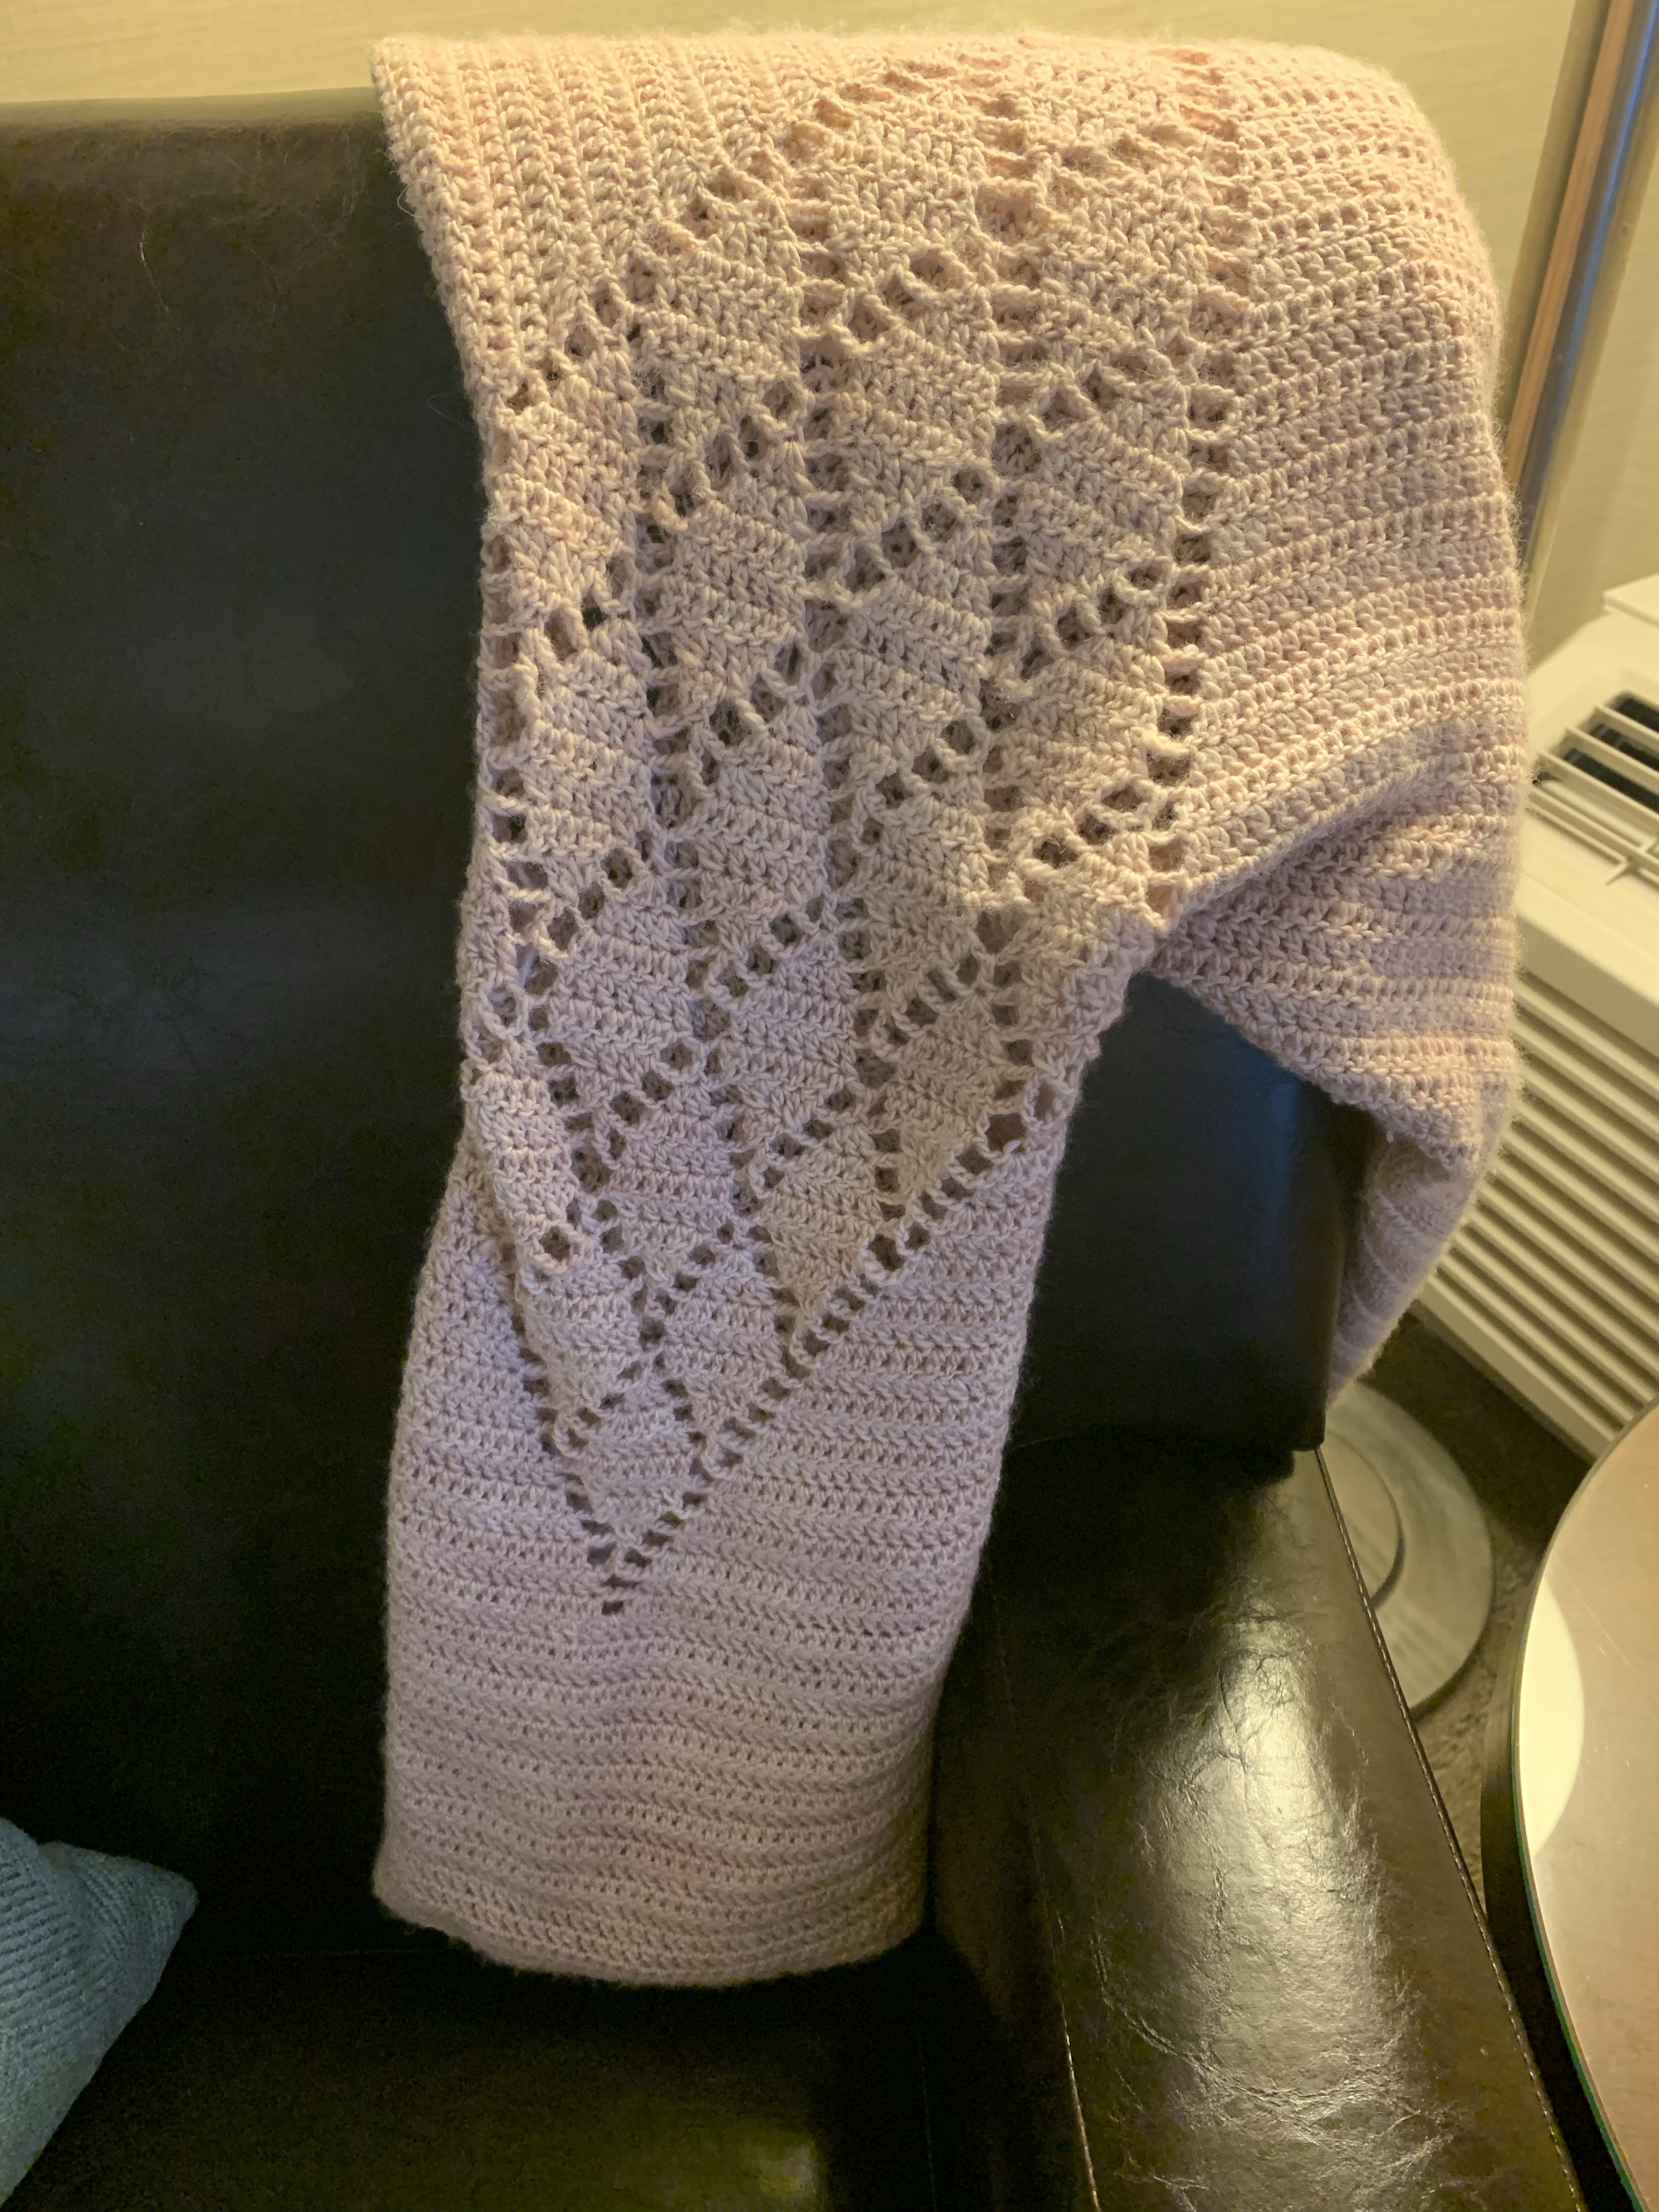
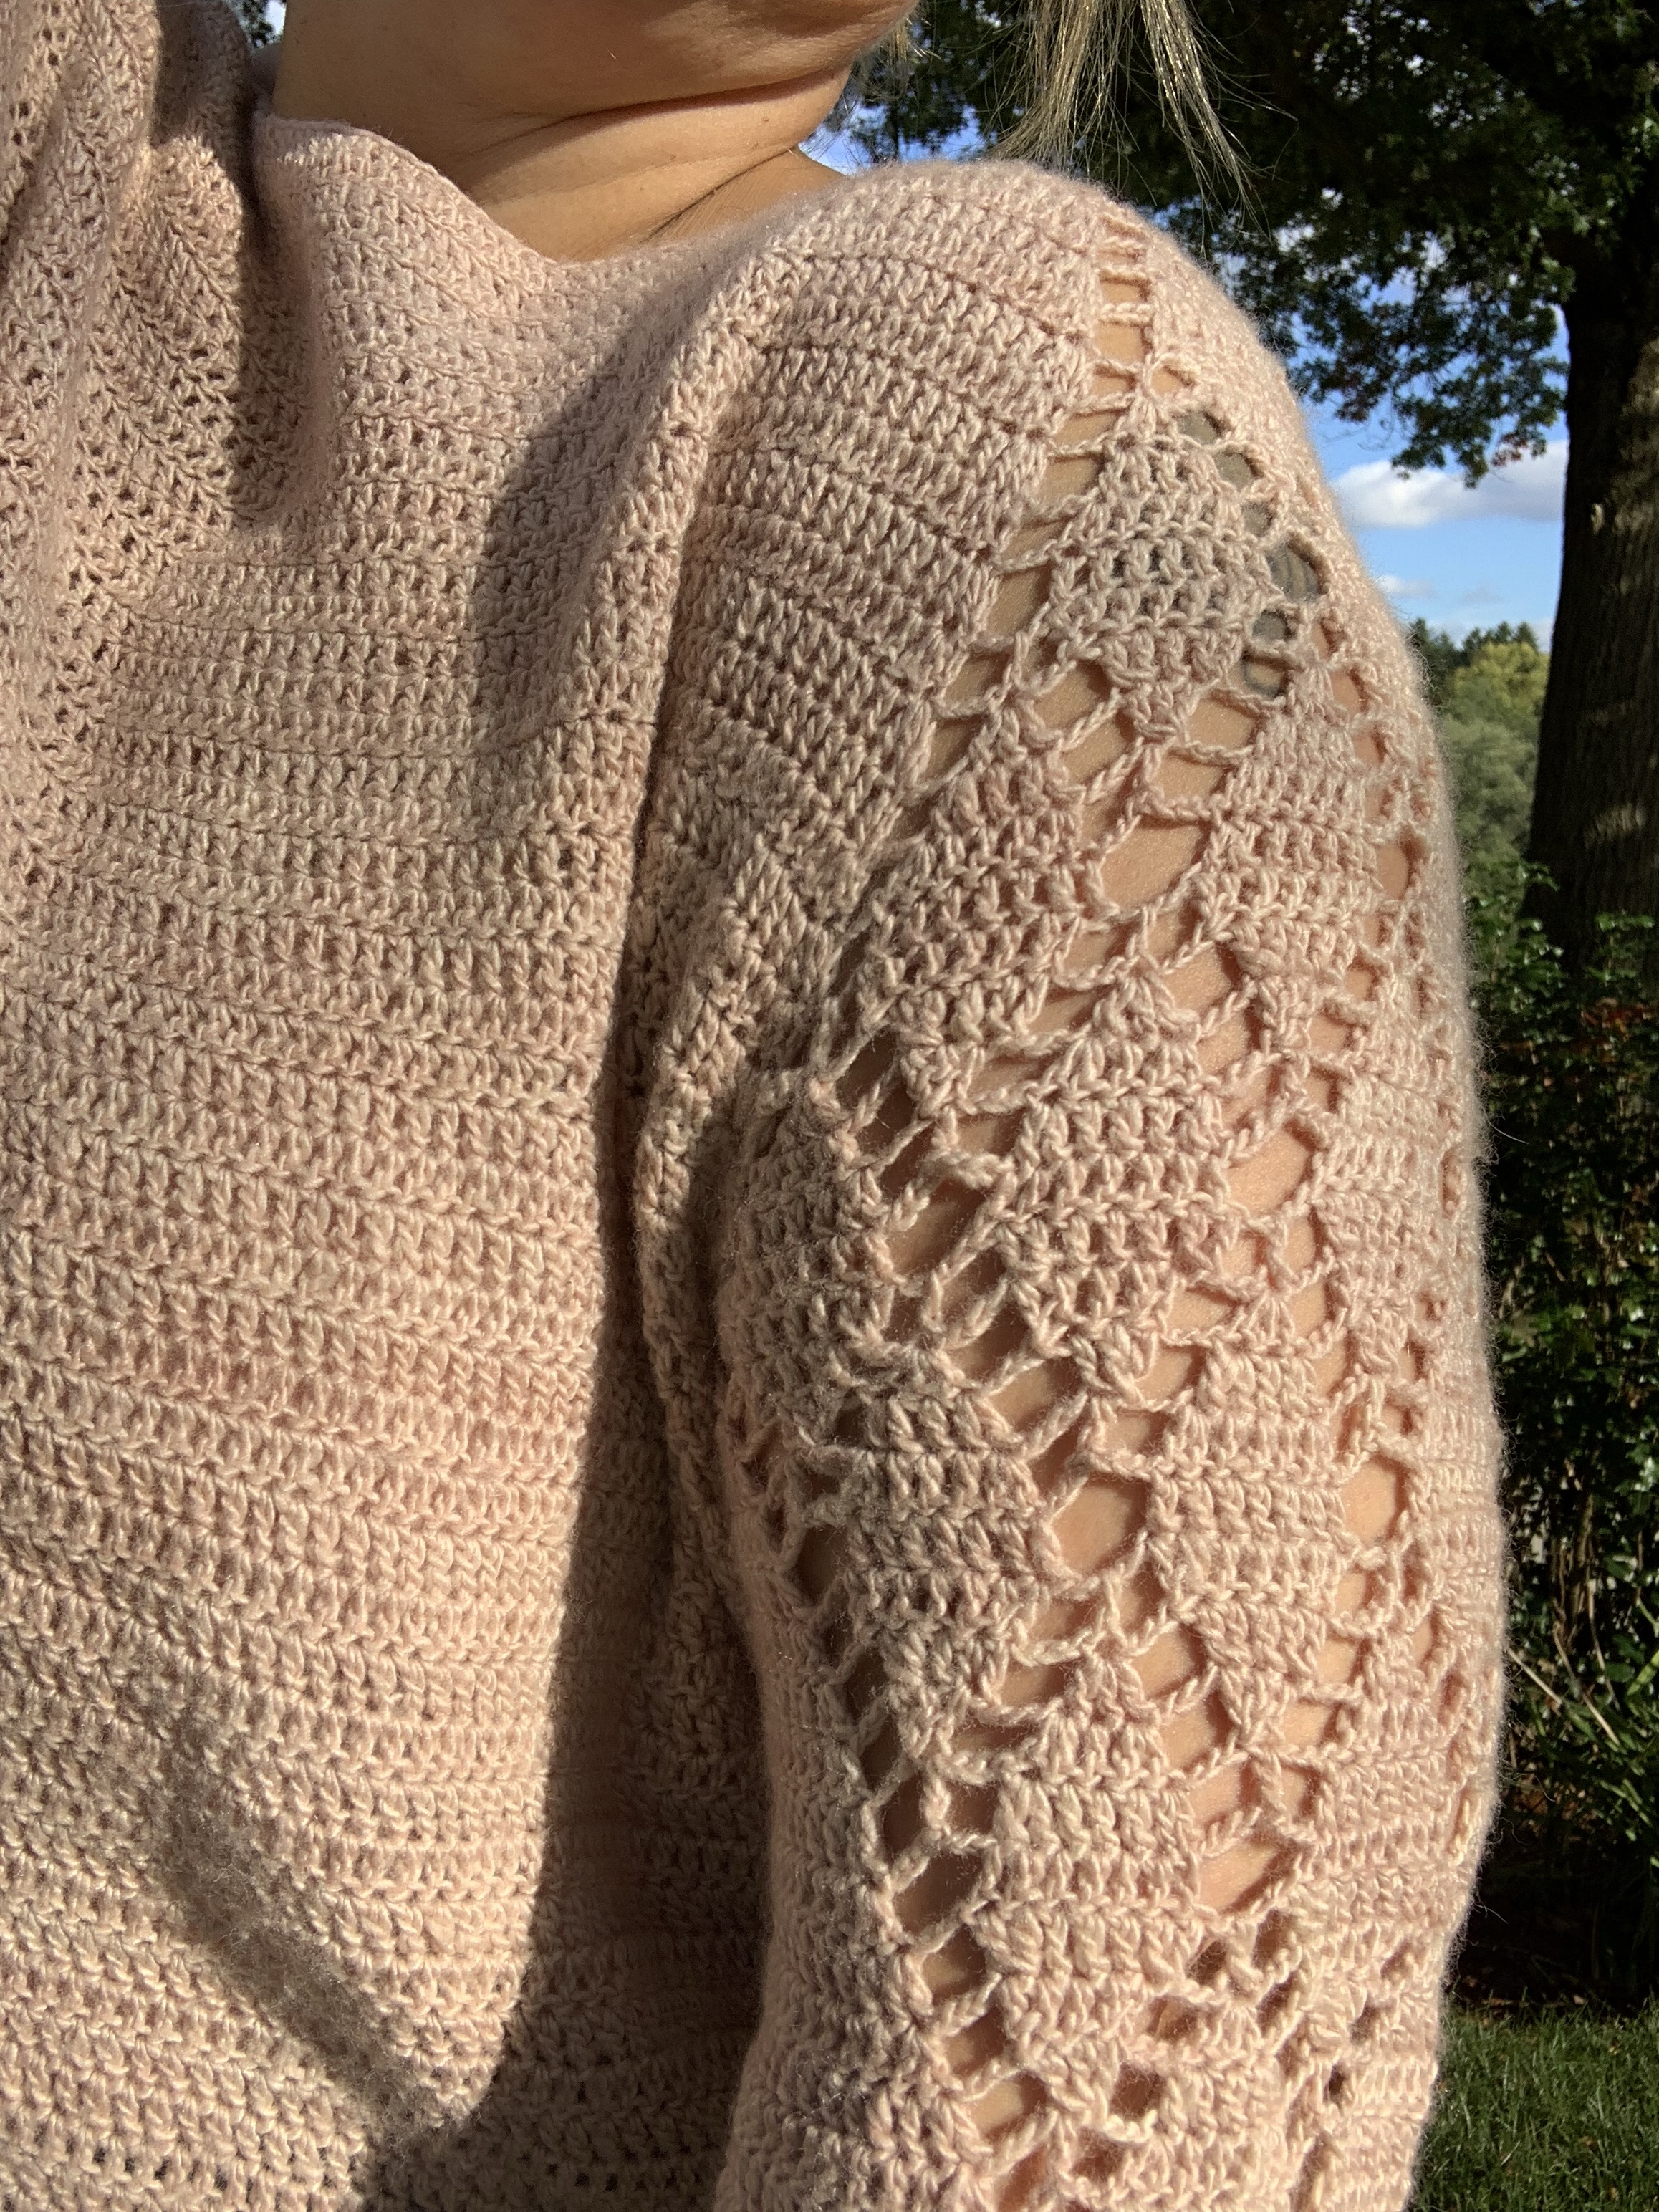
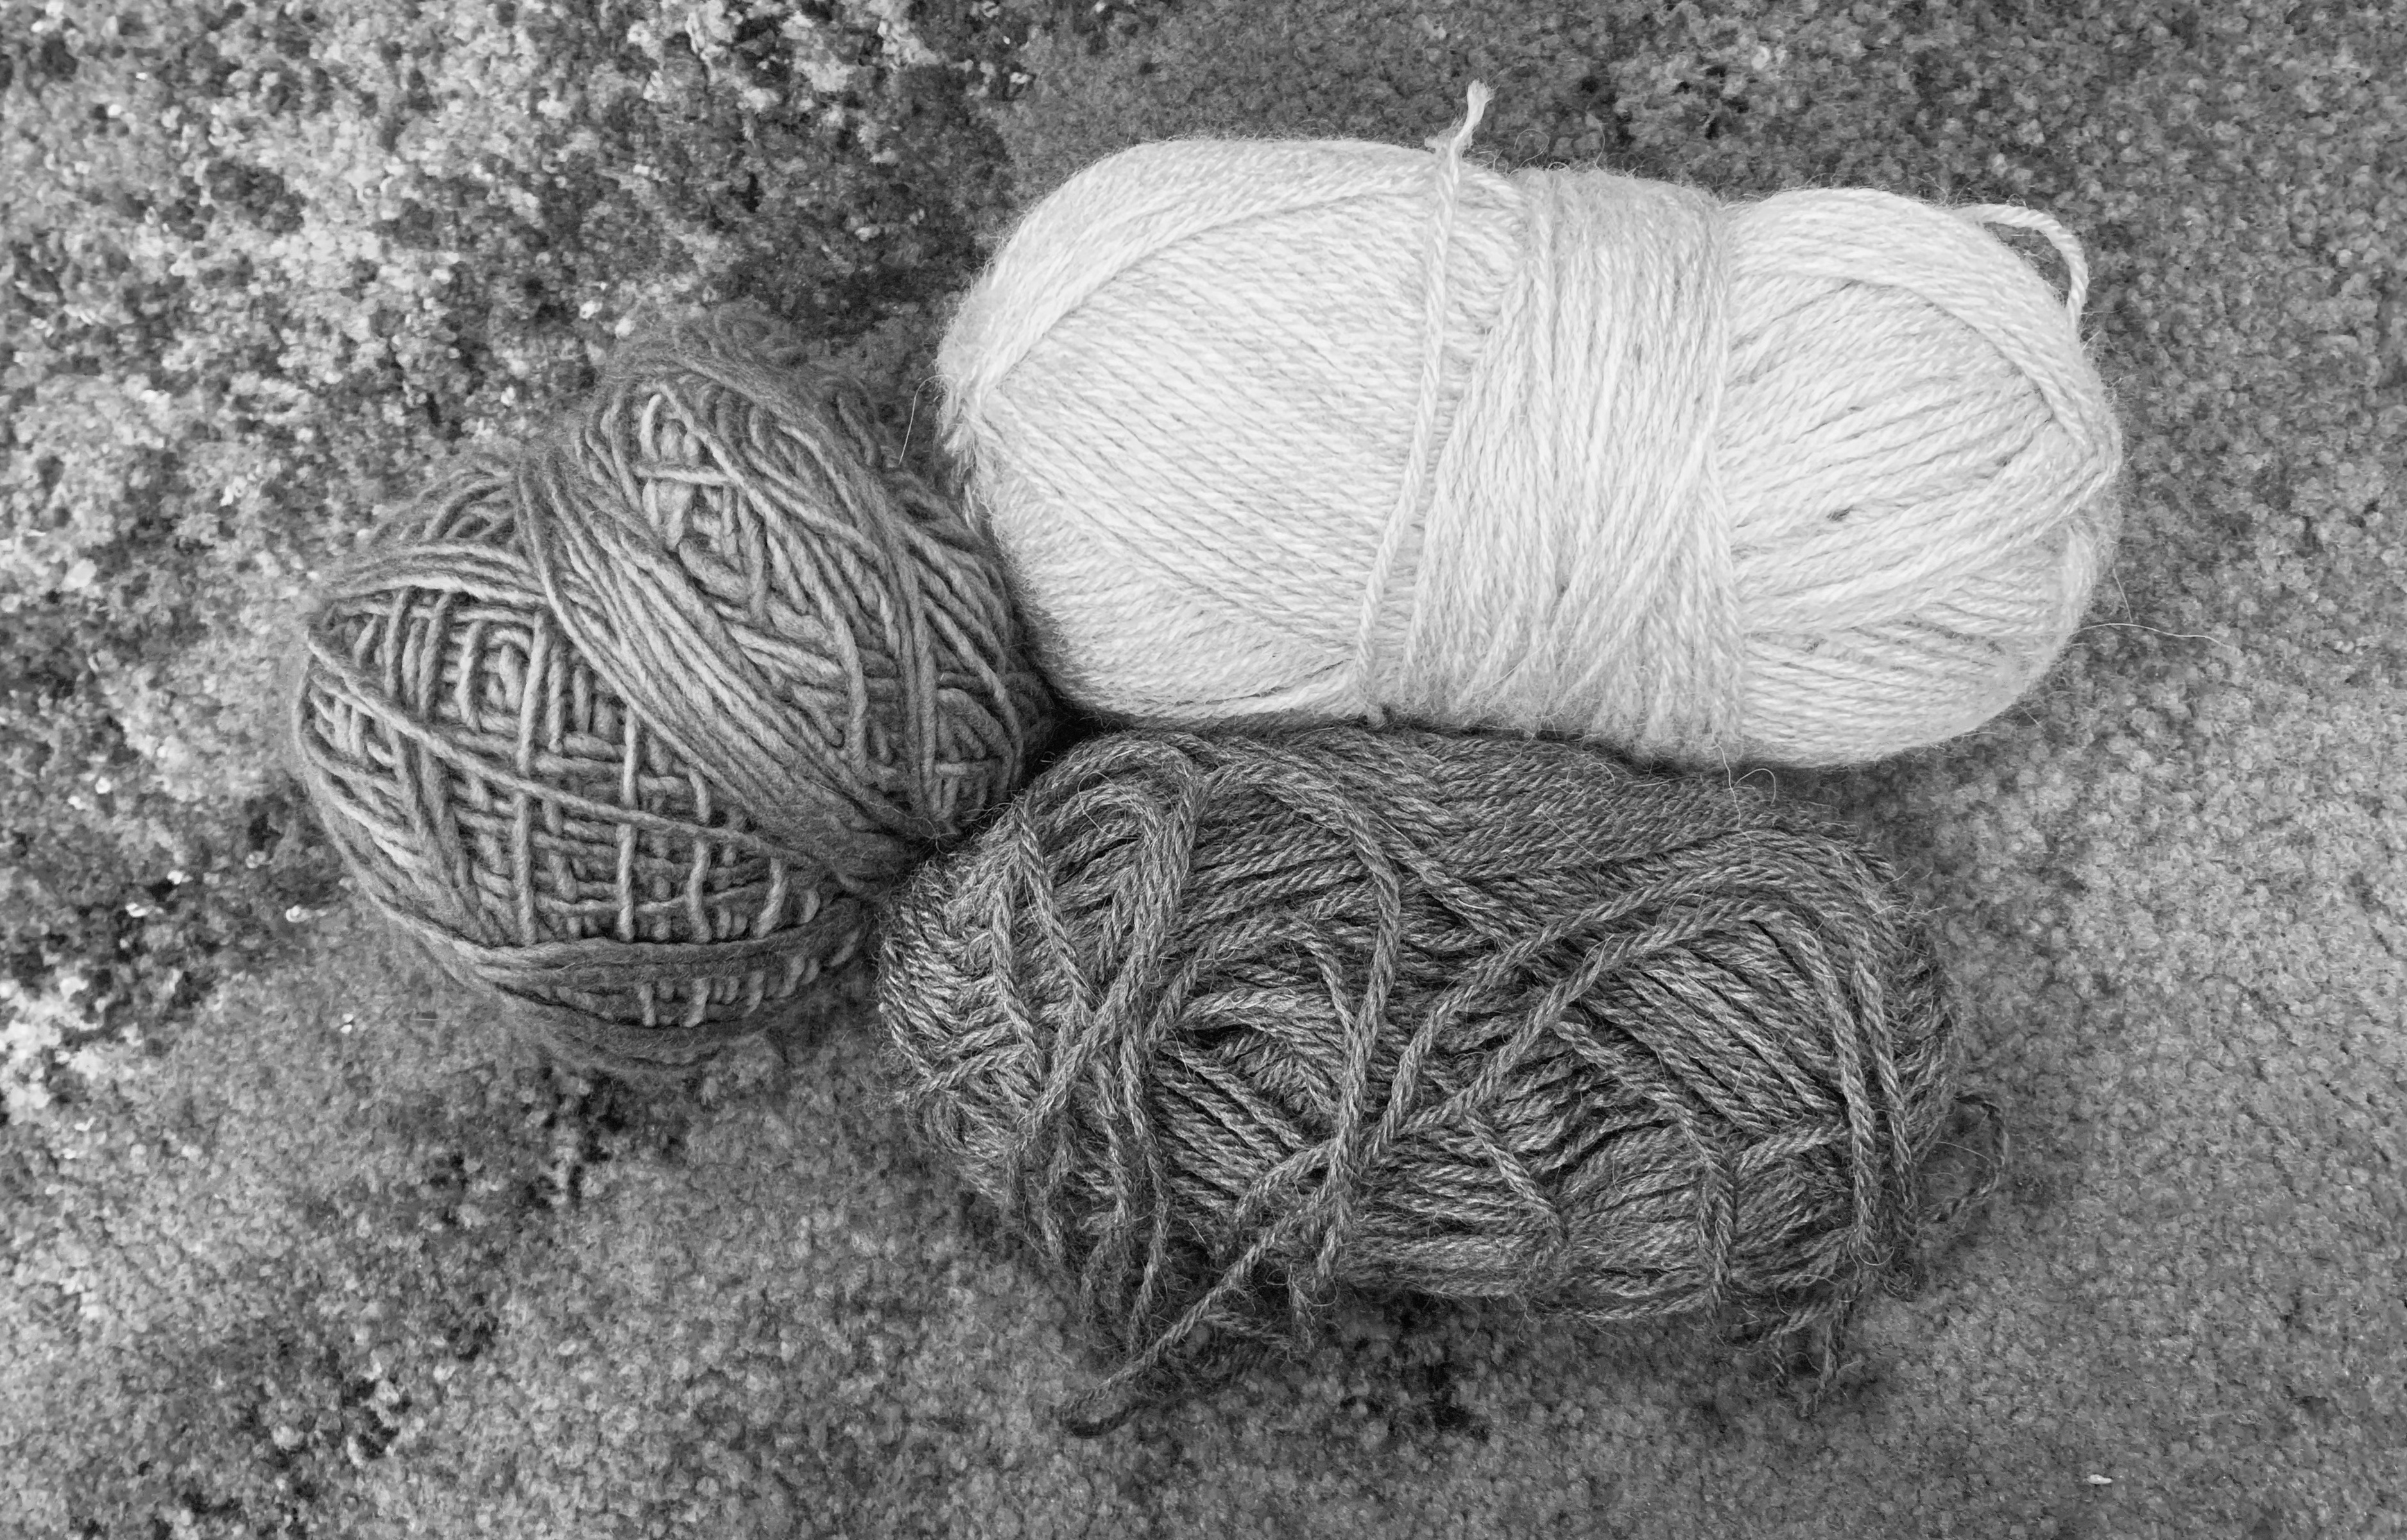
Back in the spring I saw this Sunseeker Pullover by Sara Dudek on WeCrochet. For the yarn, I used my Manos Del Uruguay Fino, that I’ve had in my stash for years. I worked on this sweater most of the spring and into the summer. I finished it during this years Pittsburgh Creative Arts Festival. I love this pattern. It was so easy. I love the sleeves and I added my own little flair to them. (Ignore the fact that I’ve gained weight.) I don’t really have anything else to say about this sweater. Just love it, and I’m wearing it right now!
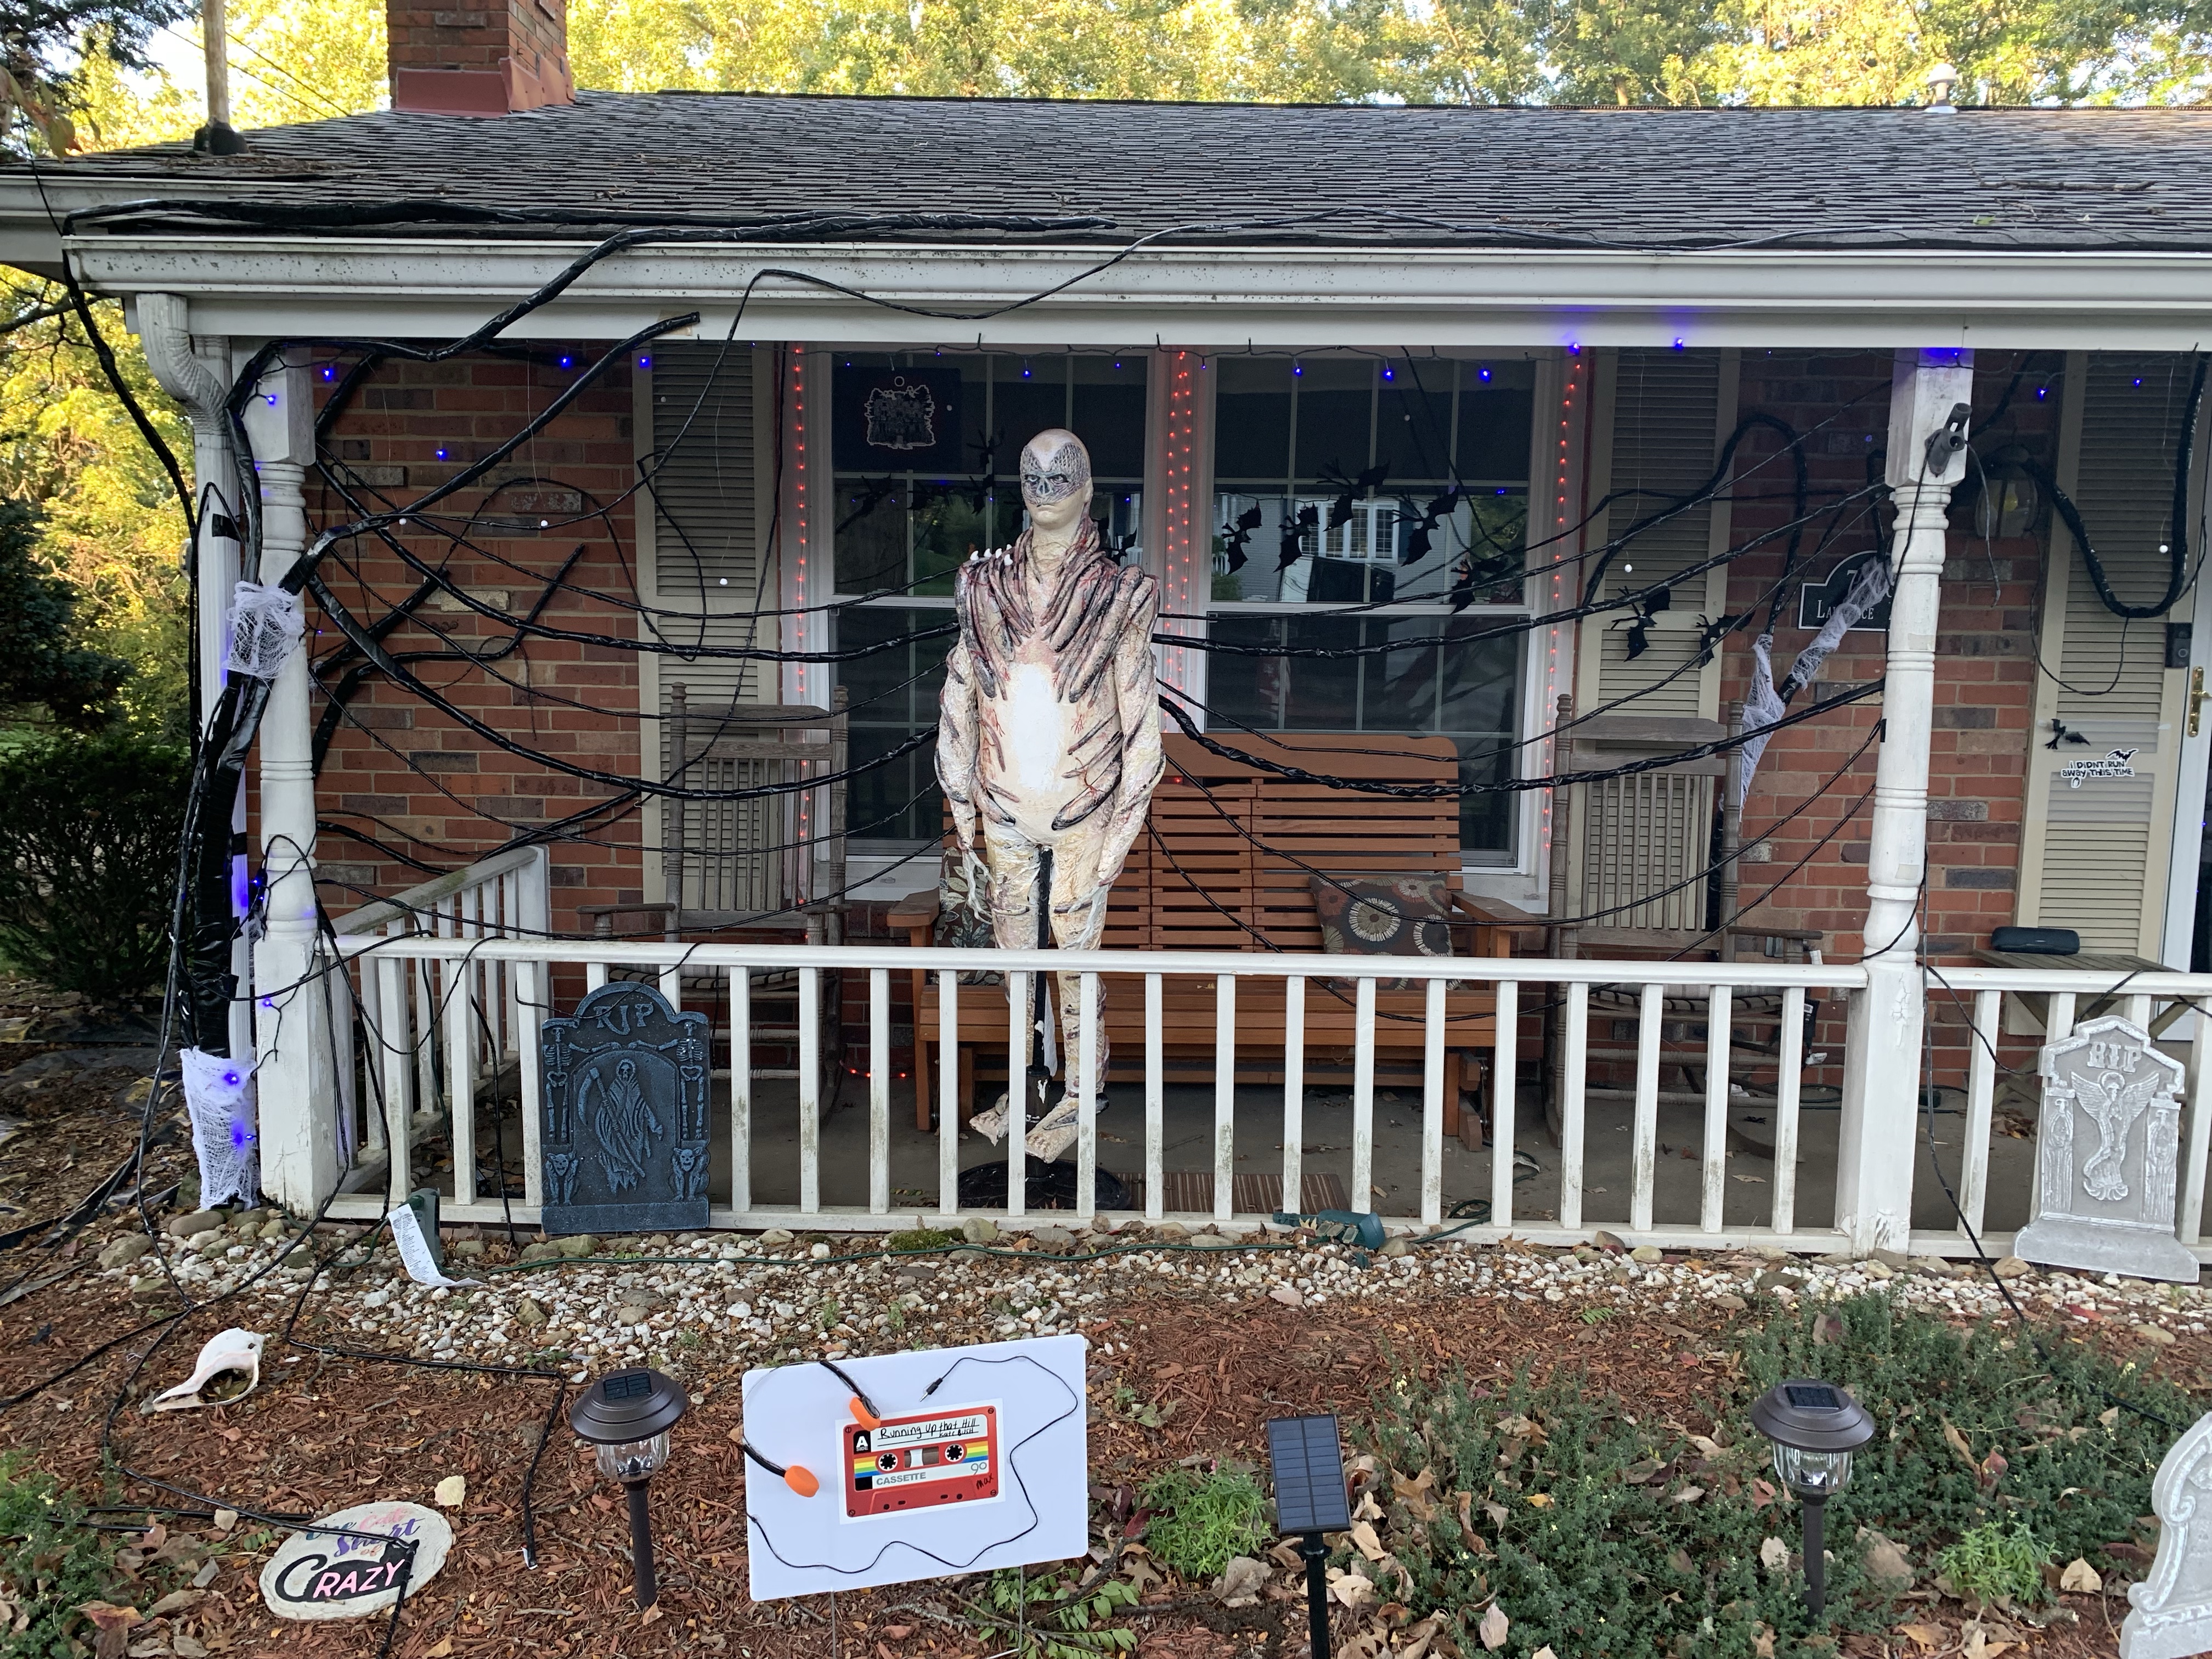
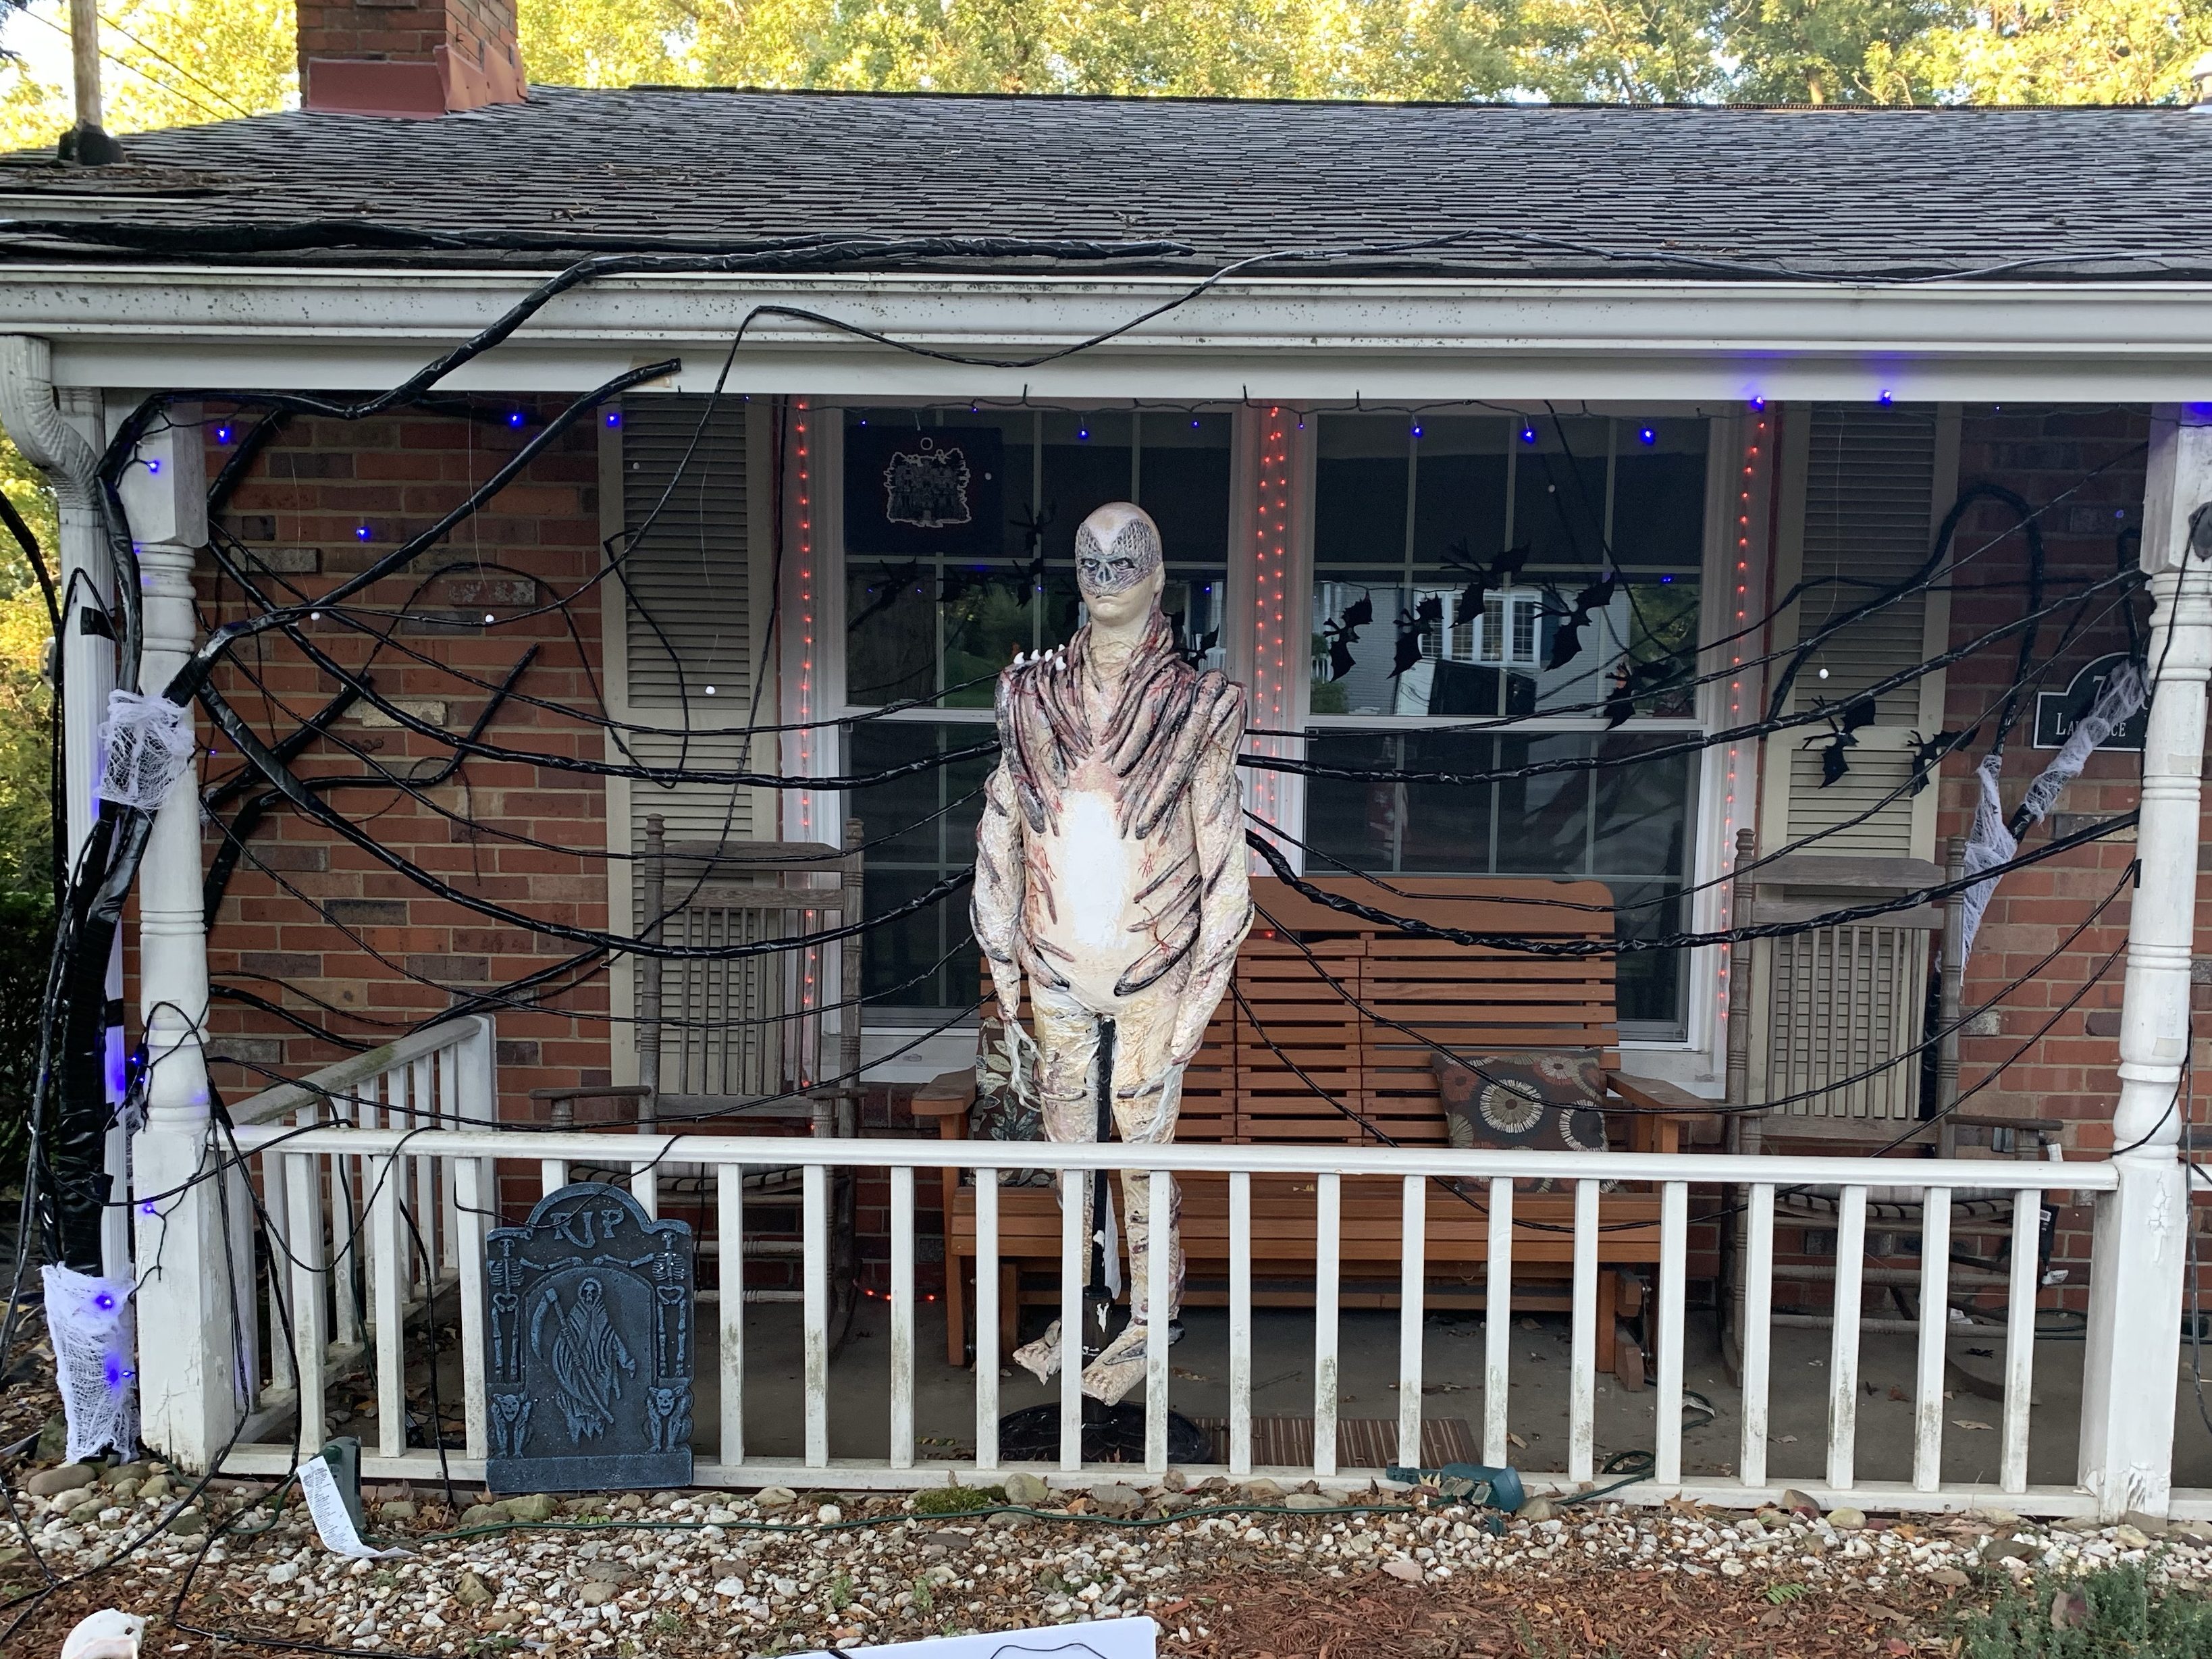
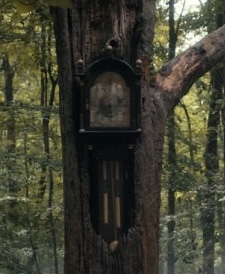
Well, as I’ve been writing about, my theme for Halloween this year is Stranger Things Season 4 and I’ll be dressing up as Eddie Munson. I started by trying to re-create the Grandfather Clock from the first episode. Then I built Vecna using a lot of foam and tape. And most of my other decorations center around Eddie’s story from Season 4.
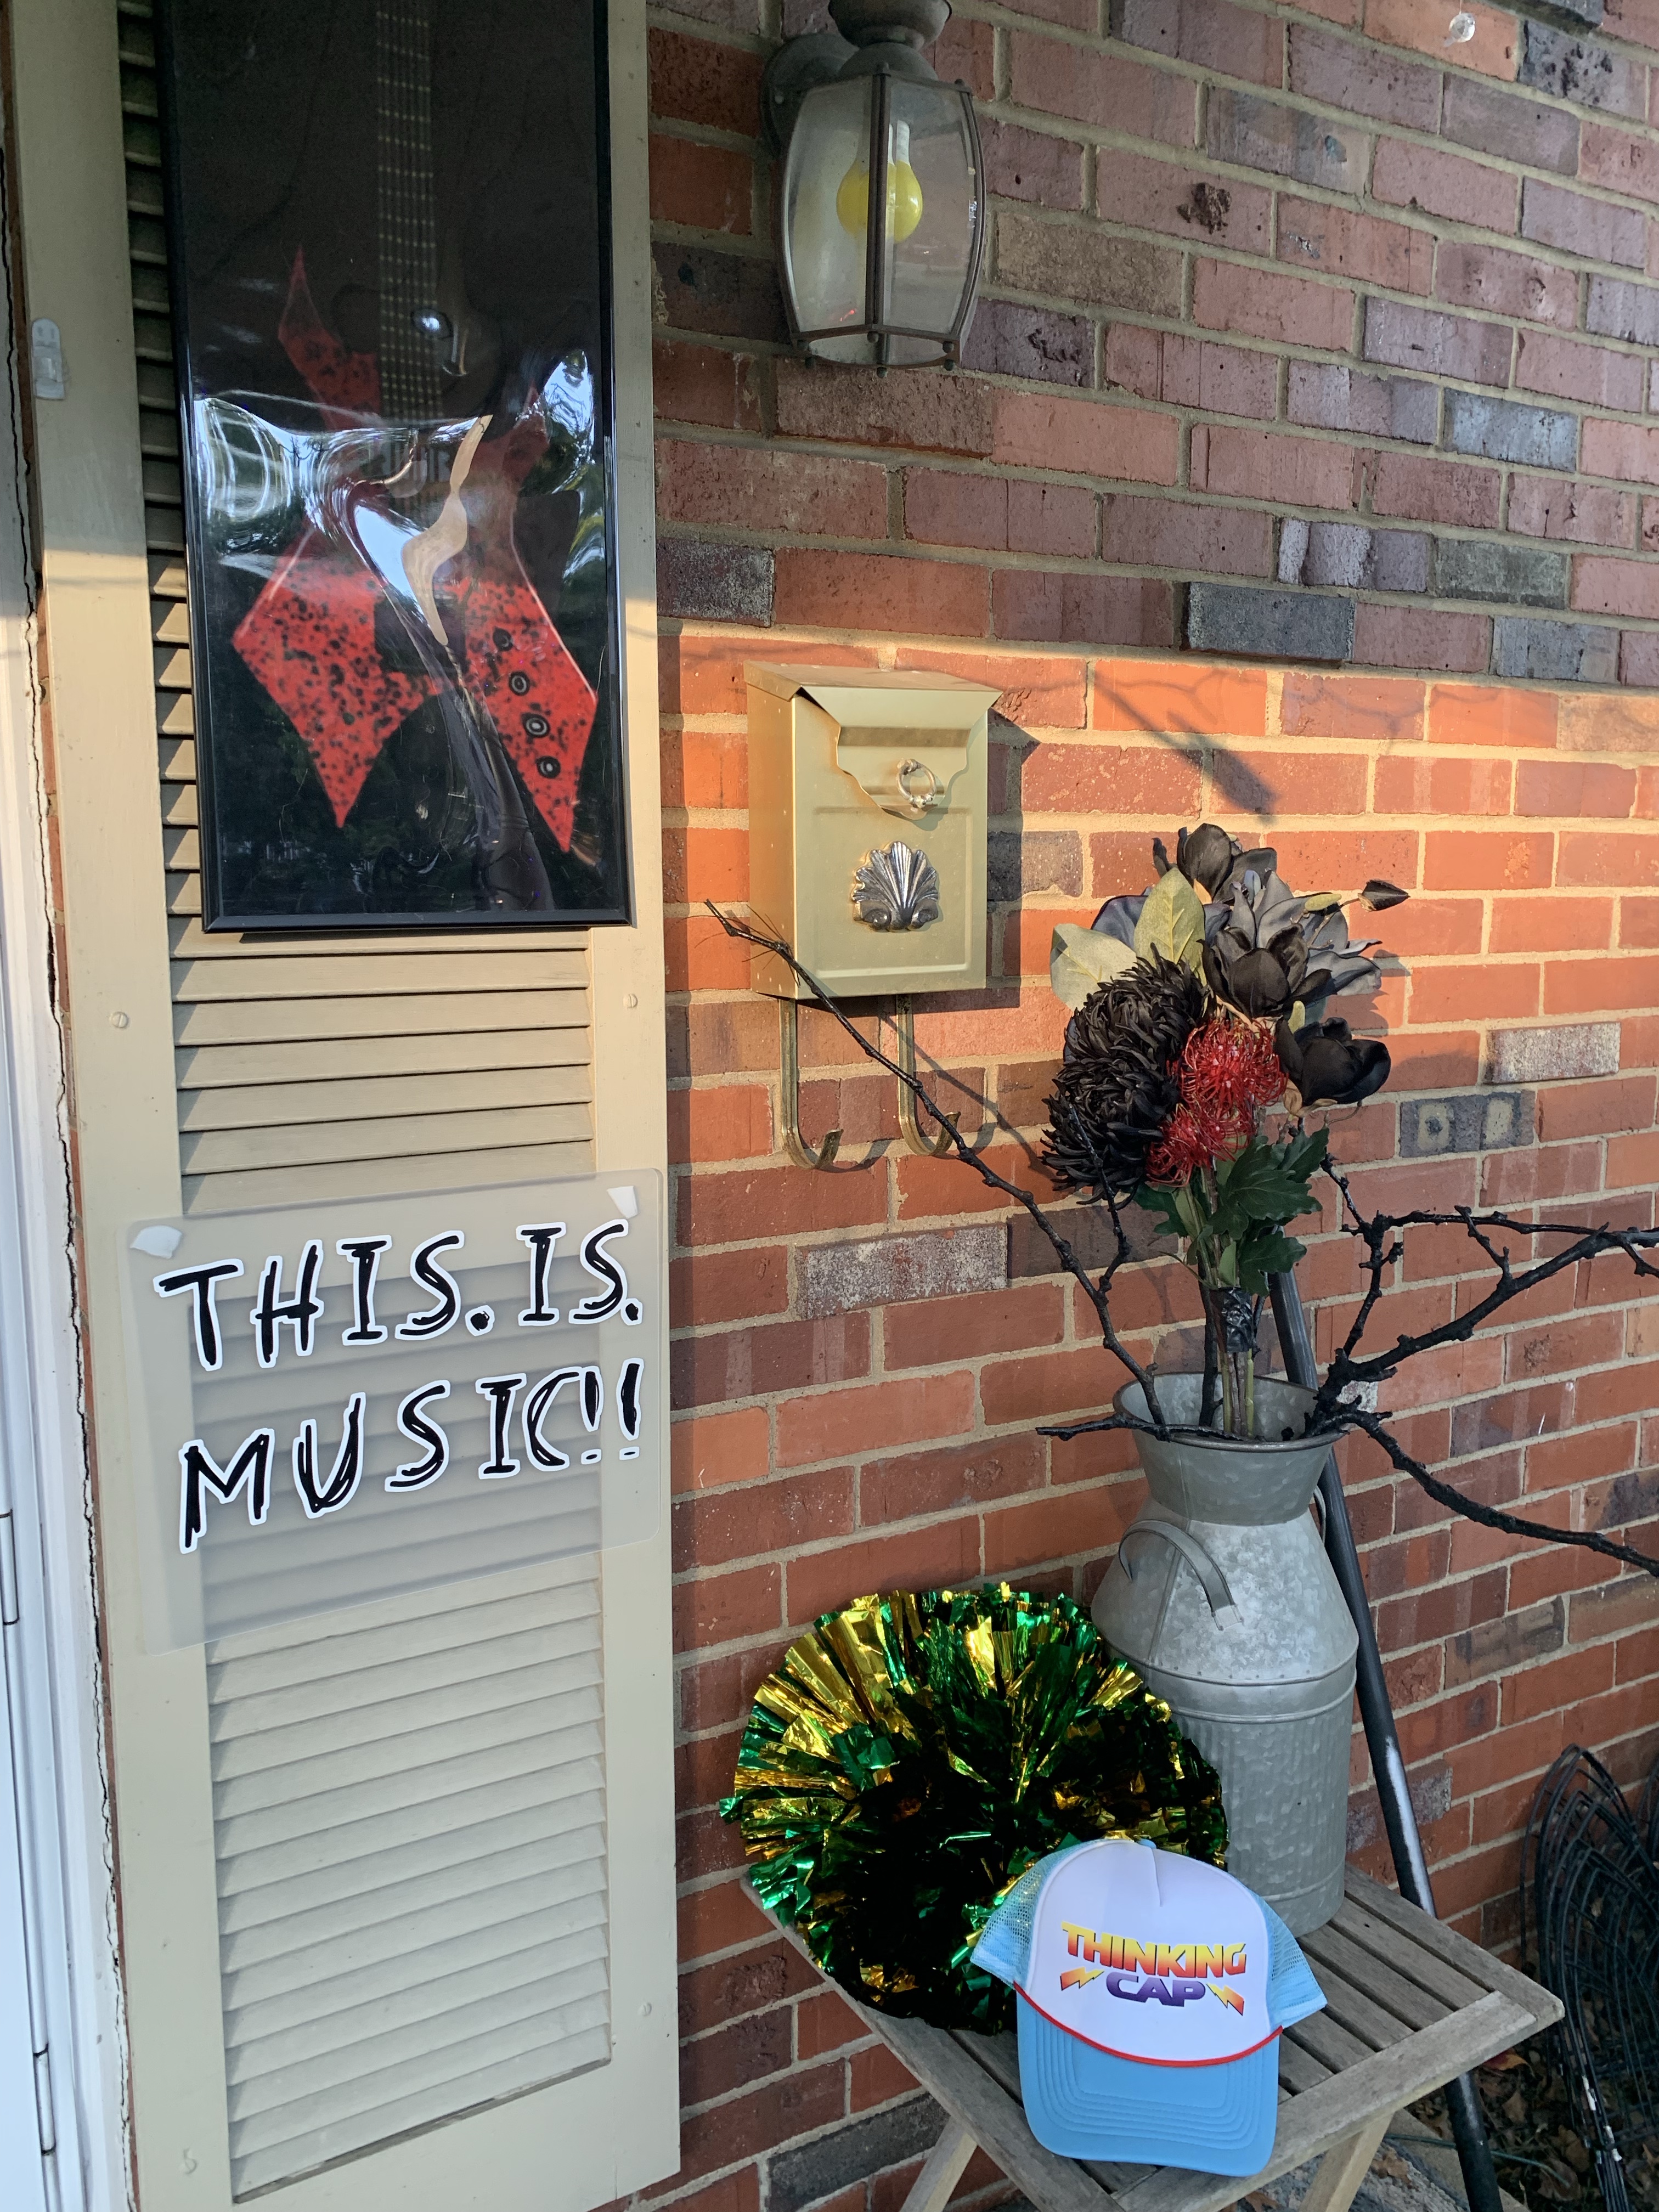
Most of the stuff I used for decorations I found on Amazon, a couple of demobats to hang from the porch, a Stained glass poster to hang on my storm door, bats, pom poms, Tigers patch, and door mat. I also found Dusty’s hat, but that link doesn’t work anymore. I’m surprised I couldn’t find more.
A hung the grandfather clock on our tree and made a Chrissy sign with a pom pom and Tigers patch. A blue spot light shines on it at night.
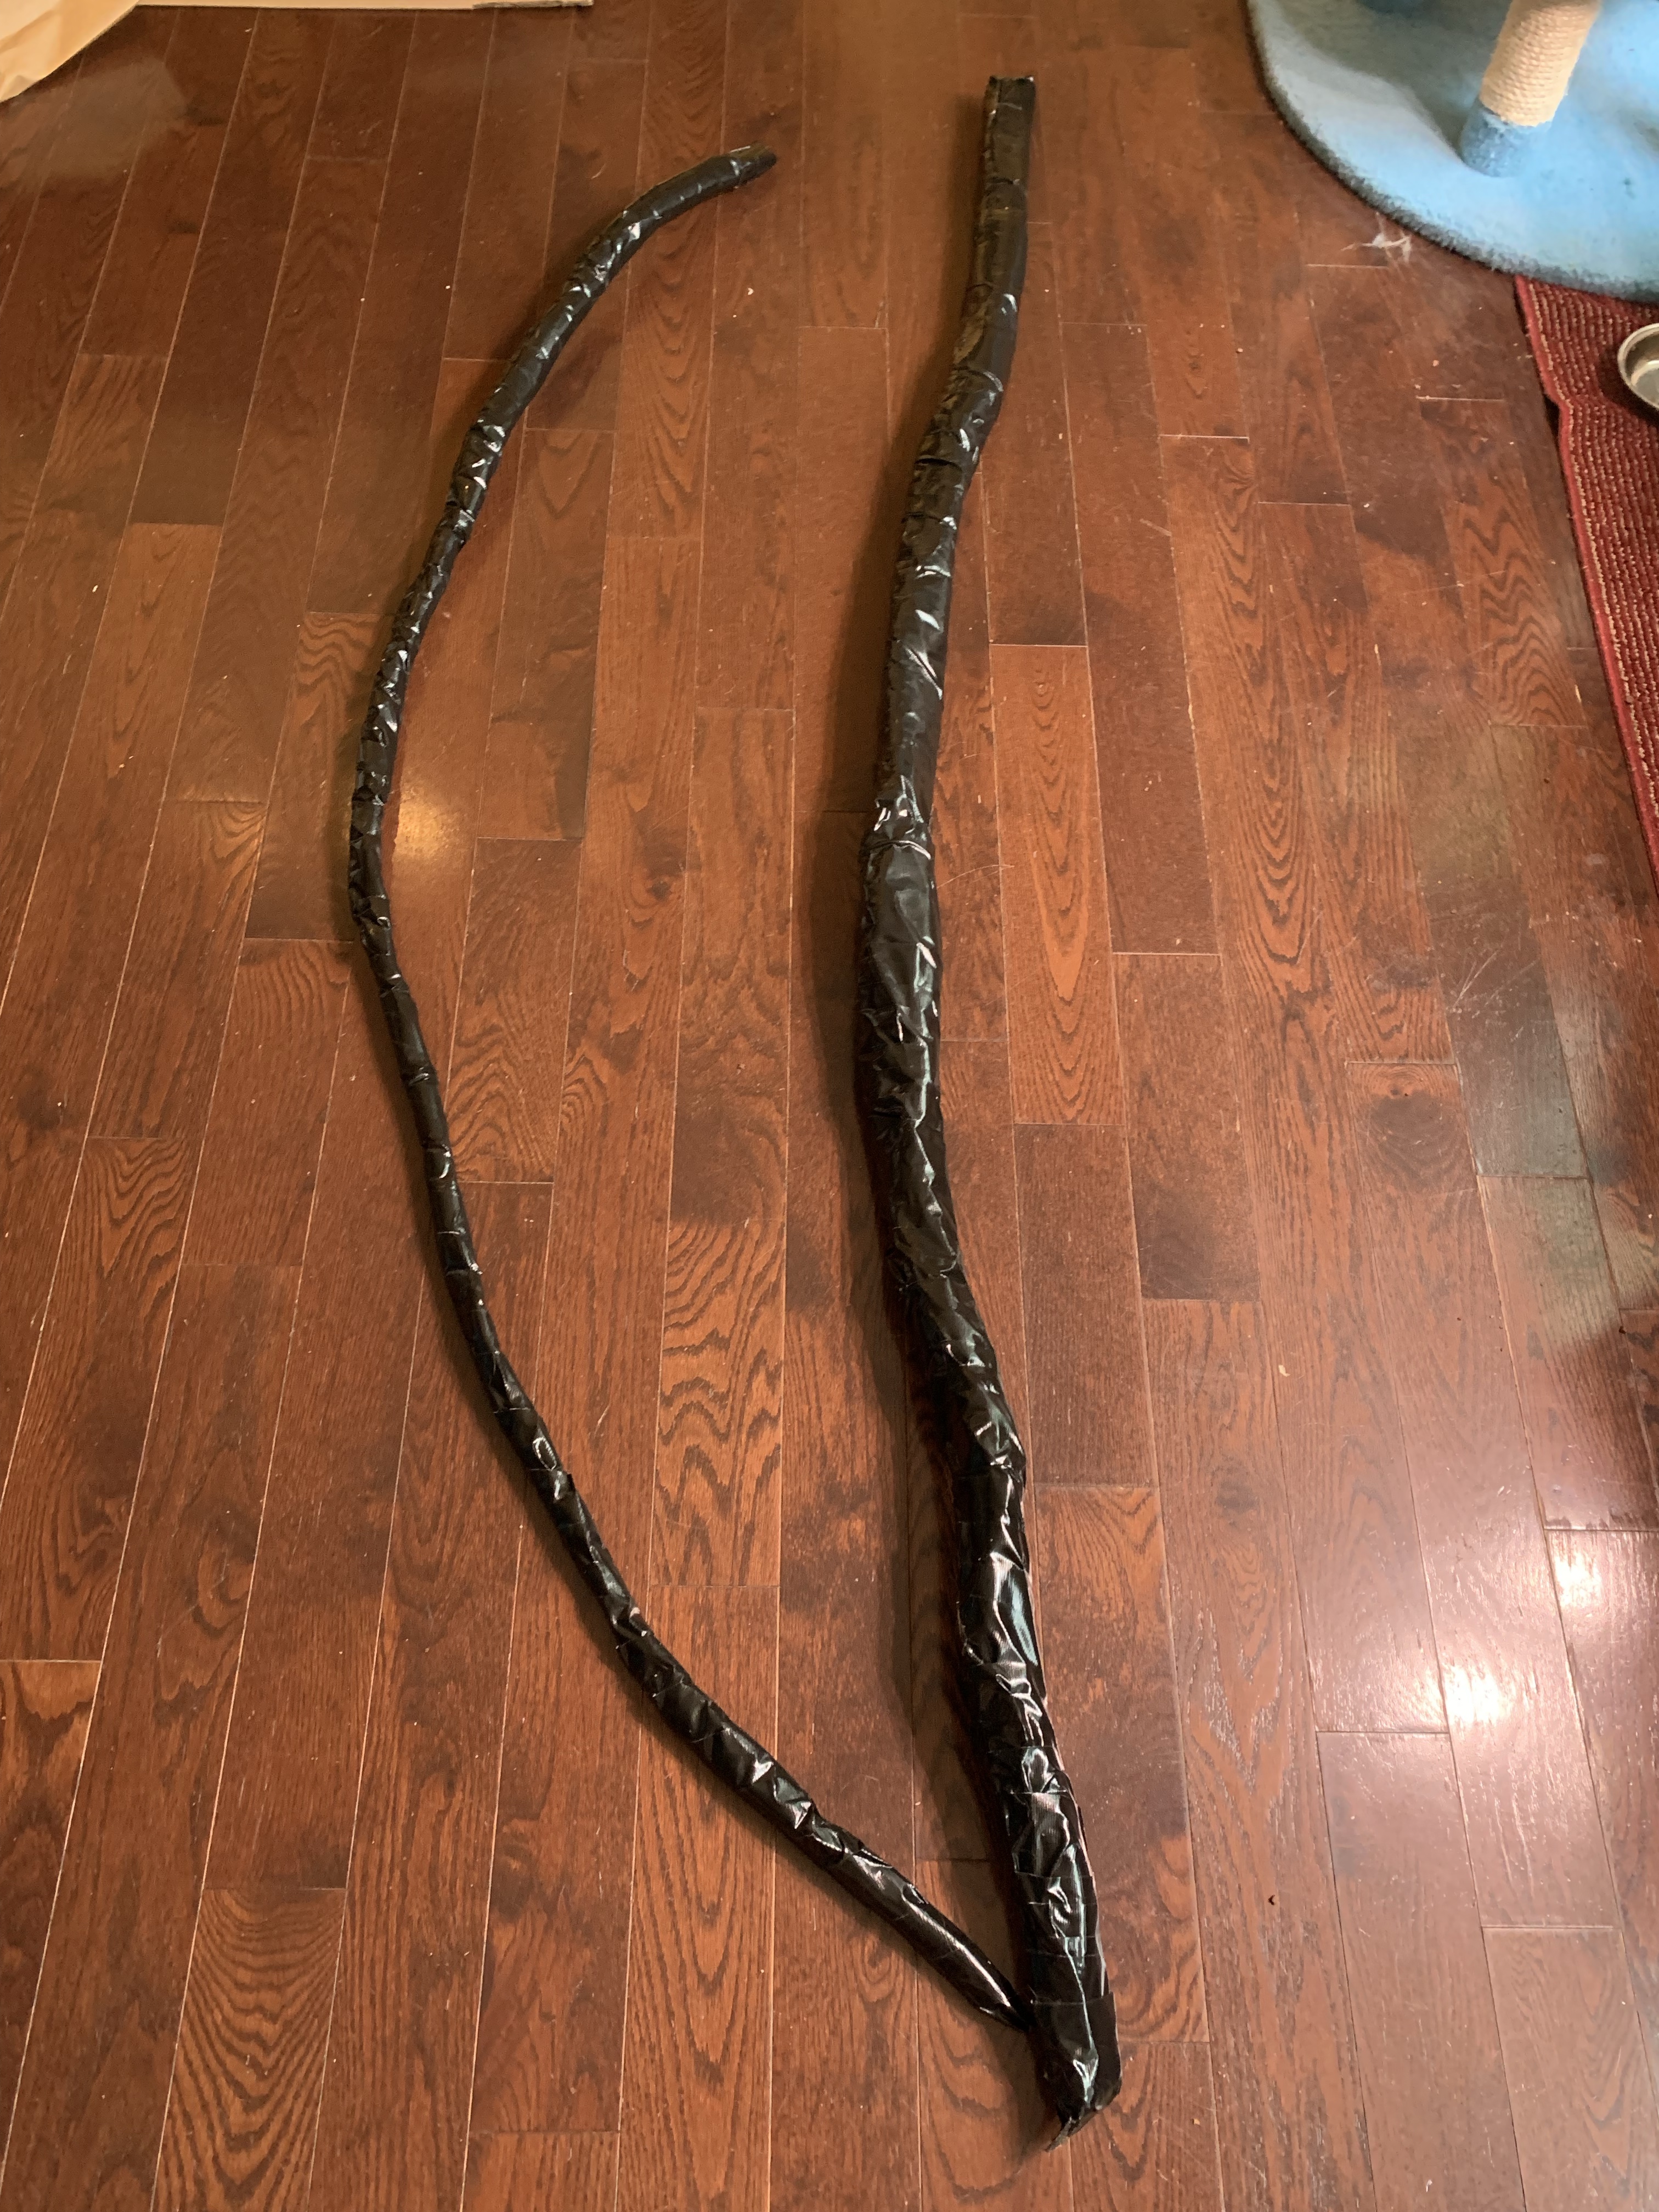
I put Vecna on the front porch and used my vines to attach him to the porch posts. I also added vines to the house in several locations. My vines were several sizes because I used foam sliced in strips, for the thicker vines, and clothesline and dollar store clothesline for the smaller vines. They were wrapped in black duct tape and/or electrical tape. I also had some white spooky cloth that I wrapped around the vines in some locations.
Part of me wants to create a ton more vines to cover the house. And the other part of me say, just let it go.
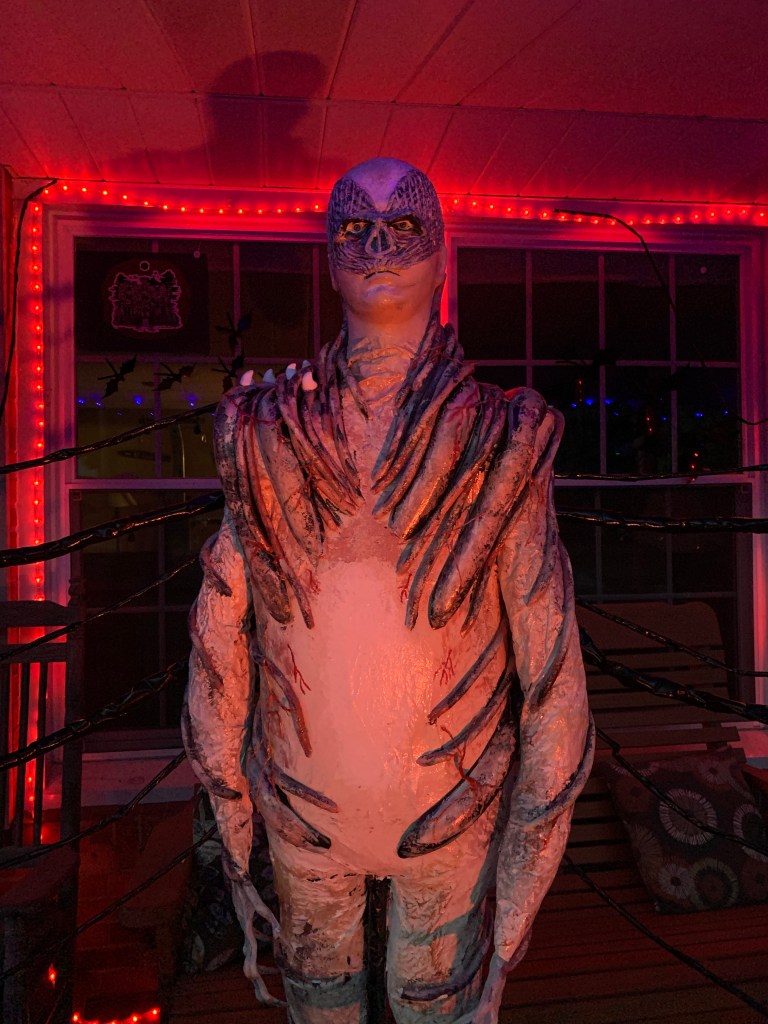
My second prop for Halloween this year was Vecna. I wanted a life sized Vecna for my decorations, but I couldn’t find anything, so I made it.
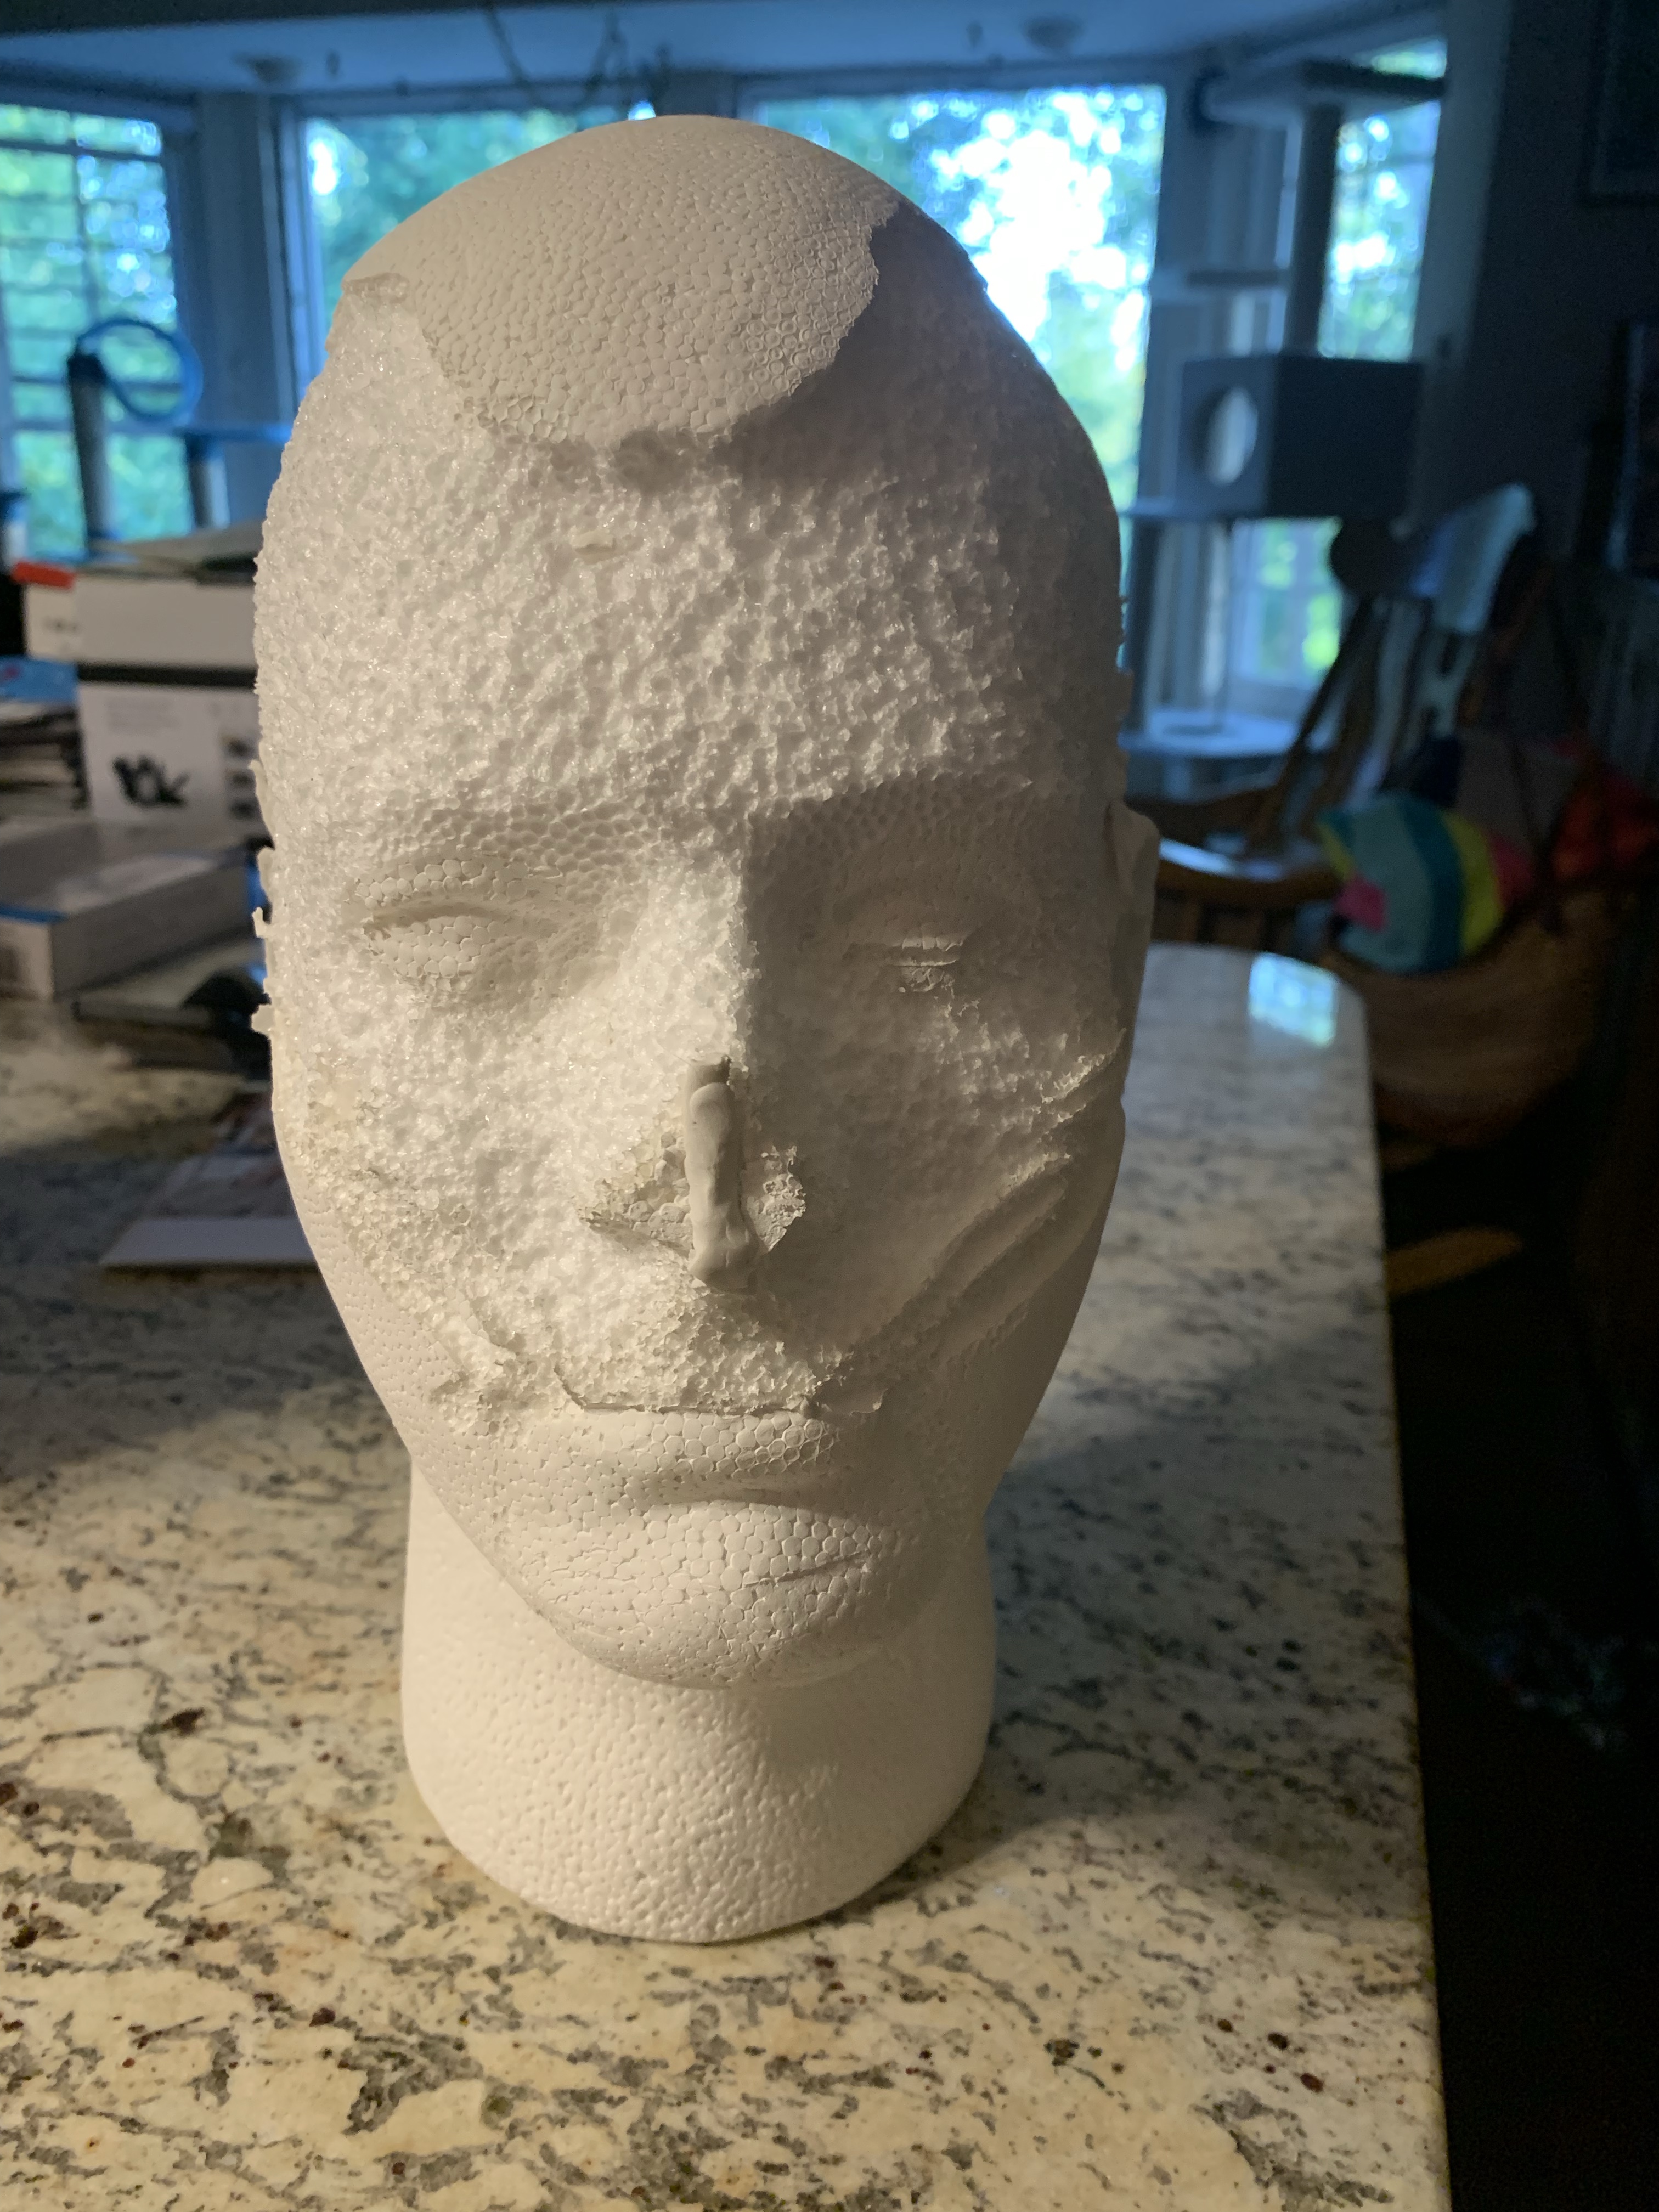
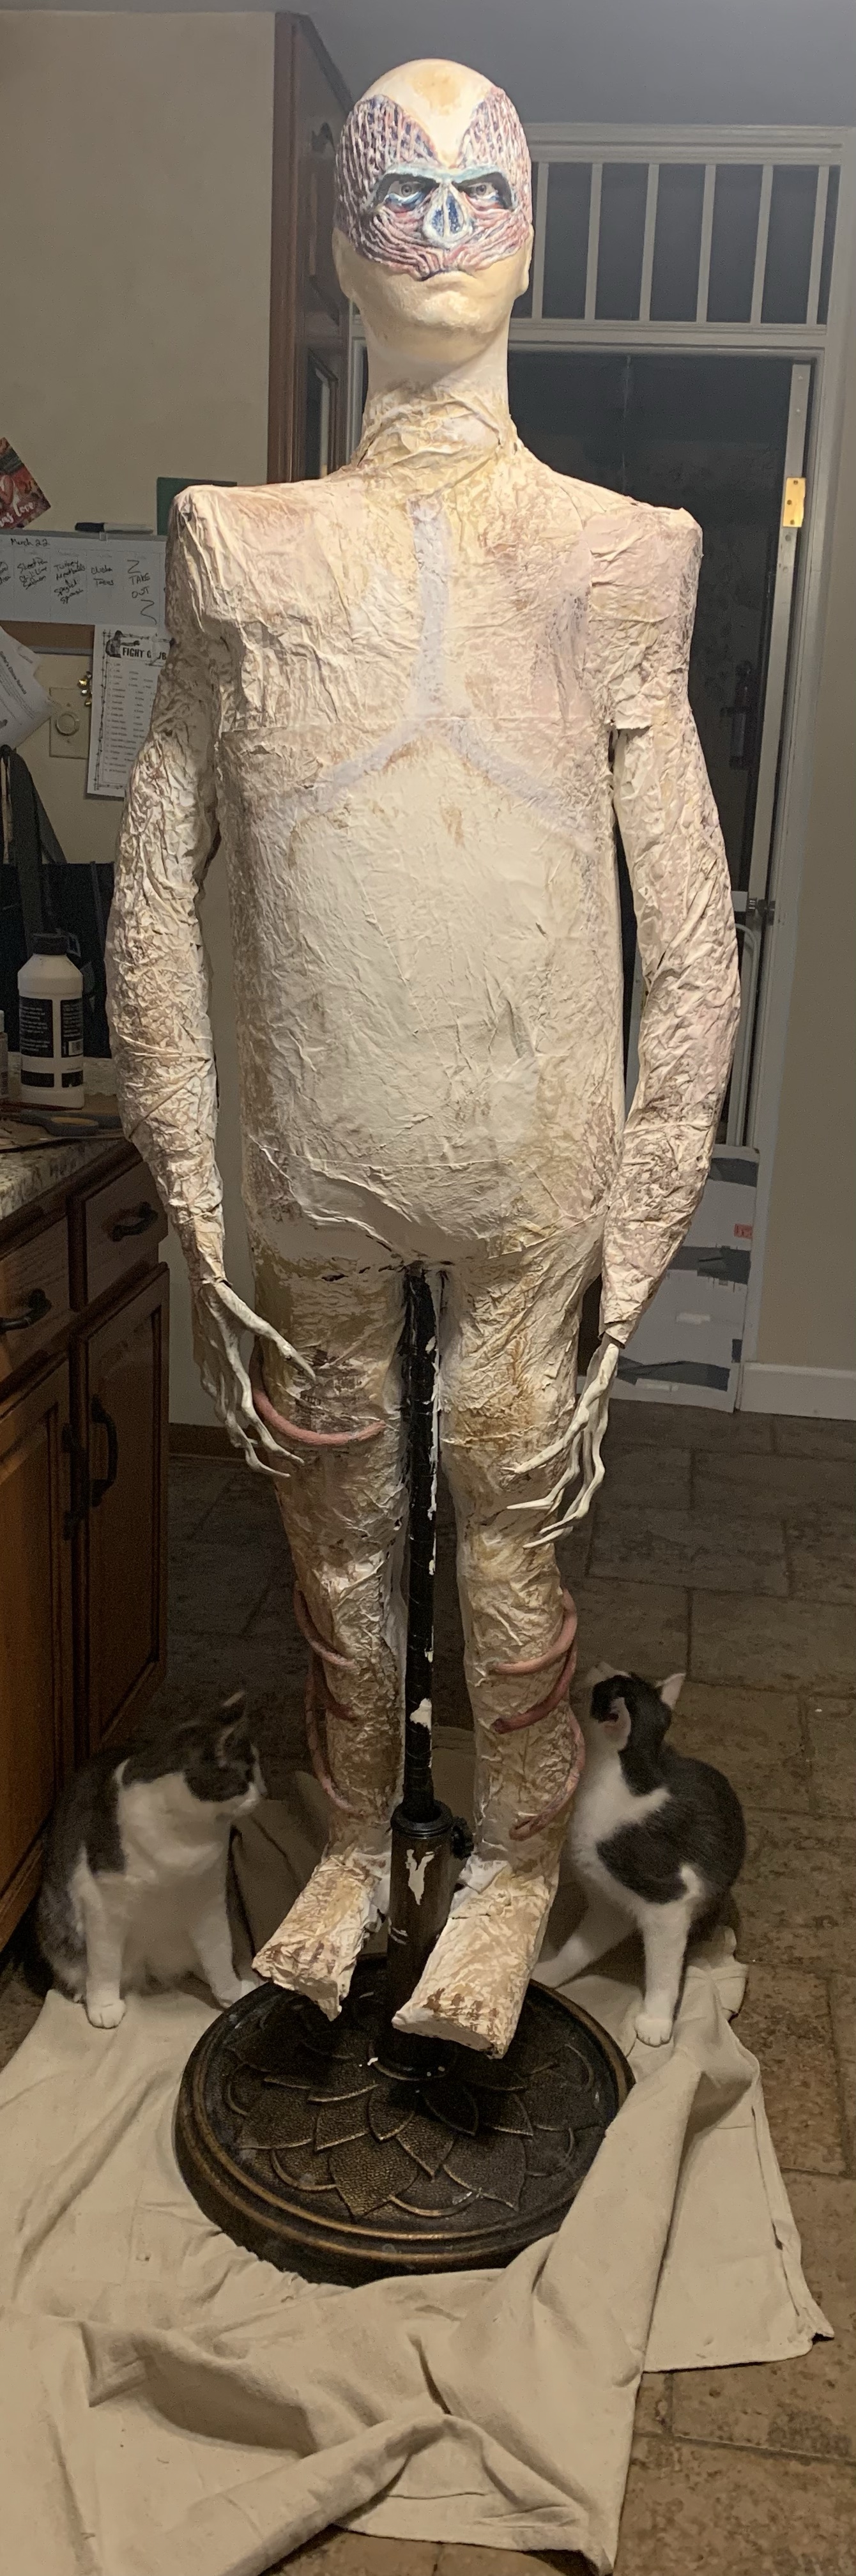
I started with a Styrofoam head, cut off the nose and used modeling clay to add the embellishments to his face. I also learned a lesson about Styrofoam. I already knew not to spray-paint Styrofoam. Now I learned not to add modeling clay directly to the Styrofoam. It will eat away at the Styrofoam as well and cause it to sink away, until eventually it just falls off and leaves the eaten away Styrofoam. In this particular case, he kind of reminded me of Vison from the Avengers.
So after my first failed attempt, I decided to try again, but this time I made sure that I primed the Styrofoam a few times first. This time the clay stayed on and I was able to finish his head with paint and some doll eyes.
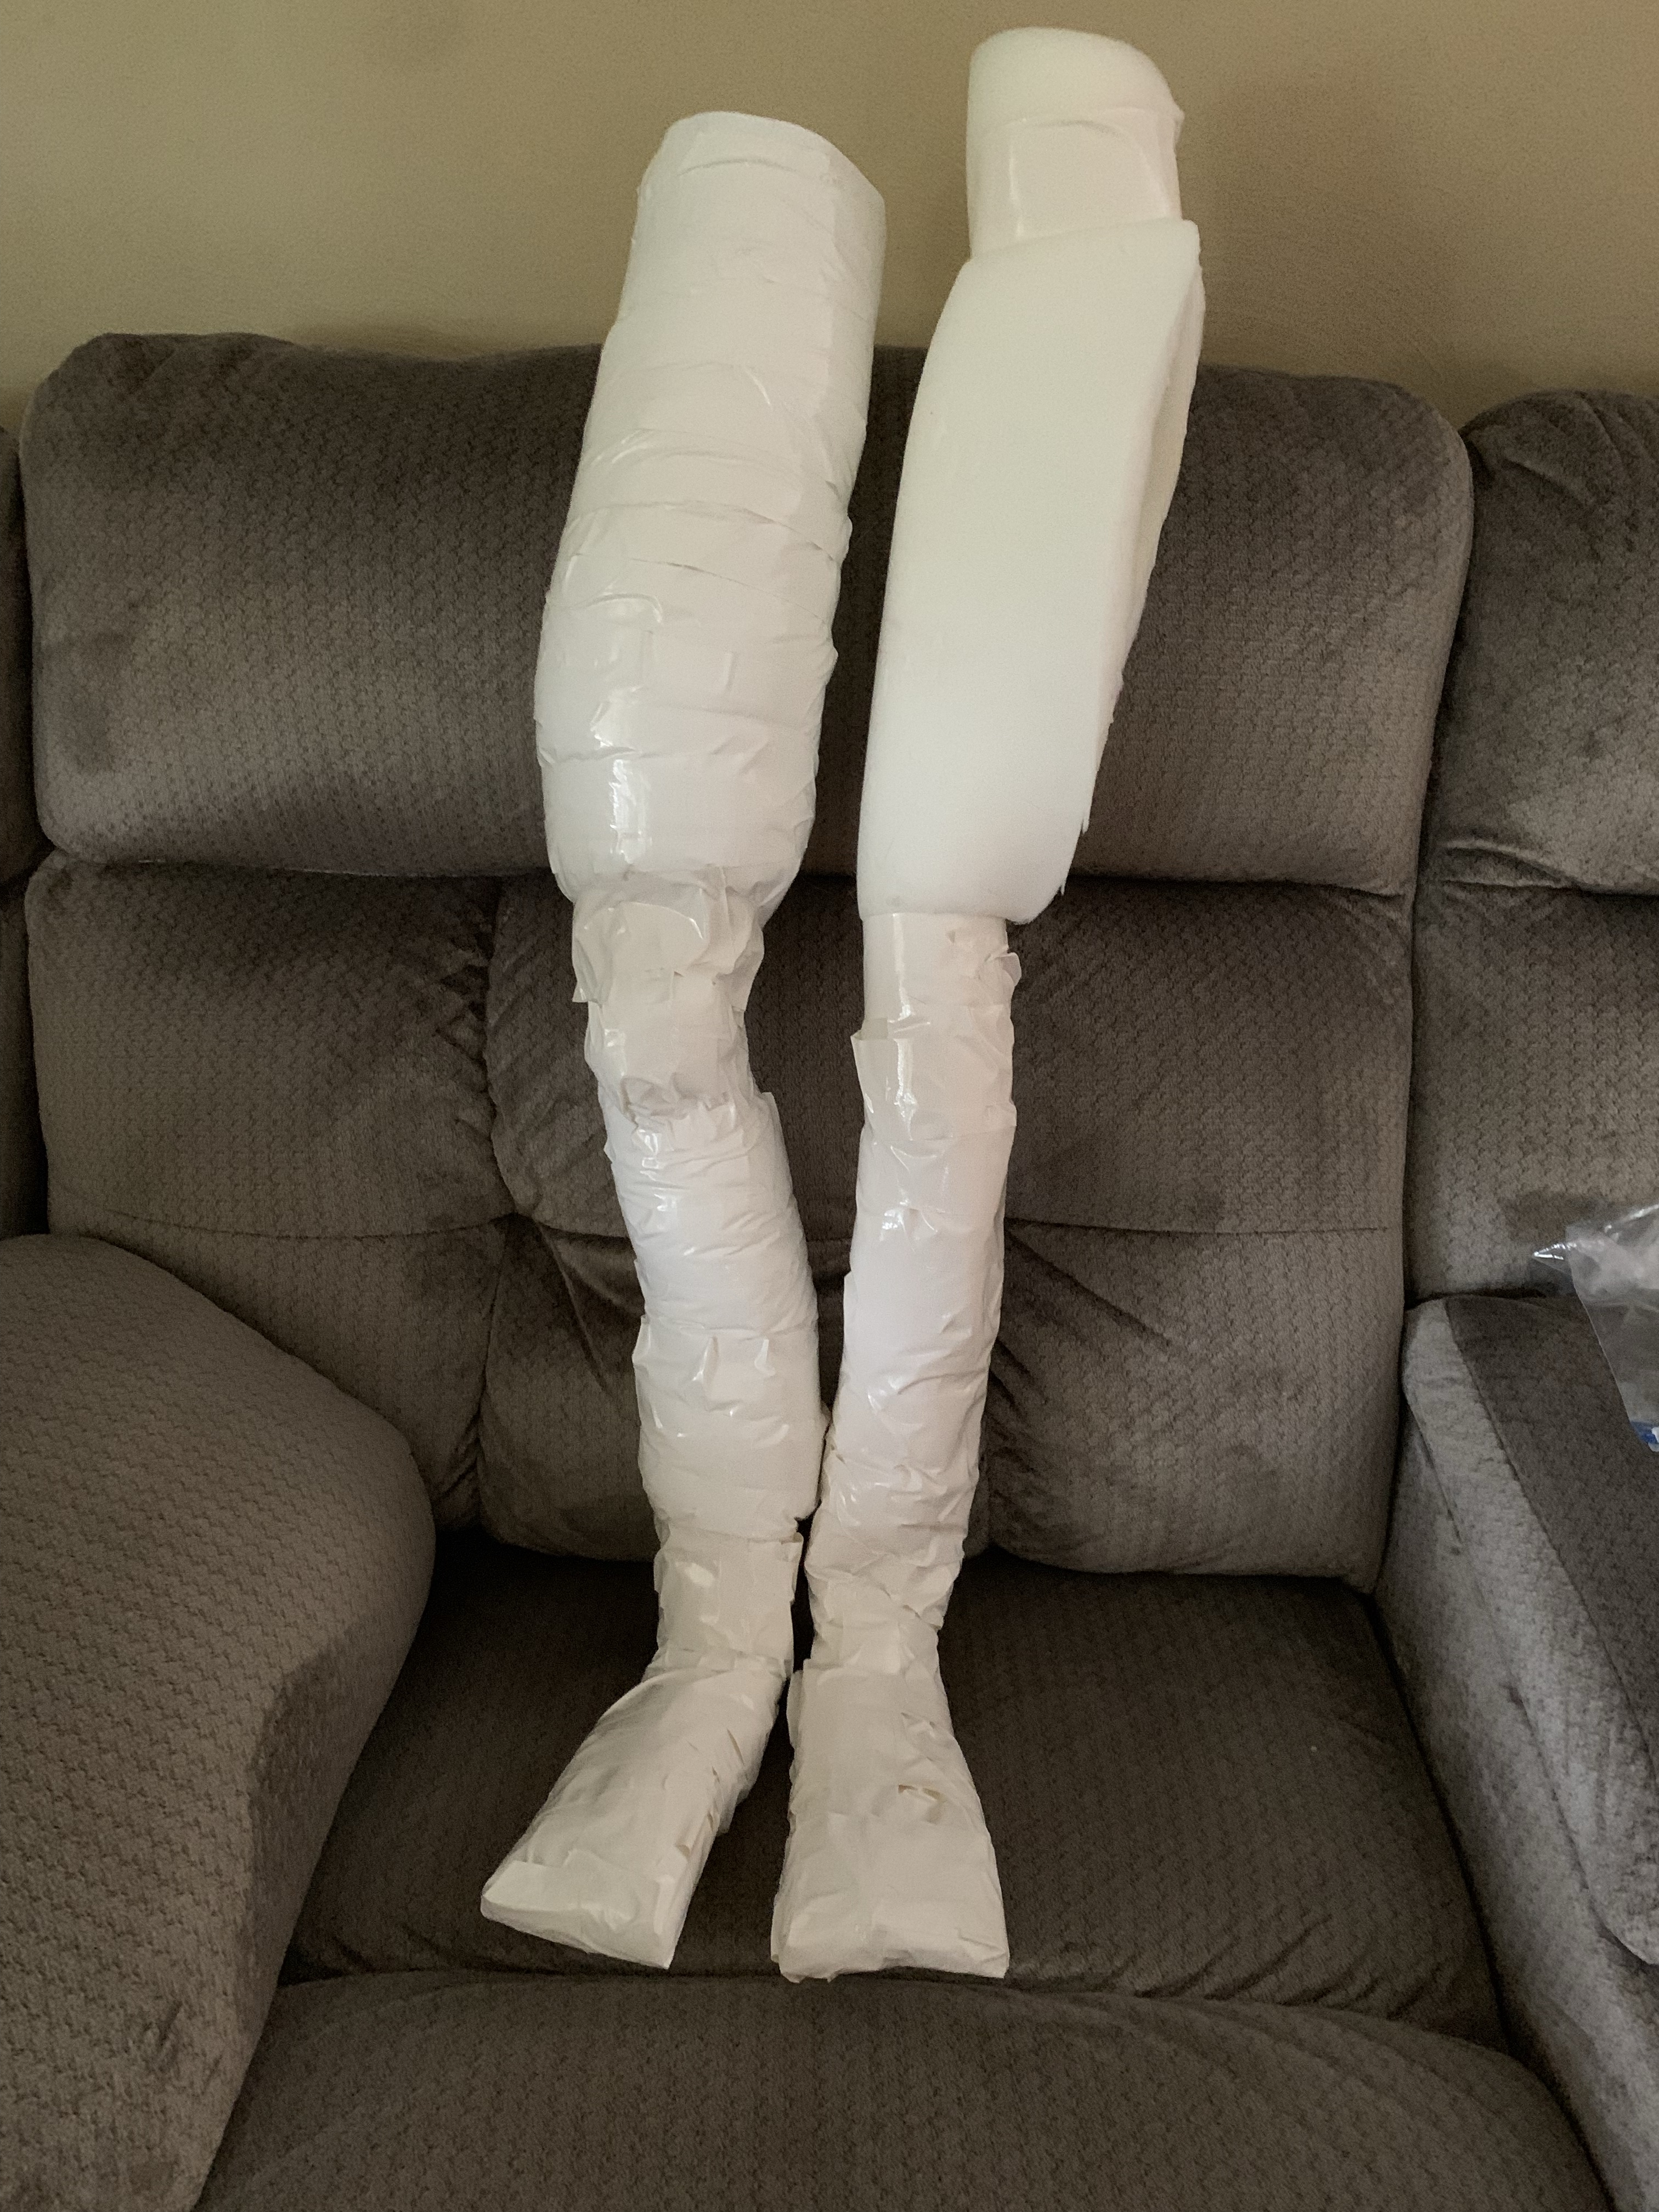
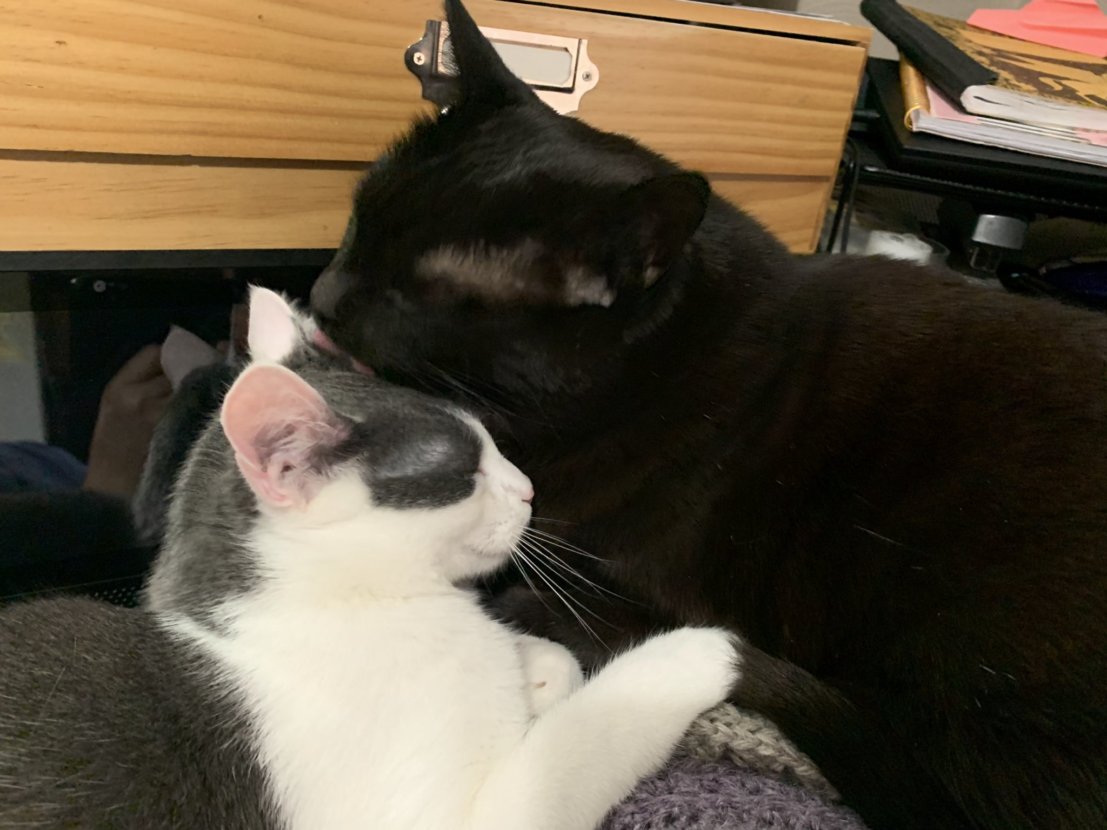
Next up, creating the body. This took a lot of foam and white duct tape. Oh, and a few wire hangers, plus some spooky hands. I started with the arms, then the legs, created the body and then taped them all together. Even Mara Jade jumped in to investigate.
I used brown packing paper, soaked in water and wrinkled up to glue on. Before papering the body and legs I speared the body with a broom handle because I wanted to use an umbrella stand to hold him up.
Once the “skin” was on I started painting, and painting, and painting. Plus I attached the head to the broom handle also.
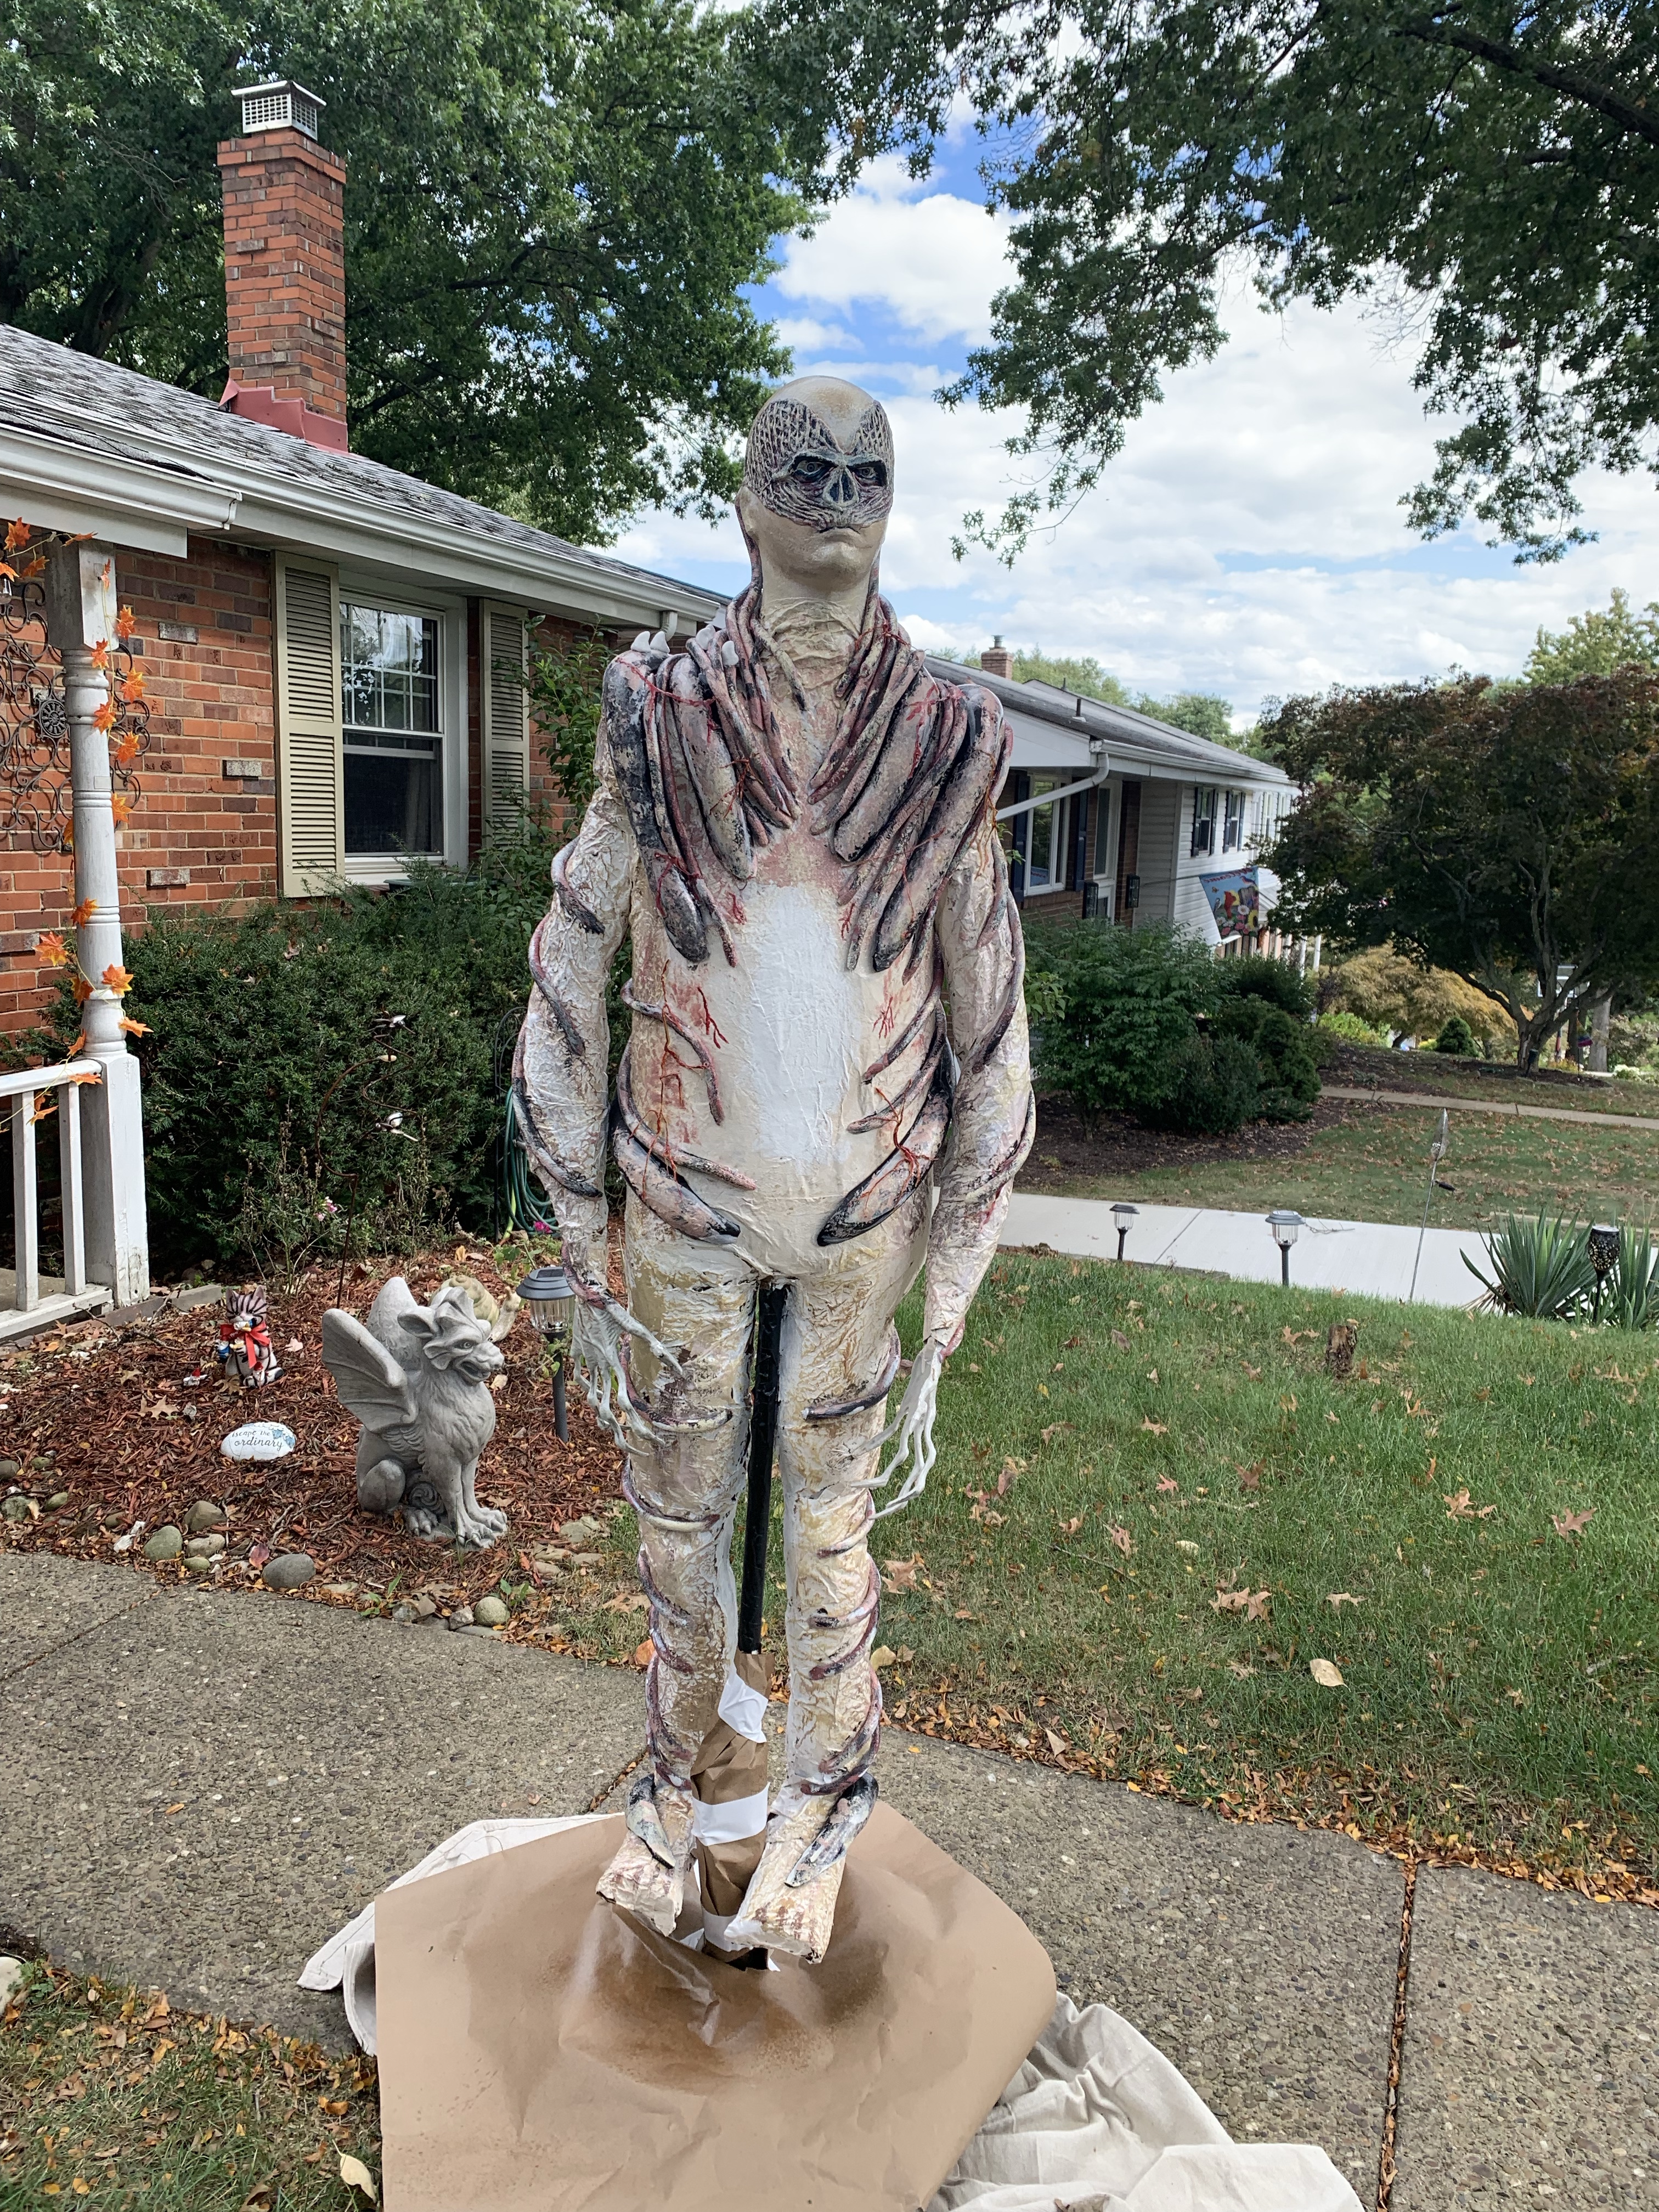
I already made many vines for the house and to attach him to the house. I used lots of cut foam, clothesline, black duct tape, and electrical tape.
But, I found some great YouTube videos from Cris Alex, with lots of the embellishments for Vecna, including the vines, cones, and veins. It really helped me to take him to the next level.
My husband says he is the best thing I’ve ever made, and I have to admit that I’m pretty proud of him.
This year for Halloween I decided to dress up as Eddie Munson. Which then made me start to work on decorating the house in a Stranger Things Season 4 theme for Halloween. I already made Vecna’s Grandfather clock from Episode 1. And I’ve worked on more decorations that I’ll post later. But I also worked my Eddie costume.
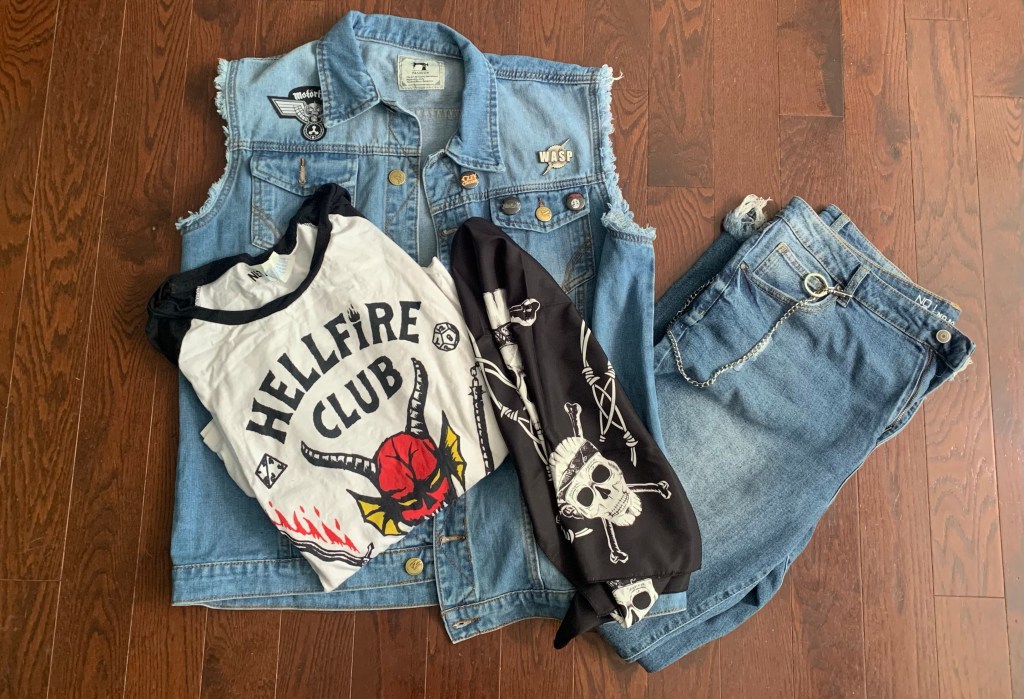
Vest, Jeans, Hellfire Club shirt, Bandana, and chain
It all started in the spring when I bought a Hellfire Club shirt. It was still while the season was airing and I just needed one. Actually, the Hellfire Club shirt I bought in the spring was polyester and I didn’t like it, so I replaced it with this cotton one.
Once I decided to dress up as Eddie, I thought it would be easy. I thought, add a jean vest, some jeans, no problem. But I didn’t realize how in depth his costume was until I watched I watched this video by Cosplay Chris.
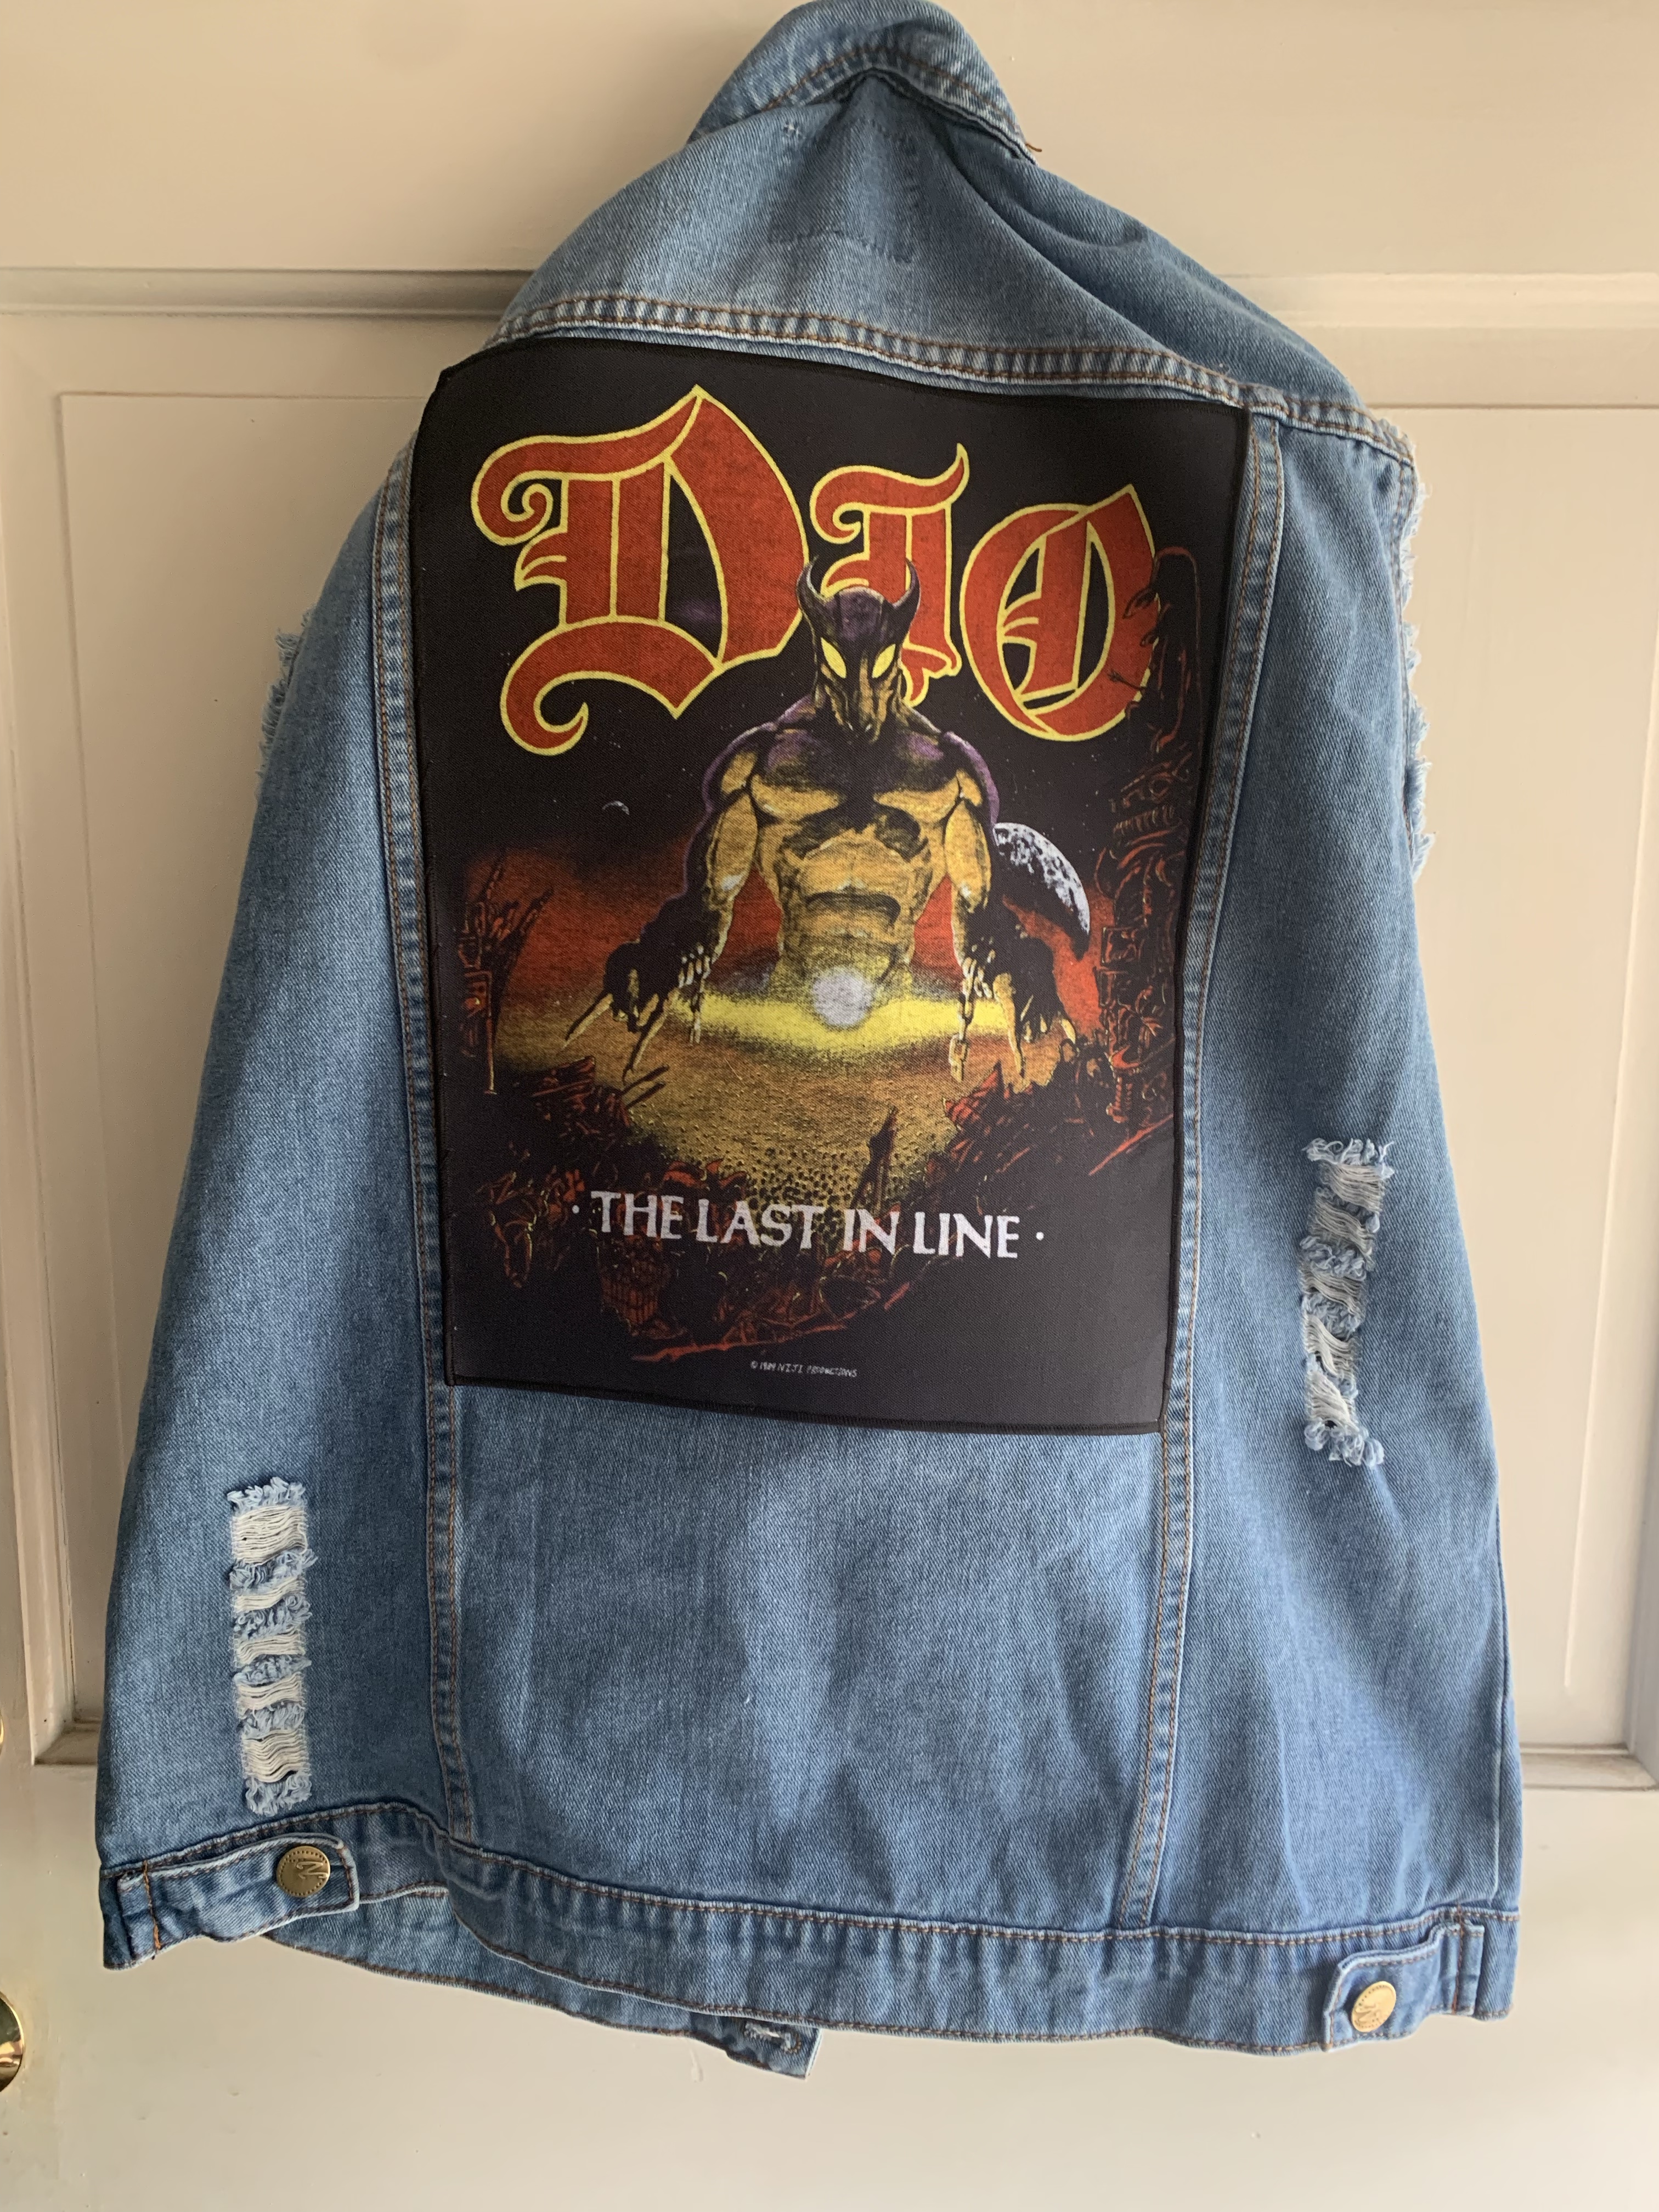
First I made the vest. I bought a cheap jean vest. Next I found the Dio back patch on the Dio Store. I couldn’t really see all the original pins on his vest, so I bought this set of classic 80s metal band pins and I chose Ozzy Osborne, Judas Priest, and Anthrax from the set. I found a replica of the Wasp pin on Ruckus Tees. The Motorhead patch was available on Amazon, but I cut off the Copyright 2022 part. And I bought some iron on adhesive to iron on the patches (although I still needed to sew the edges on the Dio patch, at least the iron on helped to adhere most of the patch onto the vest.
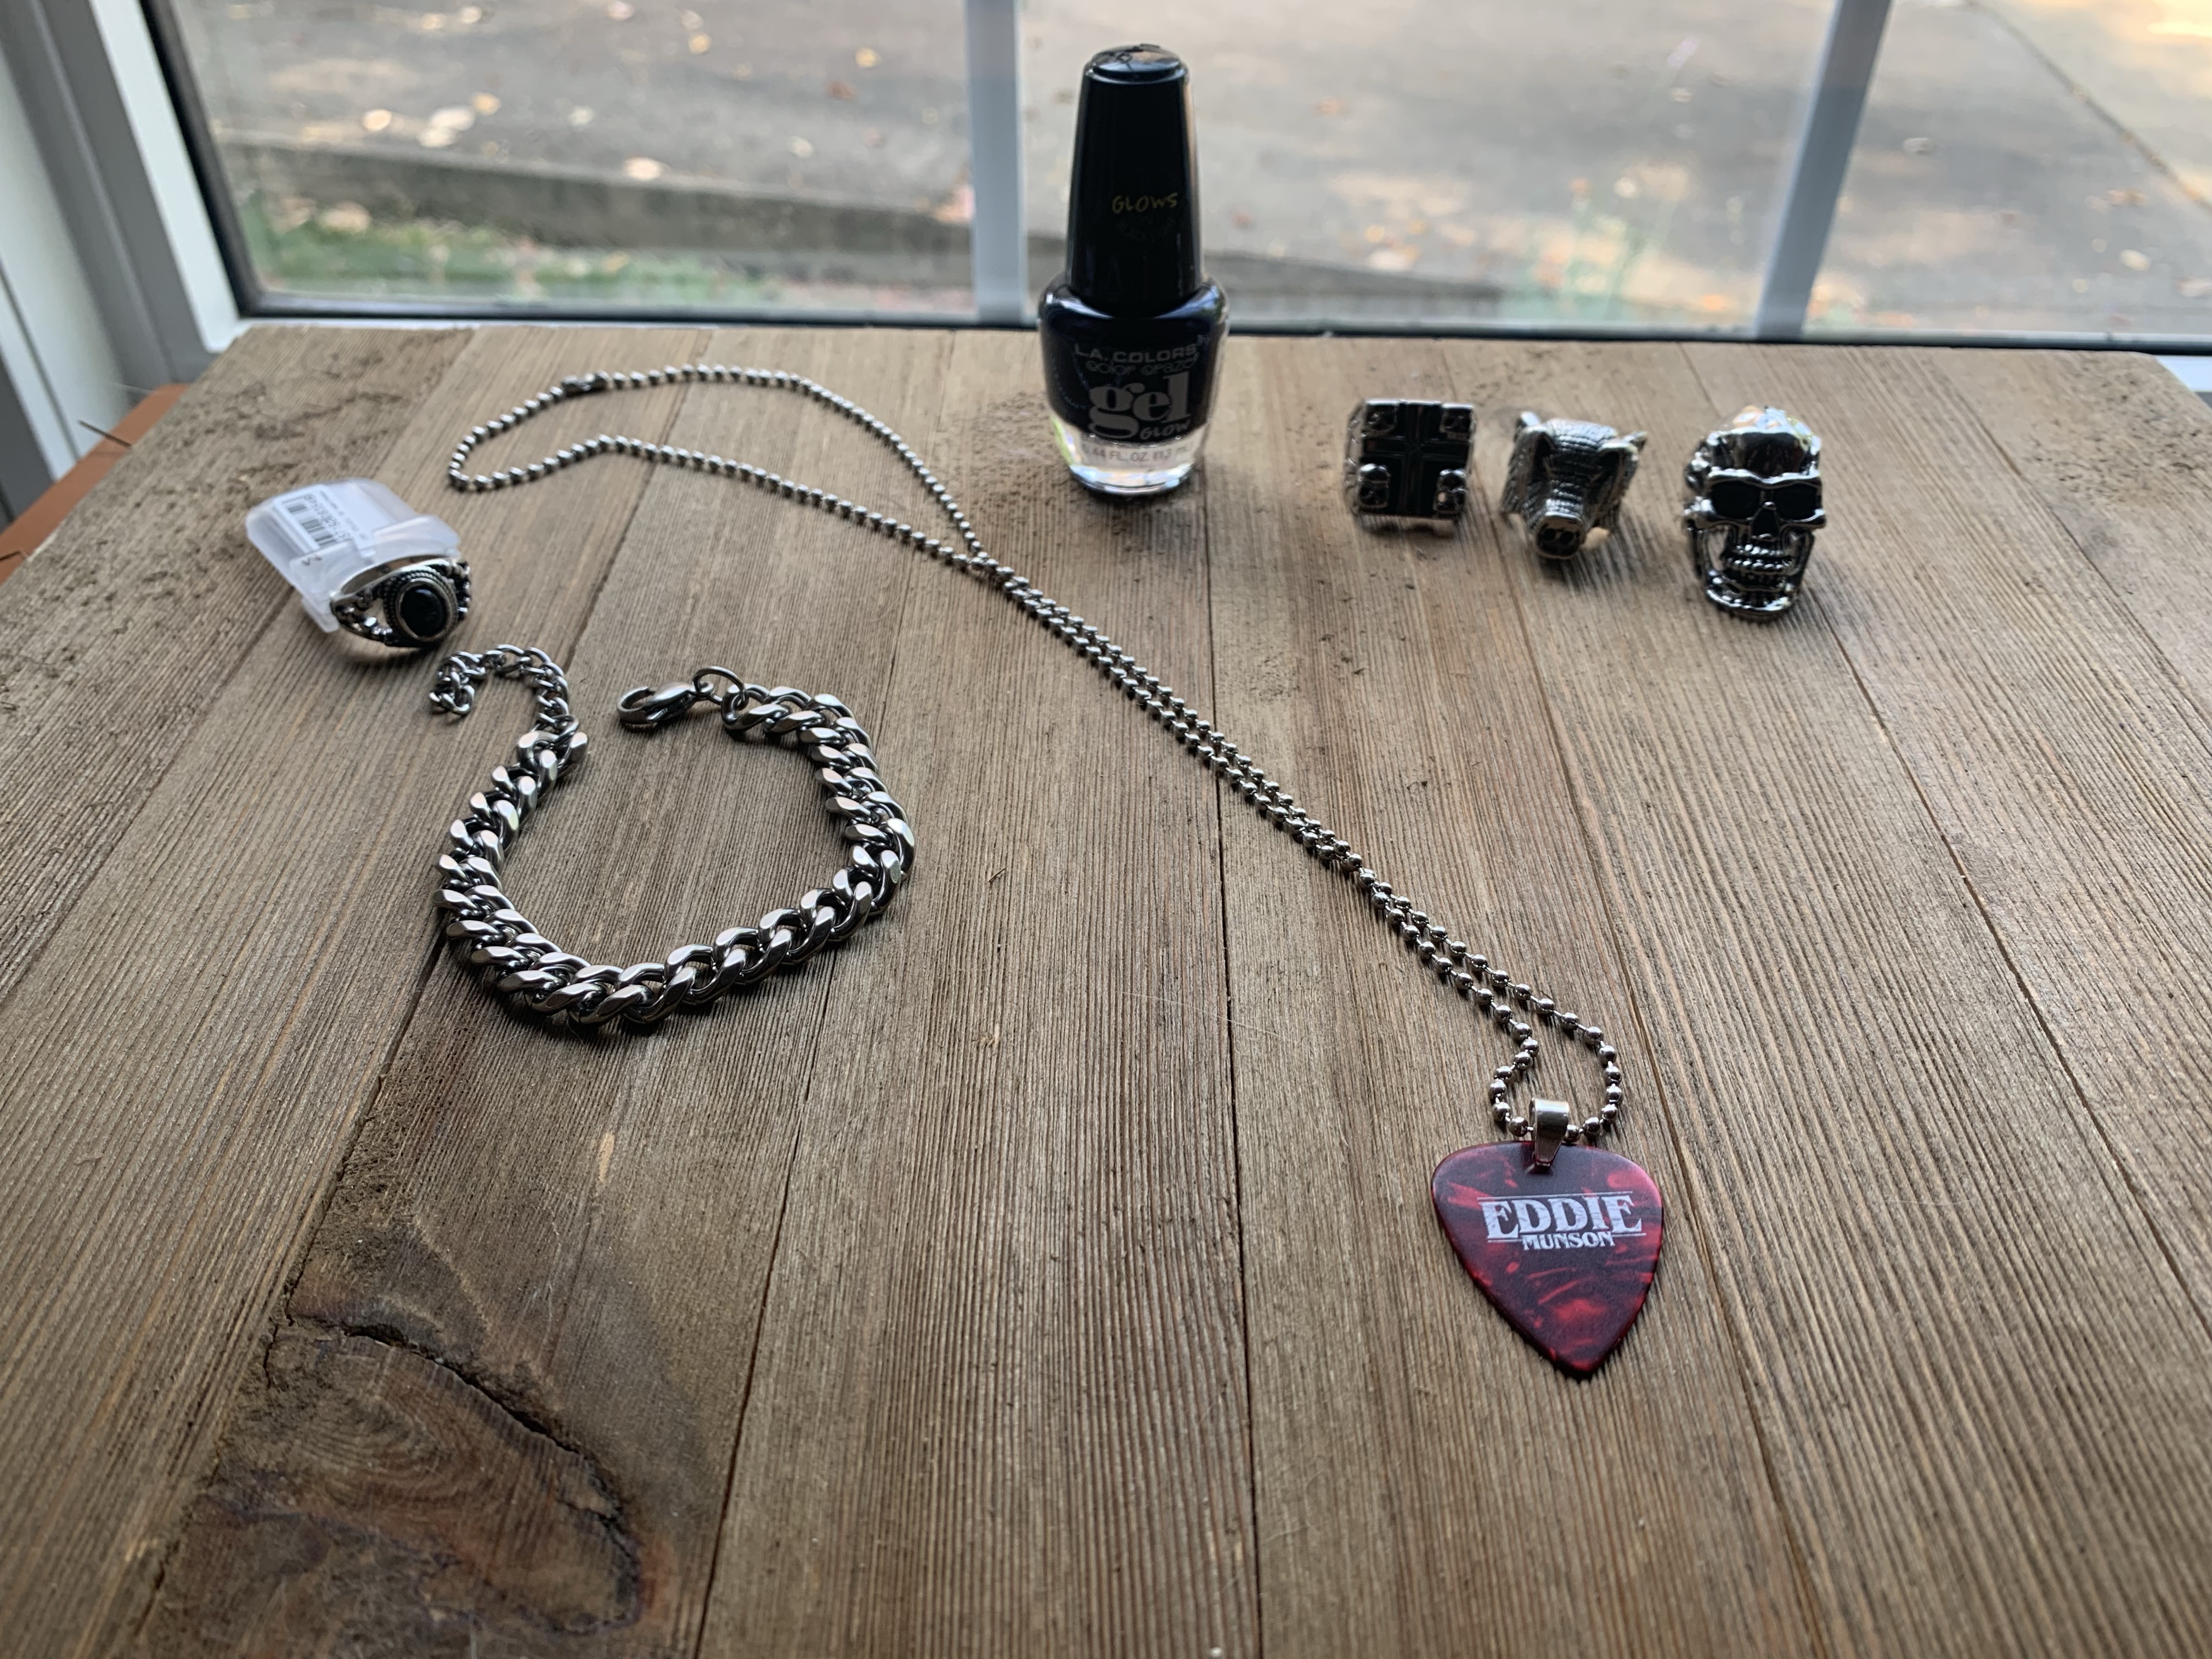
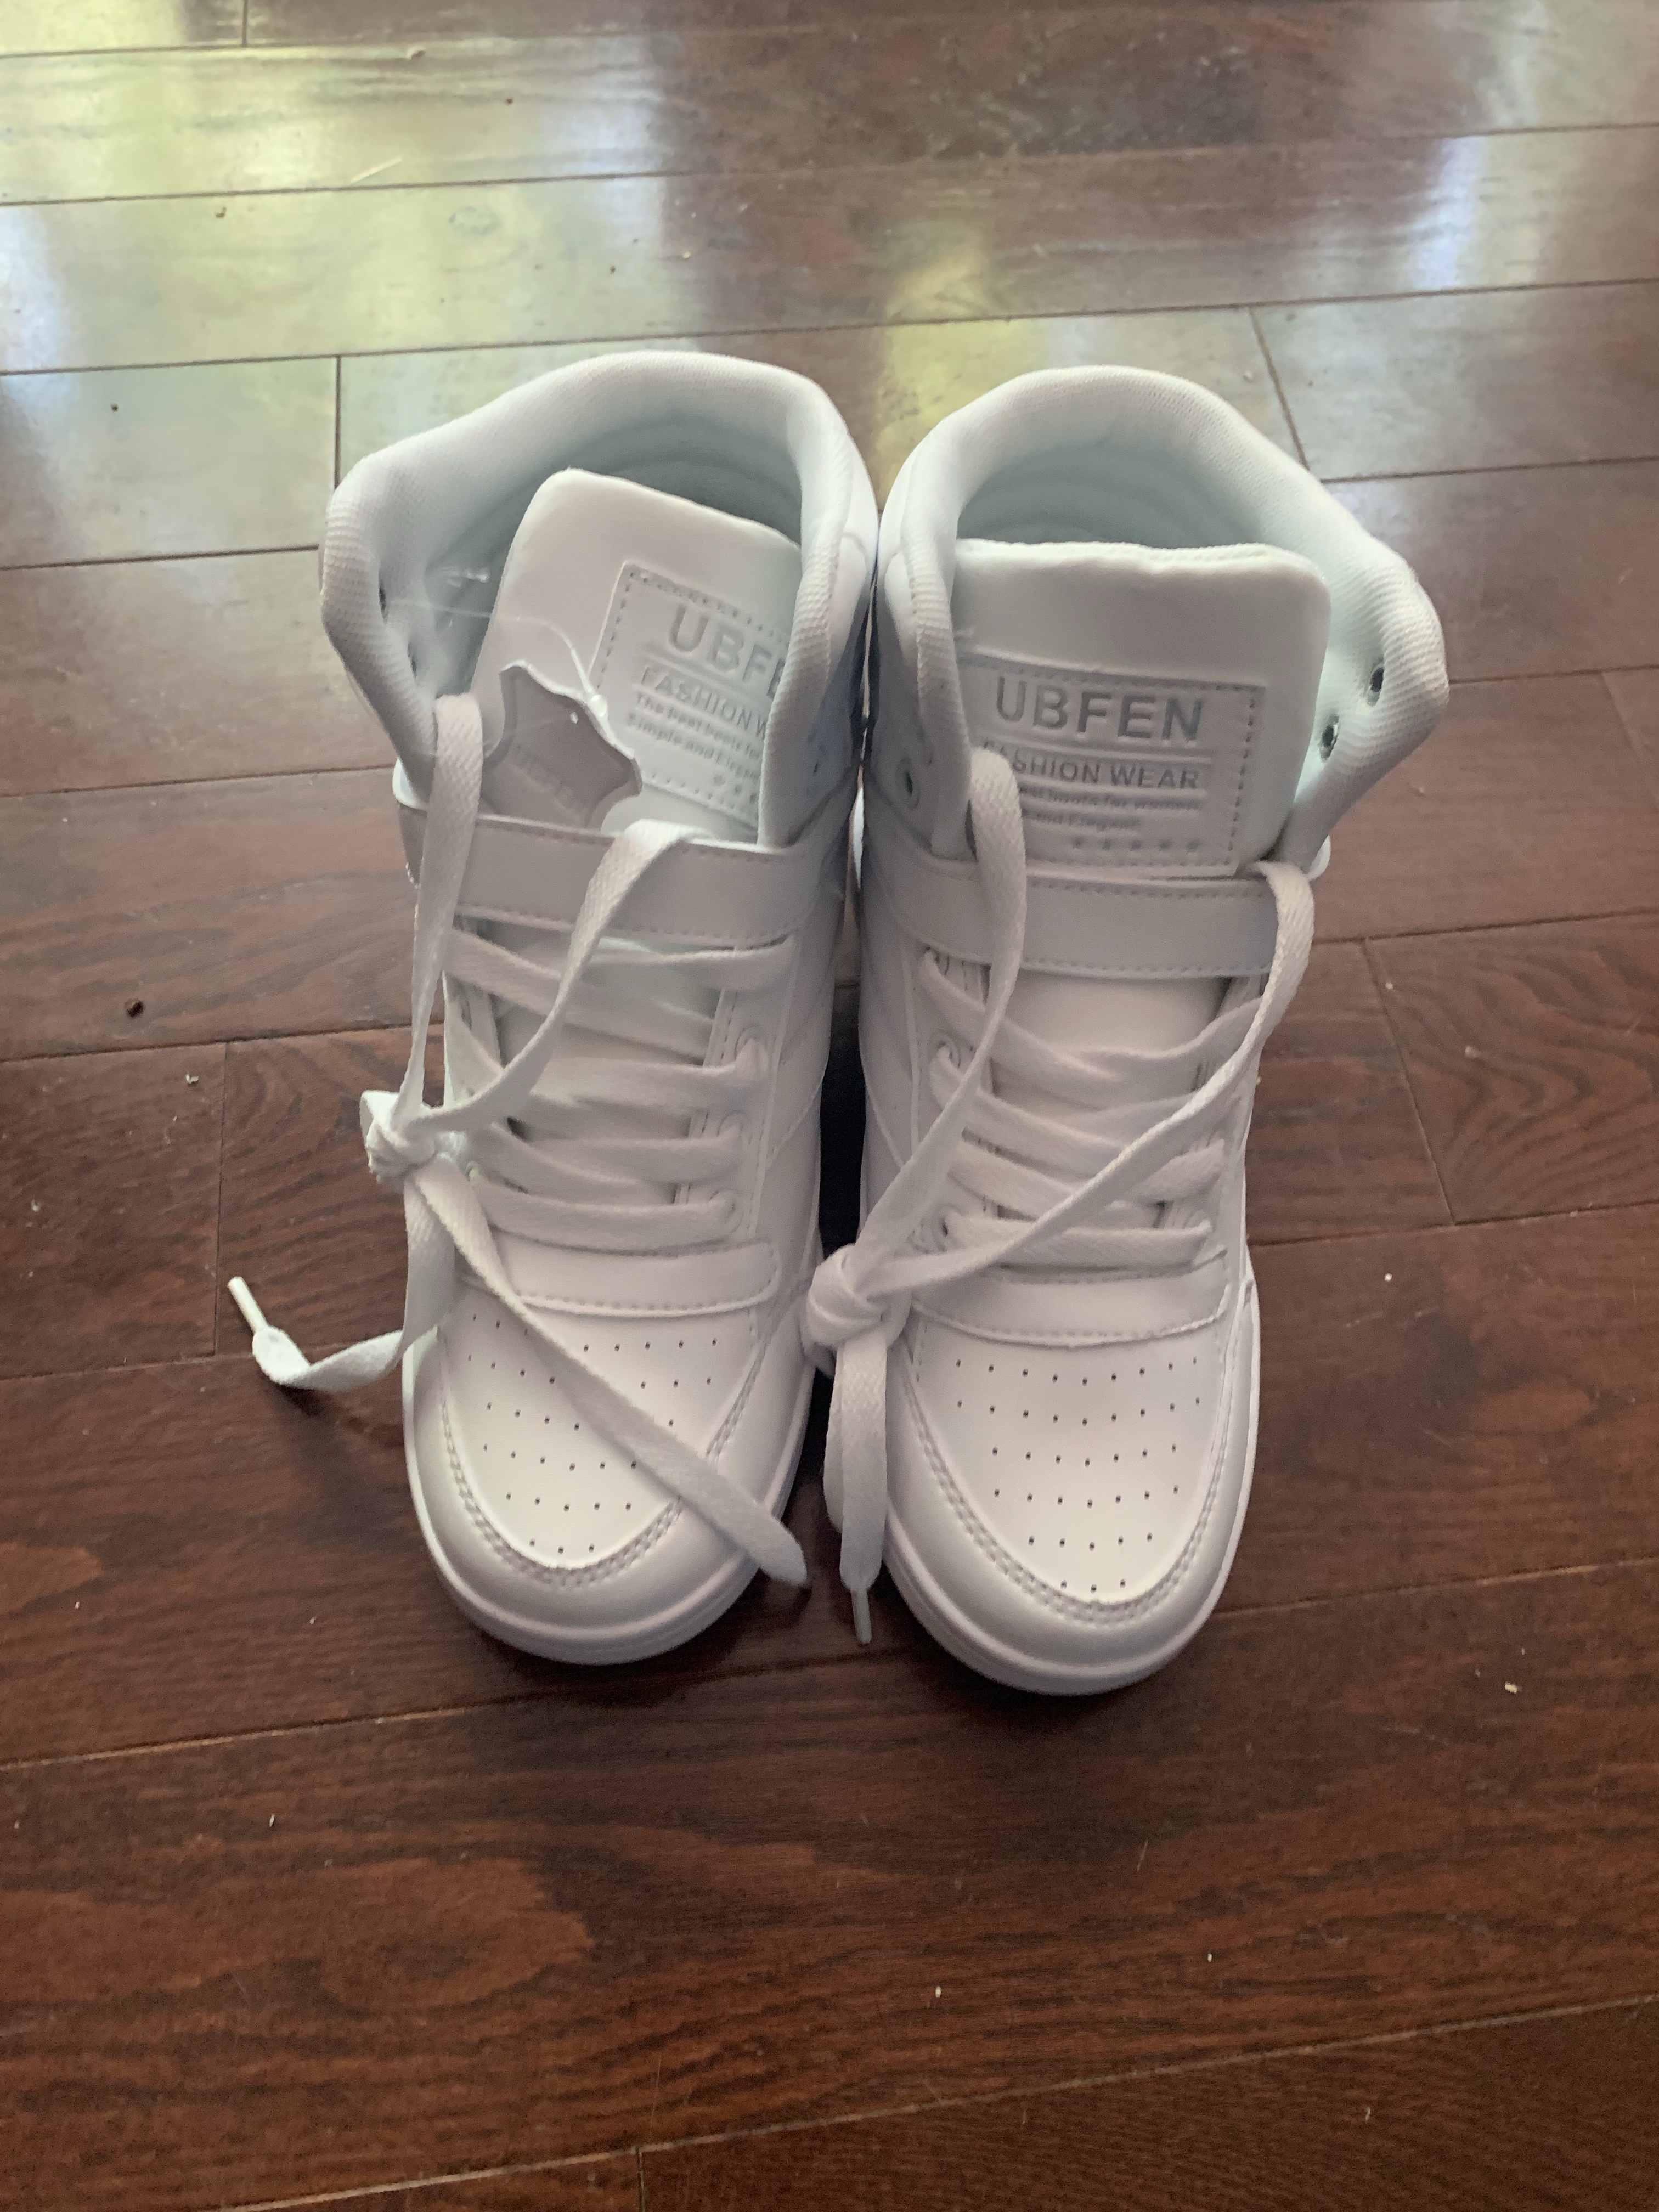
Next up, the accessories. The mood ring was found on Ebay along with the Hog Ring. Unfortunately, when I bought the hog ring, I thought I was getting the full set of 3 rings for $44, but it was $44 for each ring. Since I couldn’t find the hog ring anywhere else, I decided to keep it. I found the tombstone ring on Amazon as well as a skull ring (but not the skull ring and I didn’t want to spend another $44, so it was close enough). If you don’t care about matching the rings closely, you can just grab a bag of rings on Amazon. I found a wallet chain on Amazon as well as a guitar pick necklace with a chain bracelet. Note, the picture on Amazon shows a plain pick, but the one that came says Munson on both sides, oh well, it can with the bracelet. I even found the bandana on Amazon. I also found white “leather” high tops on Amazon (Jaina approves). And don’t forget black nail polish.
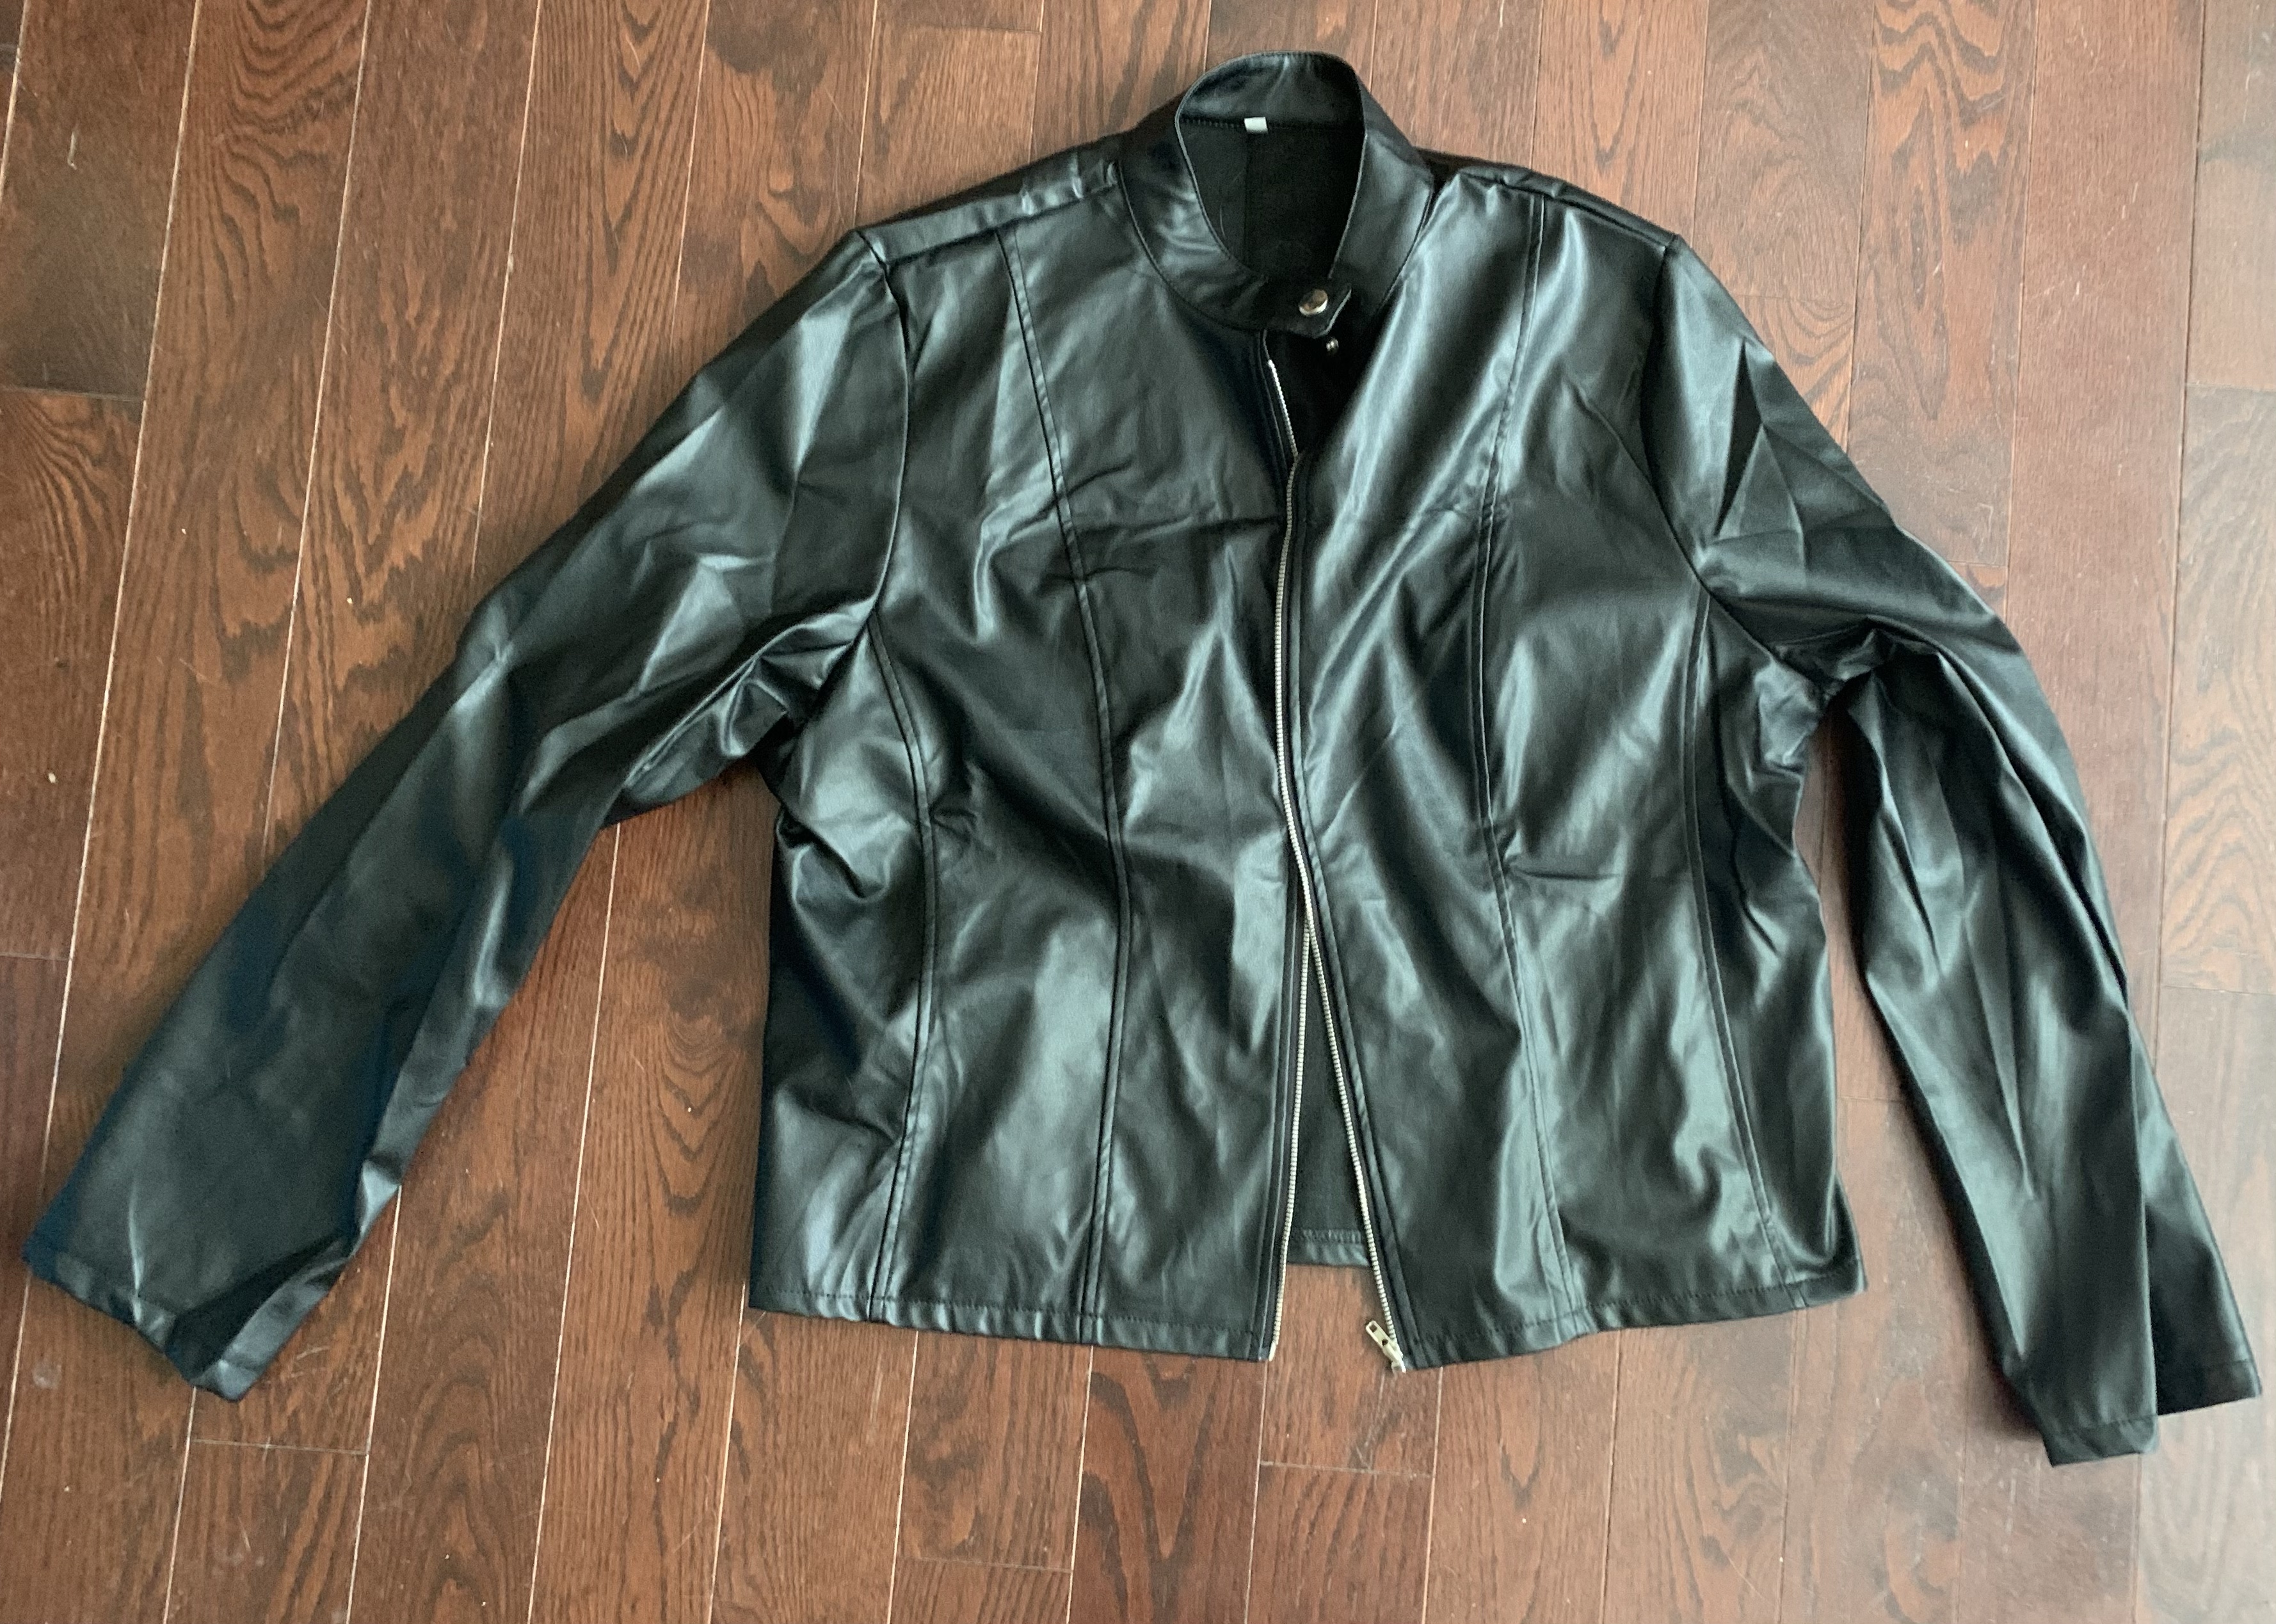
Finishing off the look also requires a pair of ripped jeans (which I had in my closet). Also a black leather jacket. This was the hardest item because I did not want to spend a lot of money on a real leather jacket and part of me wished I held on to my old biker jacket from the 90s. I tried a few from Amazon, but they didn’t fit at all. Finally I found a cheap black “leather” jacket on Walmart.
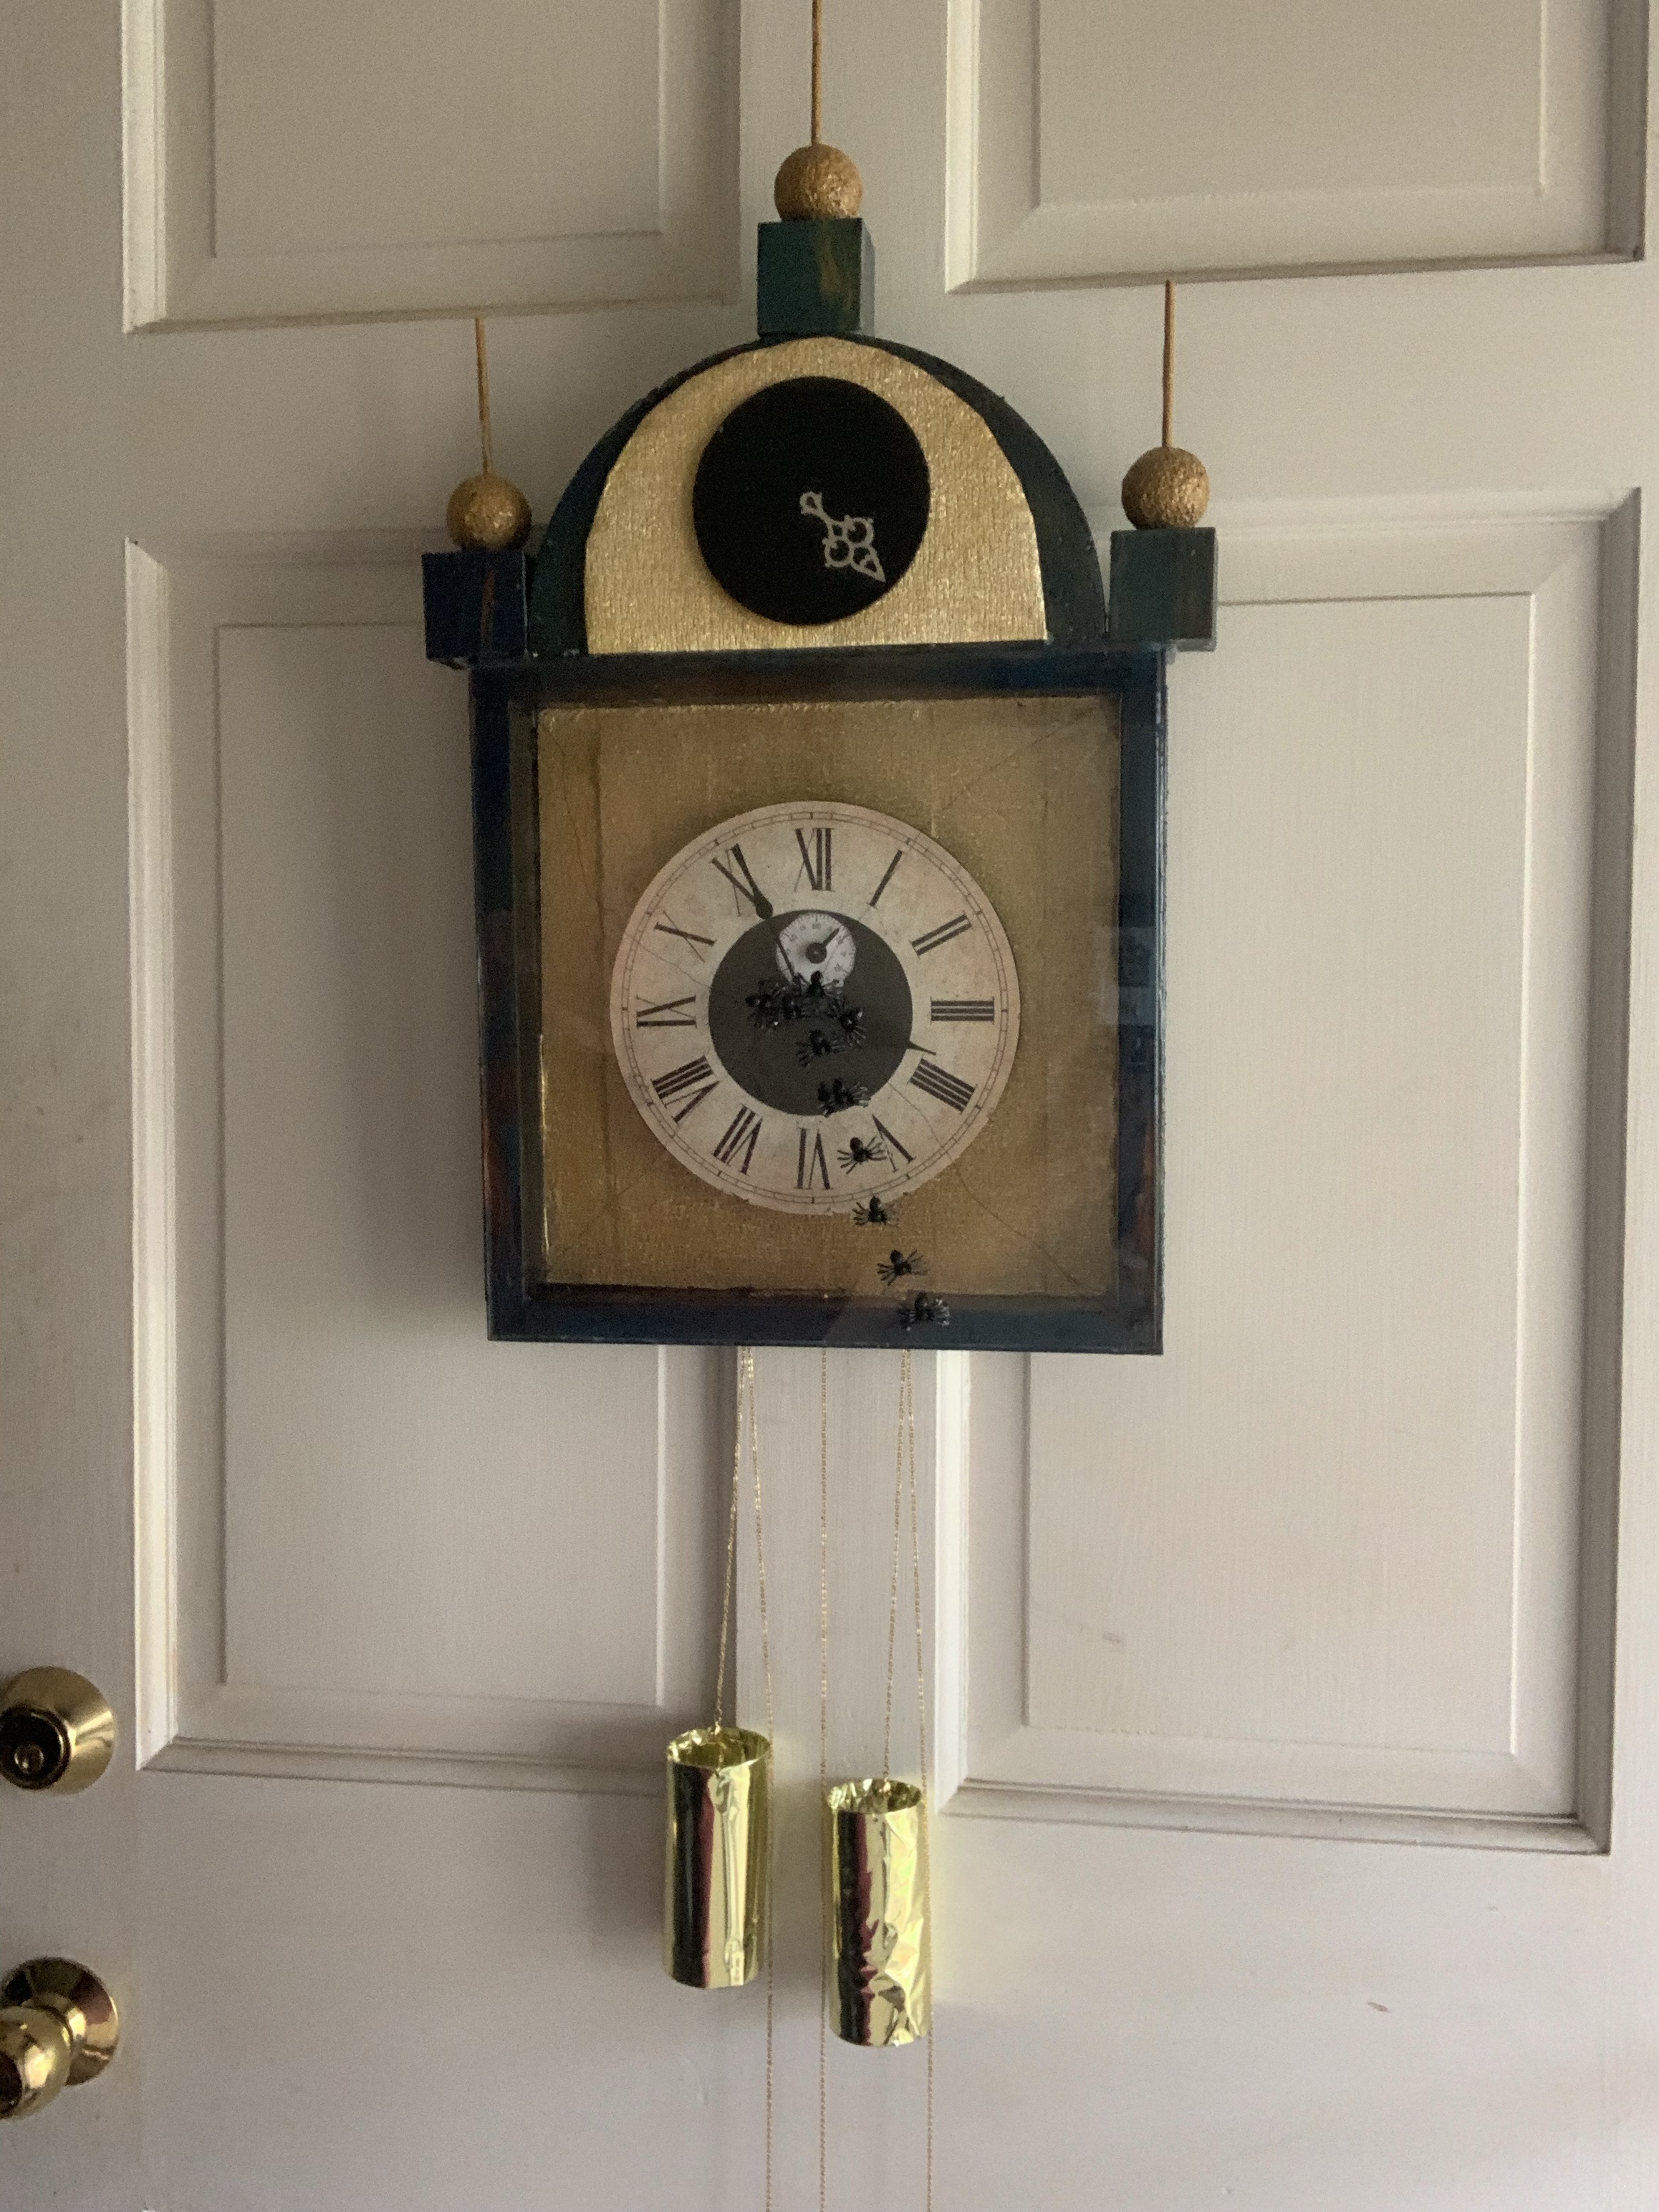
This year’s Halloween theme is Stranger Things Season 4. There are 2 main props I plan to make, plus many decorations I put together. I’ll also cosplay Eddie Munson. The first prop I made was the grandfather clock, which will be hung on a tree, to simulate the first time we see the grandfather clock in the fist episode (I grabbed this photo off the internet to help me see the details to create the clock, as well as several other photos I found).
Materials:
Box
Cheap clock
Gold scrapbooking paper
Black marbled scrapbooking paper
Clock hands
Styrofoam circle
Plexiglass
Cork coaster
3 wood blocks
Styrofoam balls
Dowels
Paint
Glue
Toilet paper rolls
Gold tissue paper (gift paper)
Chains
Grandfather clock pendulum
Sharpie
Spiders
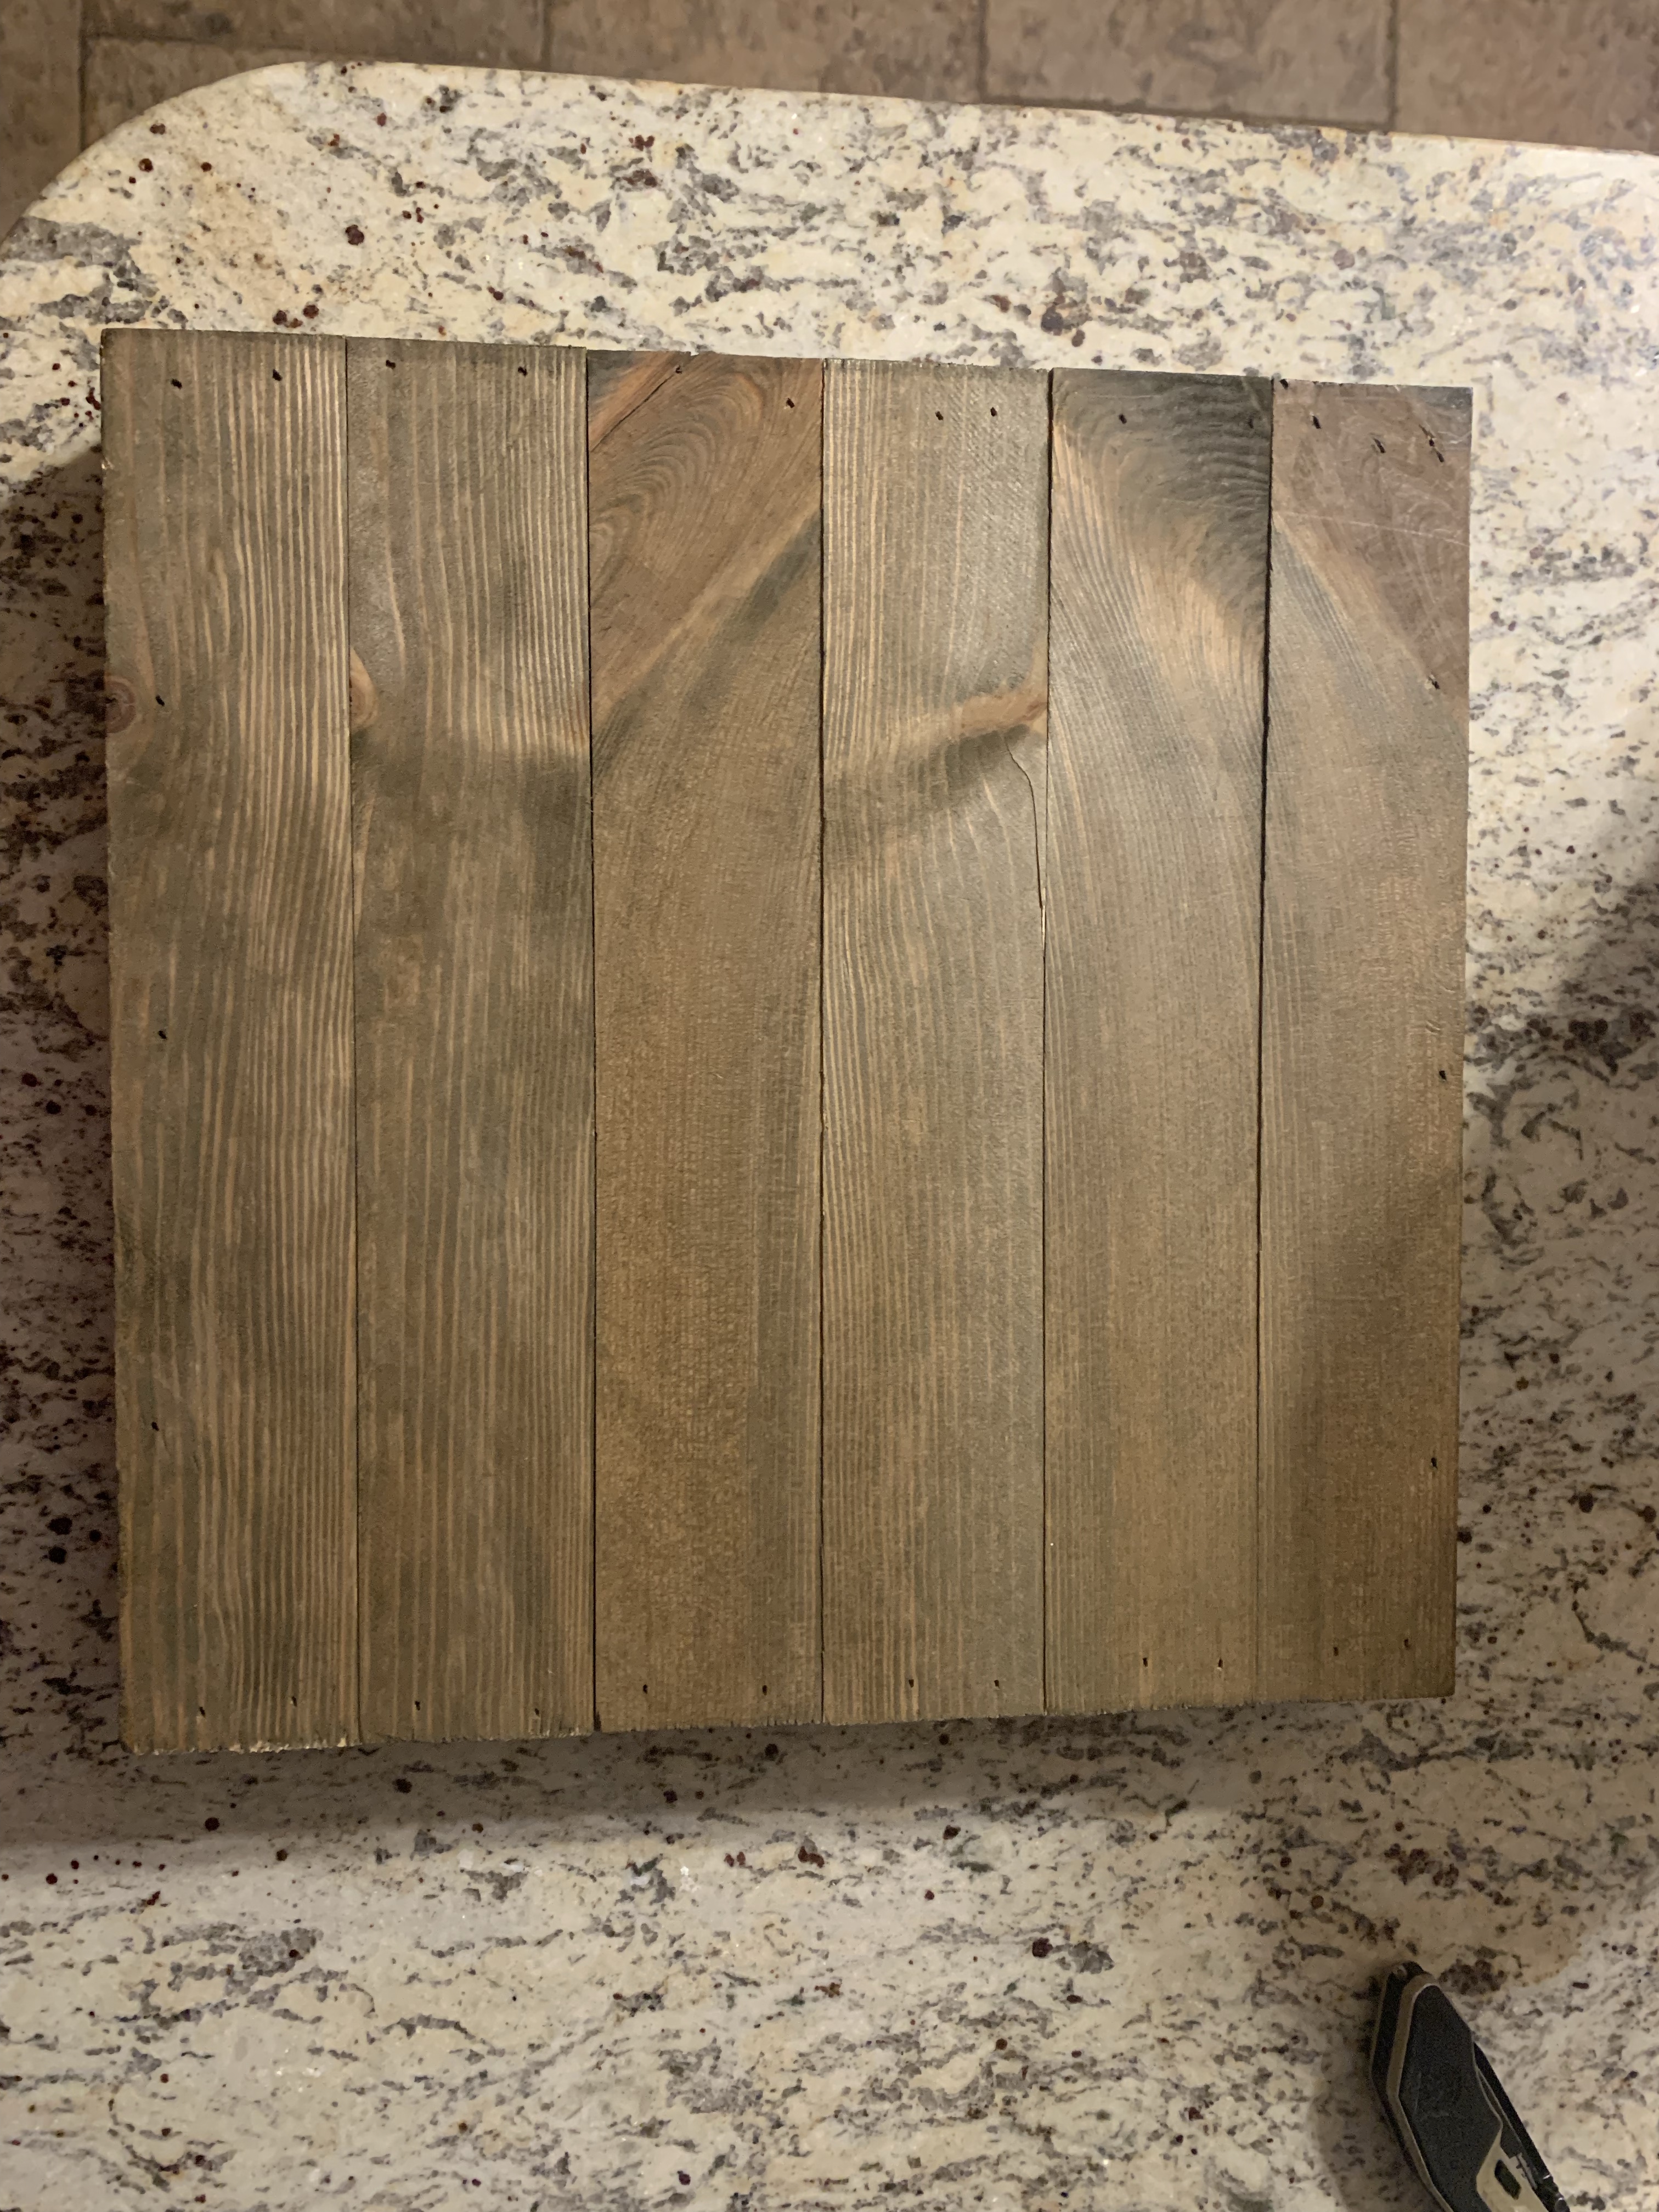
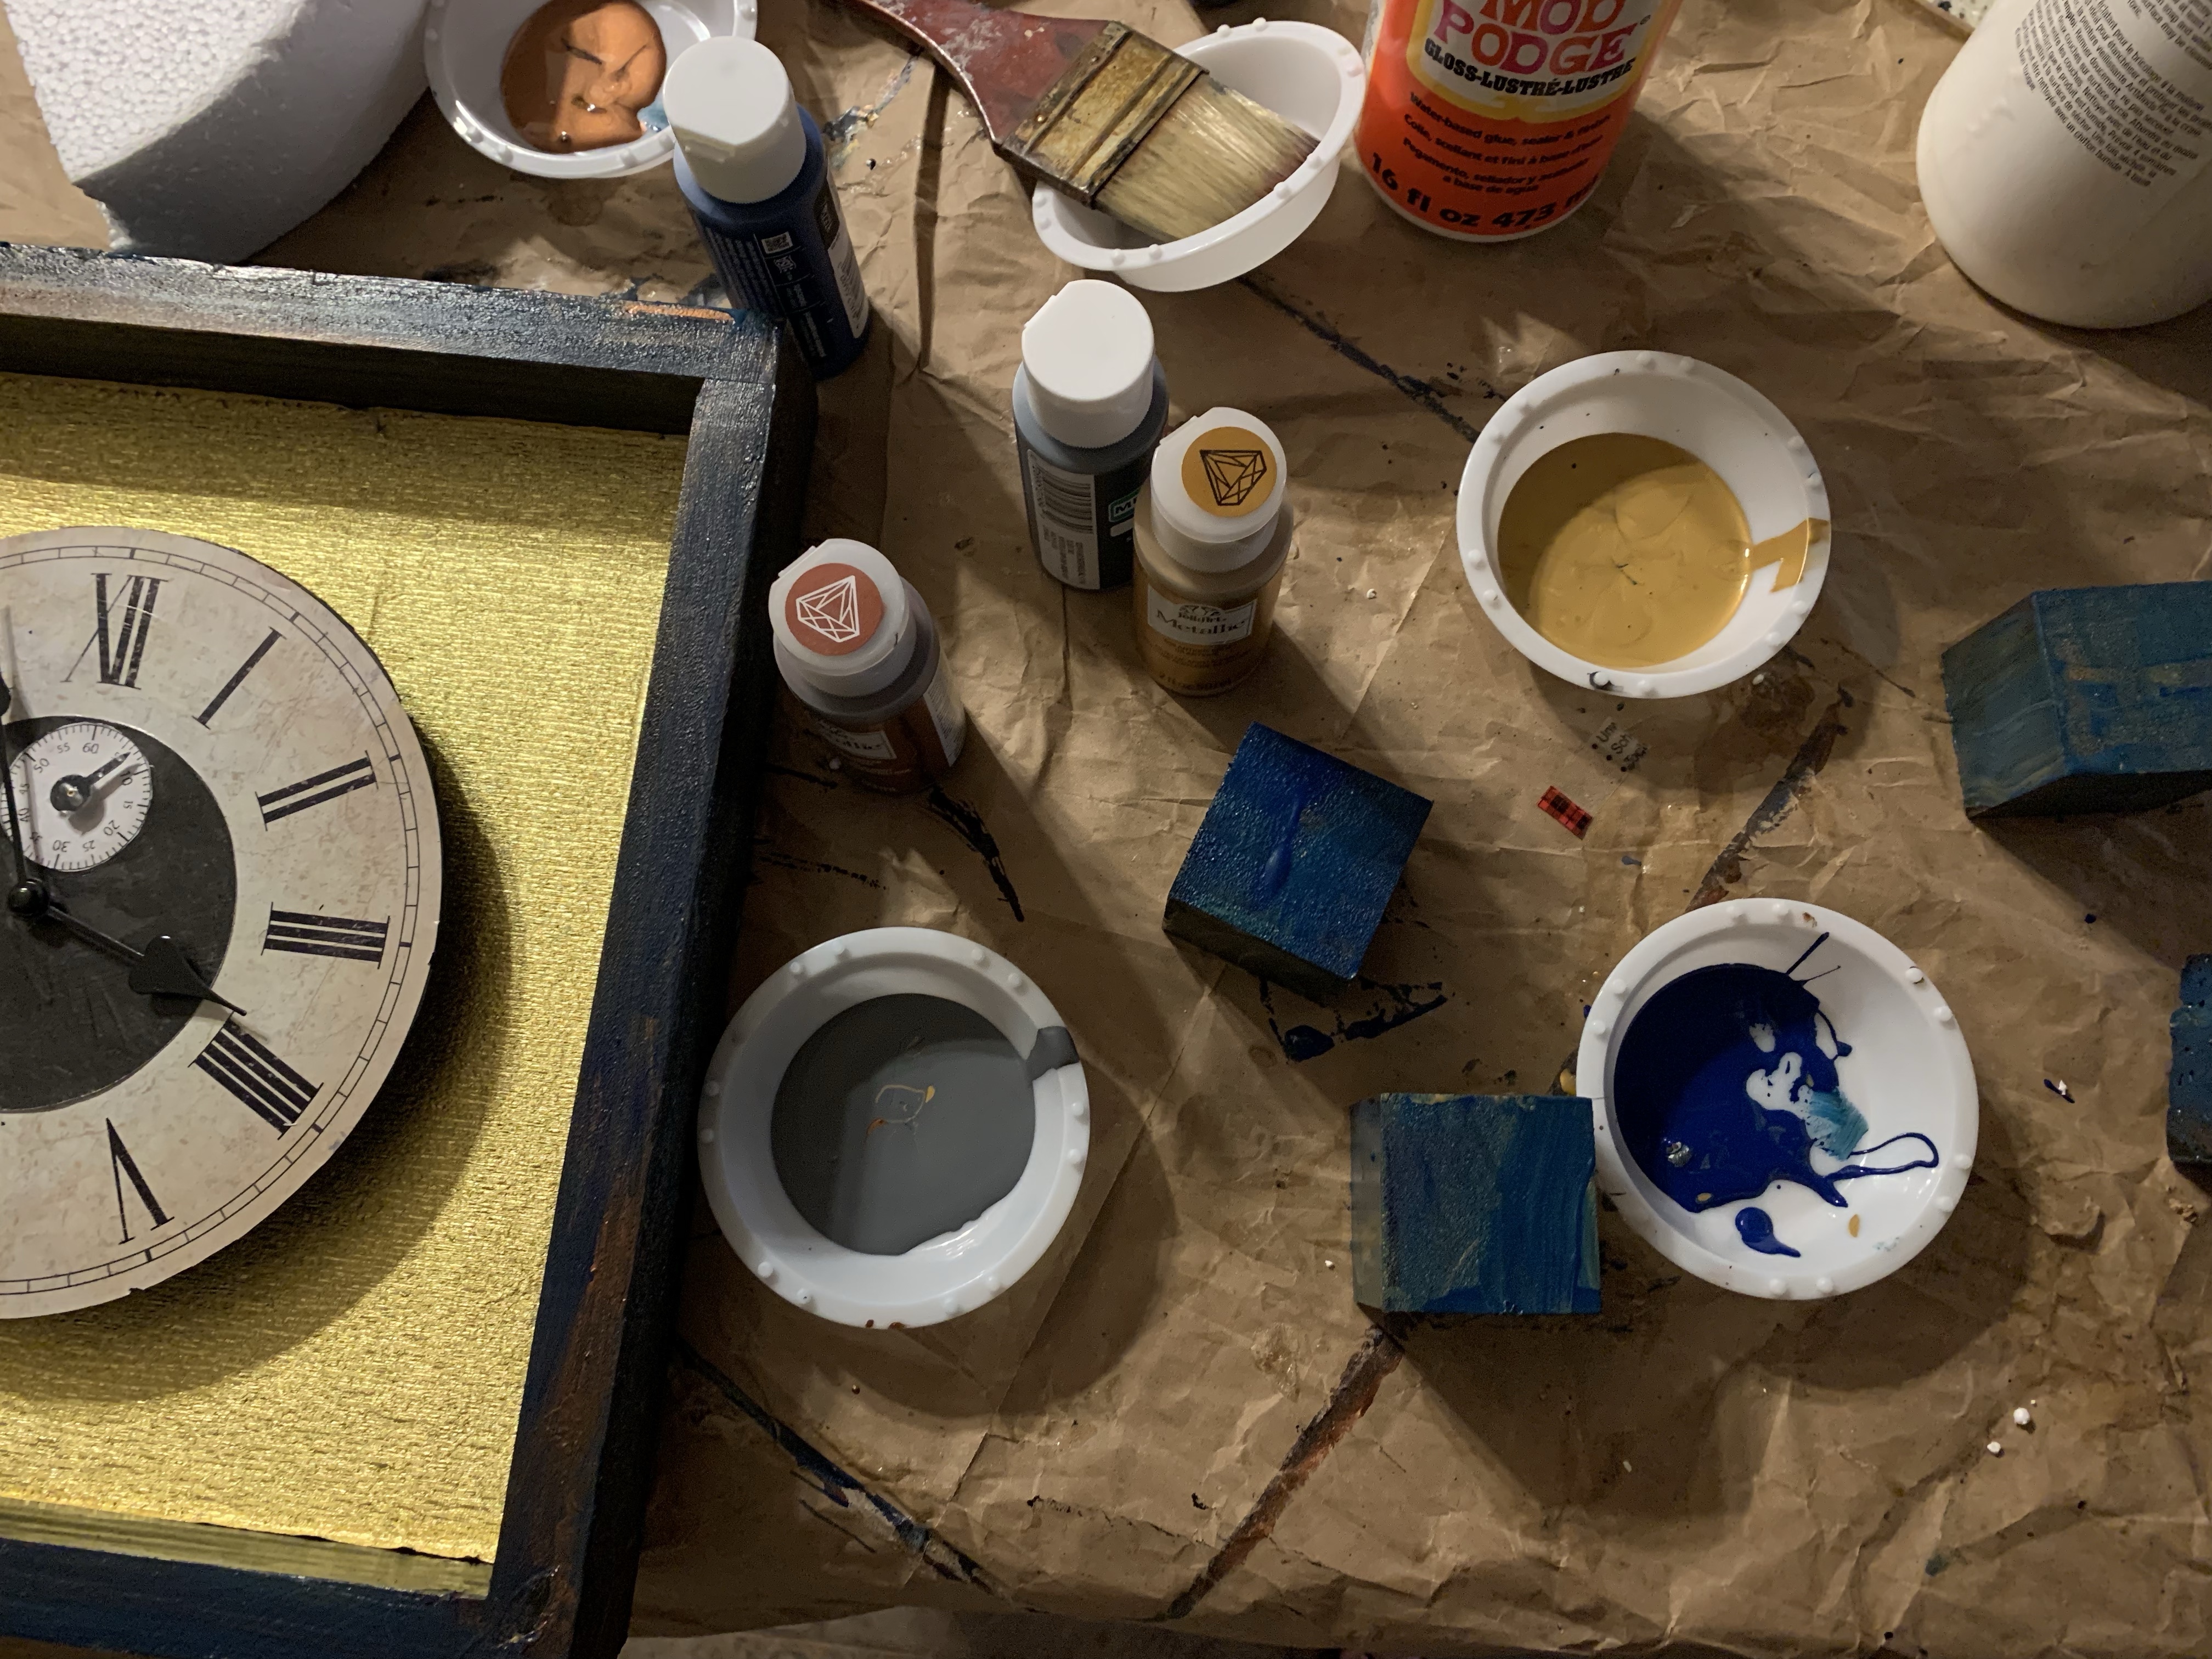
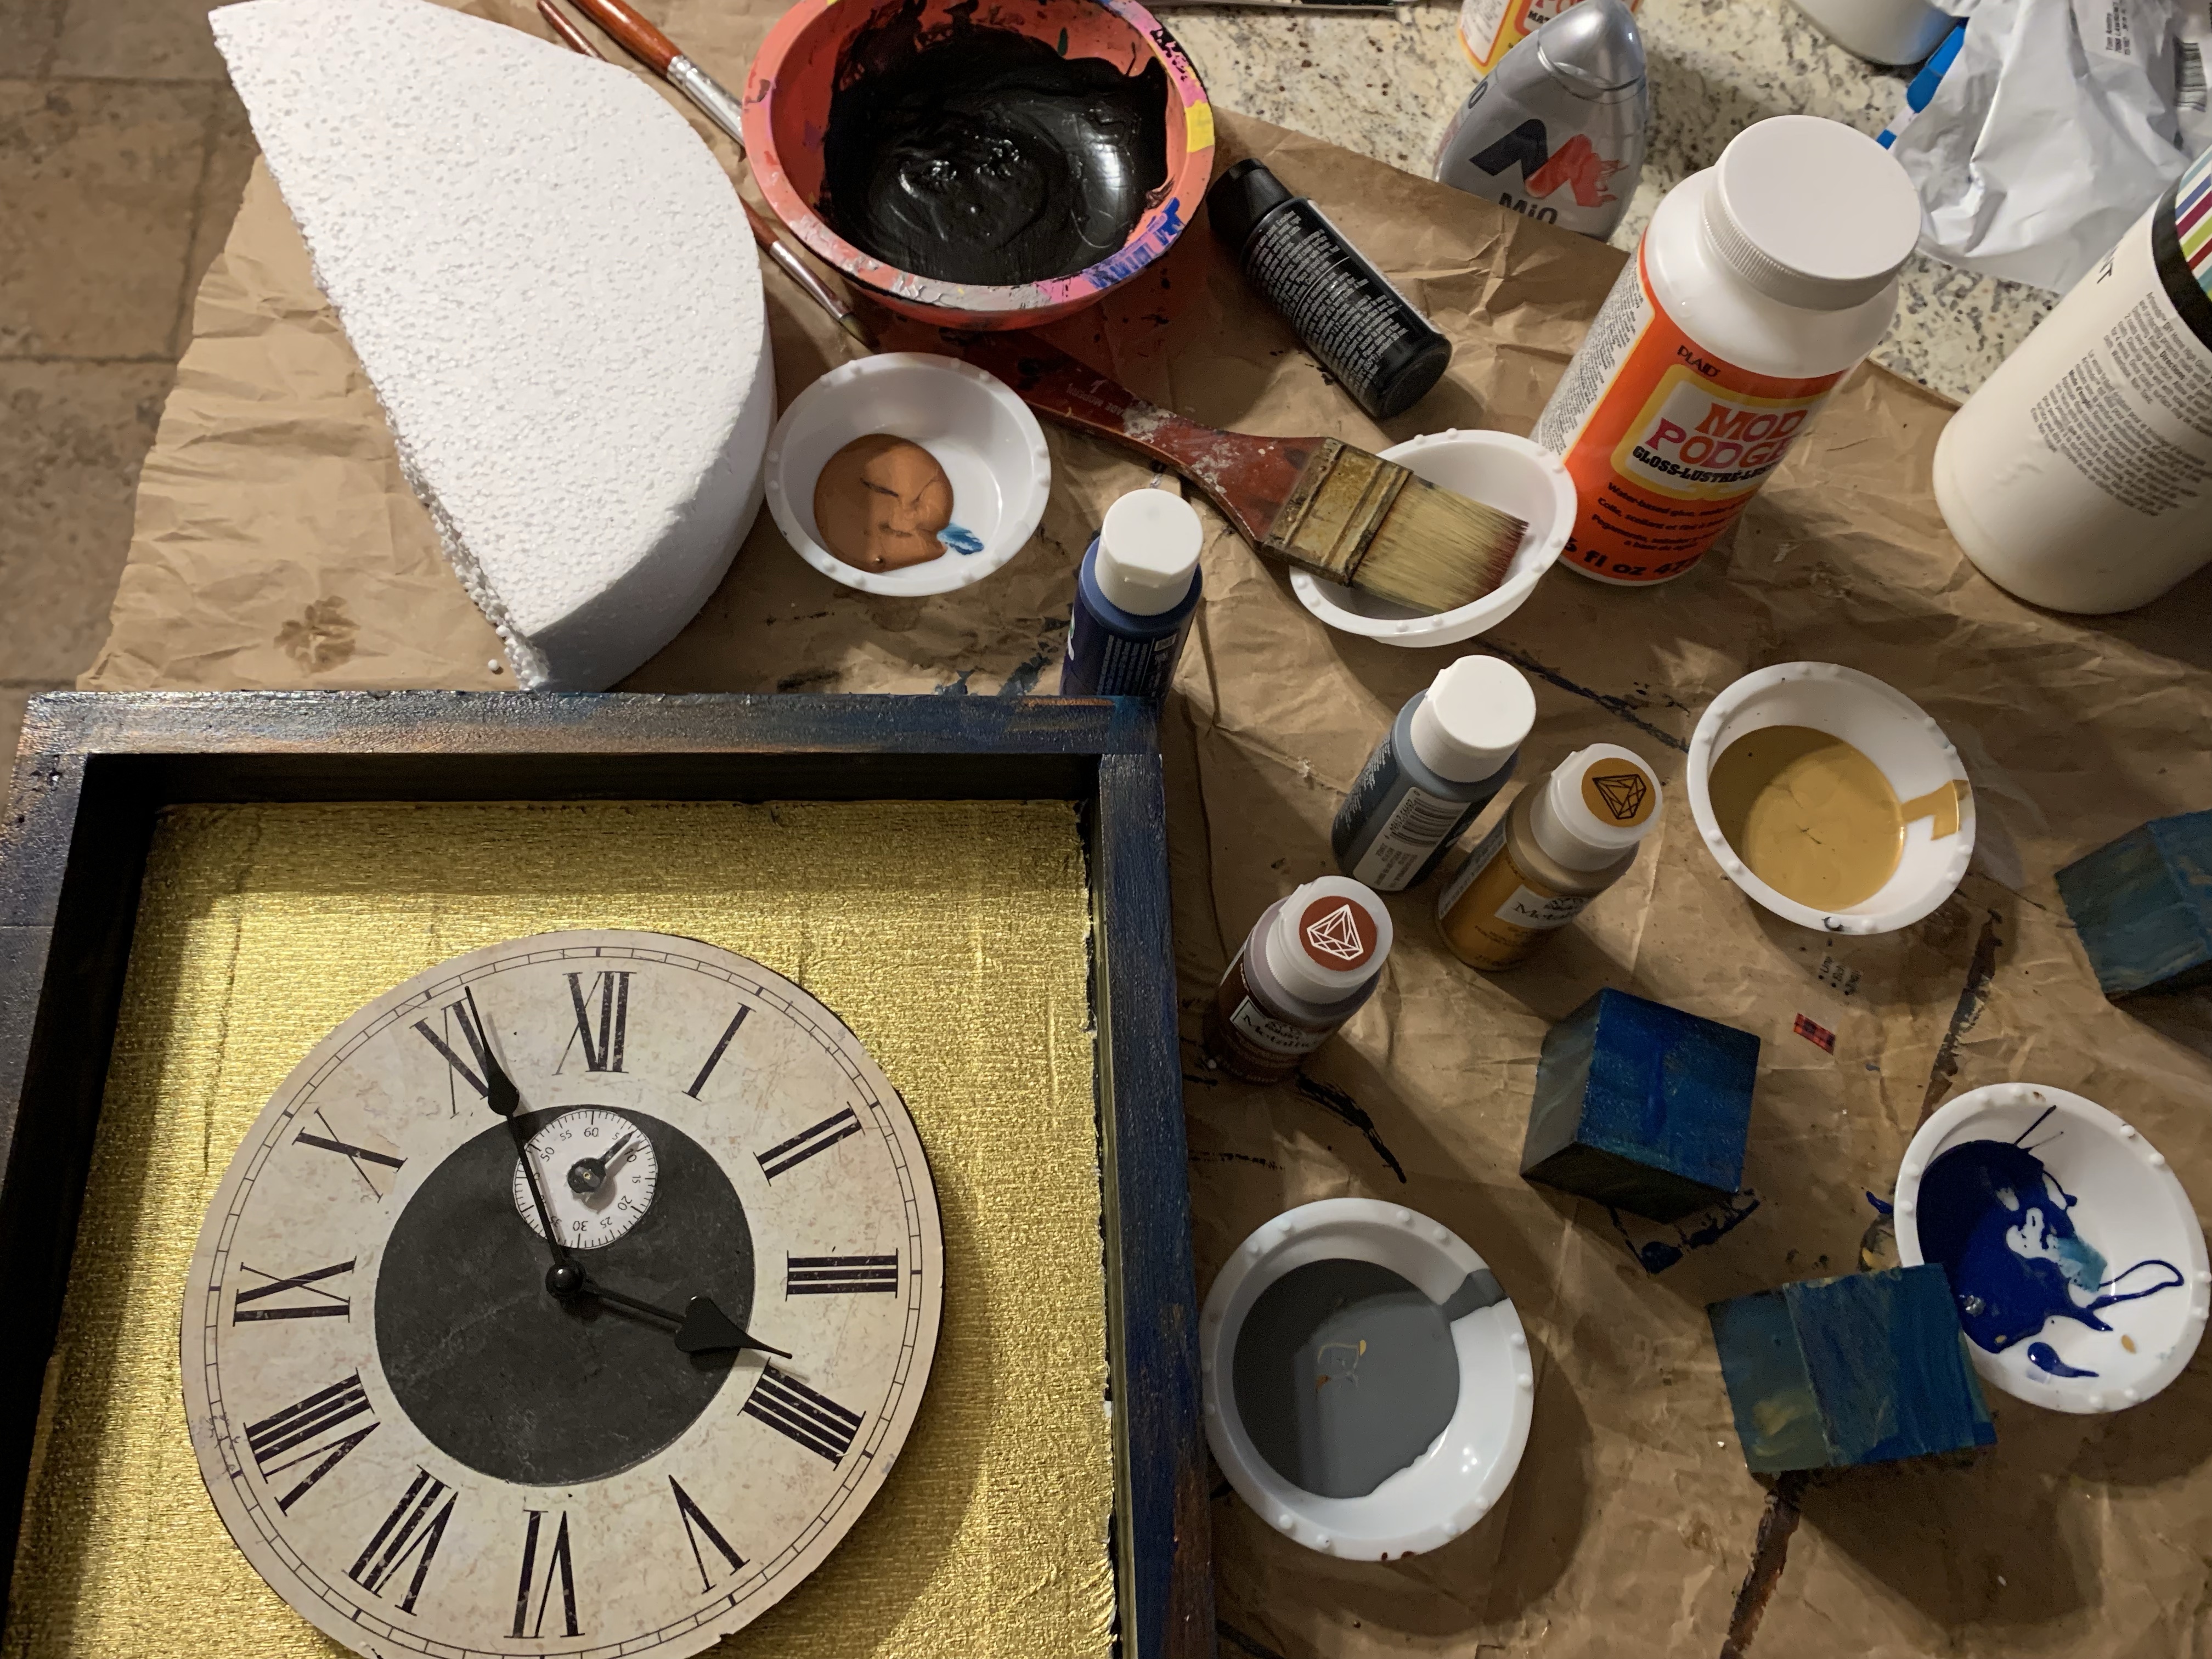
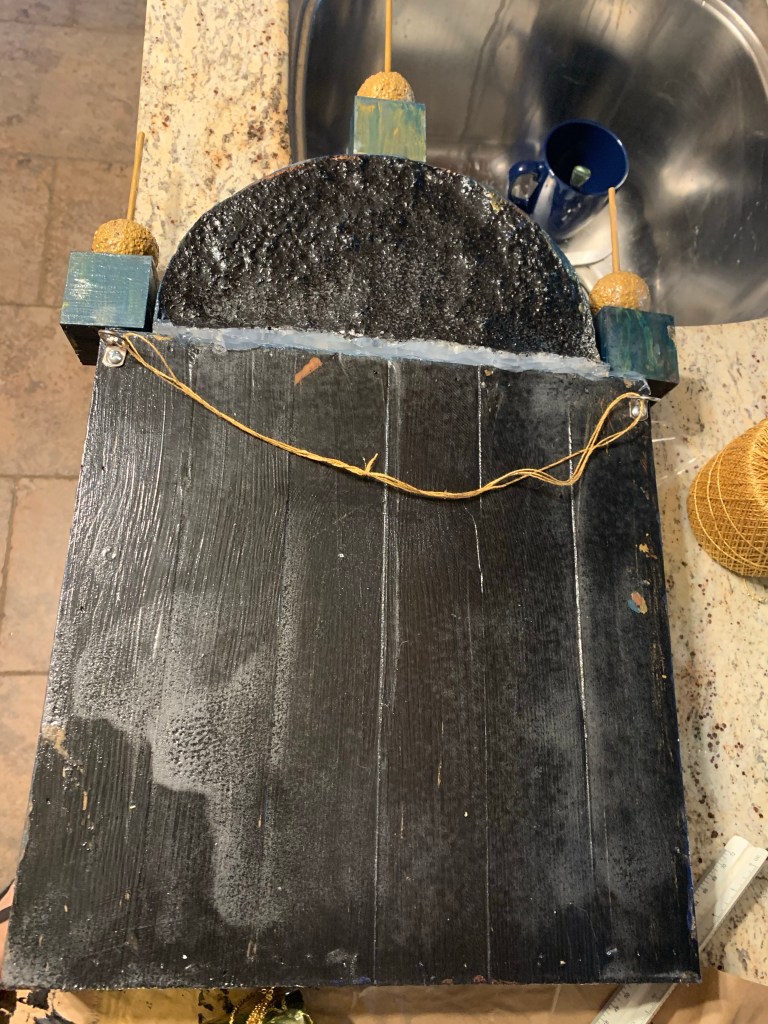
I started with this 12 x 12 box I found at Walmart. This was the exact shape I was looking for, so I started by painting it all black inside and outside. Once the black paint dried I used metallic gold, metallic copper, and dark granite to add stipes/splotches on the black paint, then used the dark blue paint to cover/smooth out the paints. I wanted to give it an old, antiqued look.
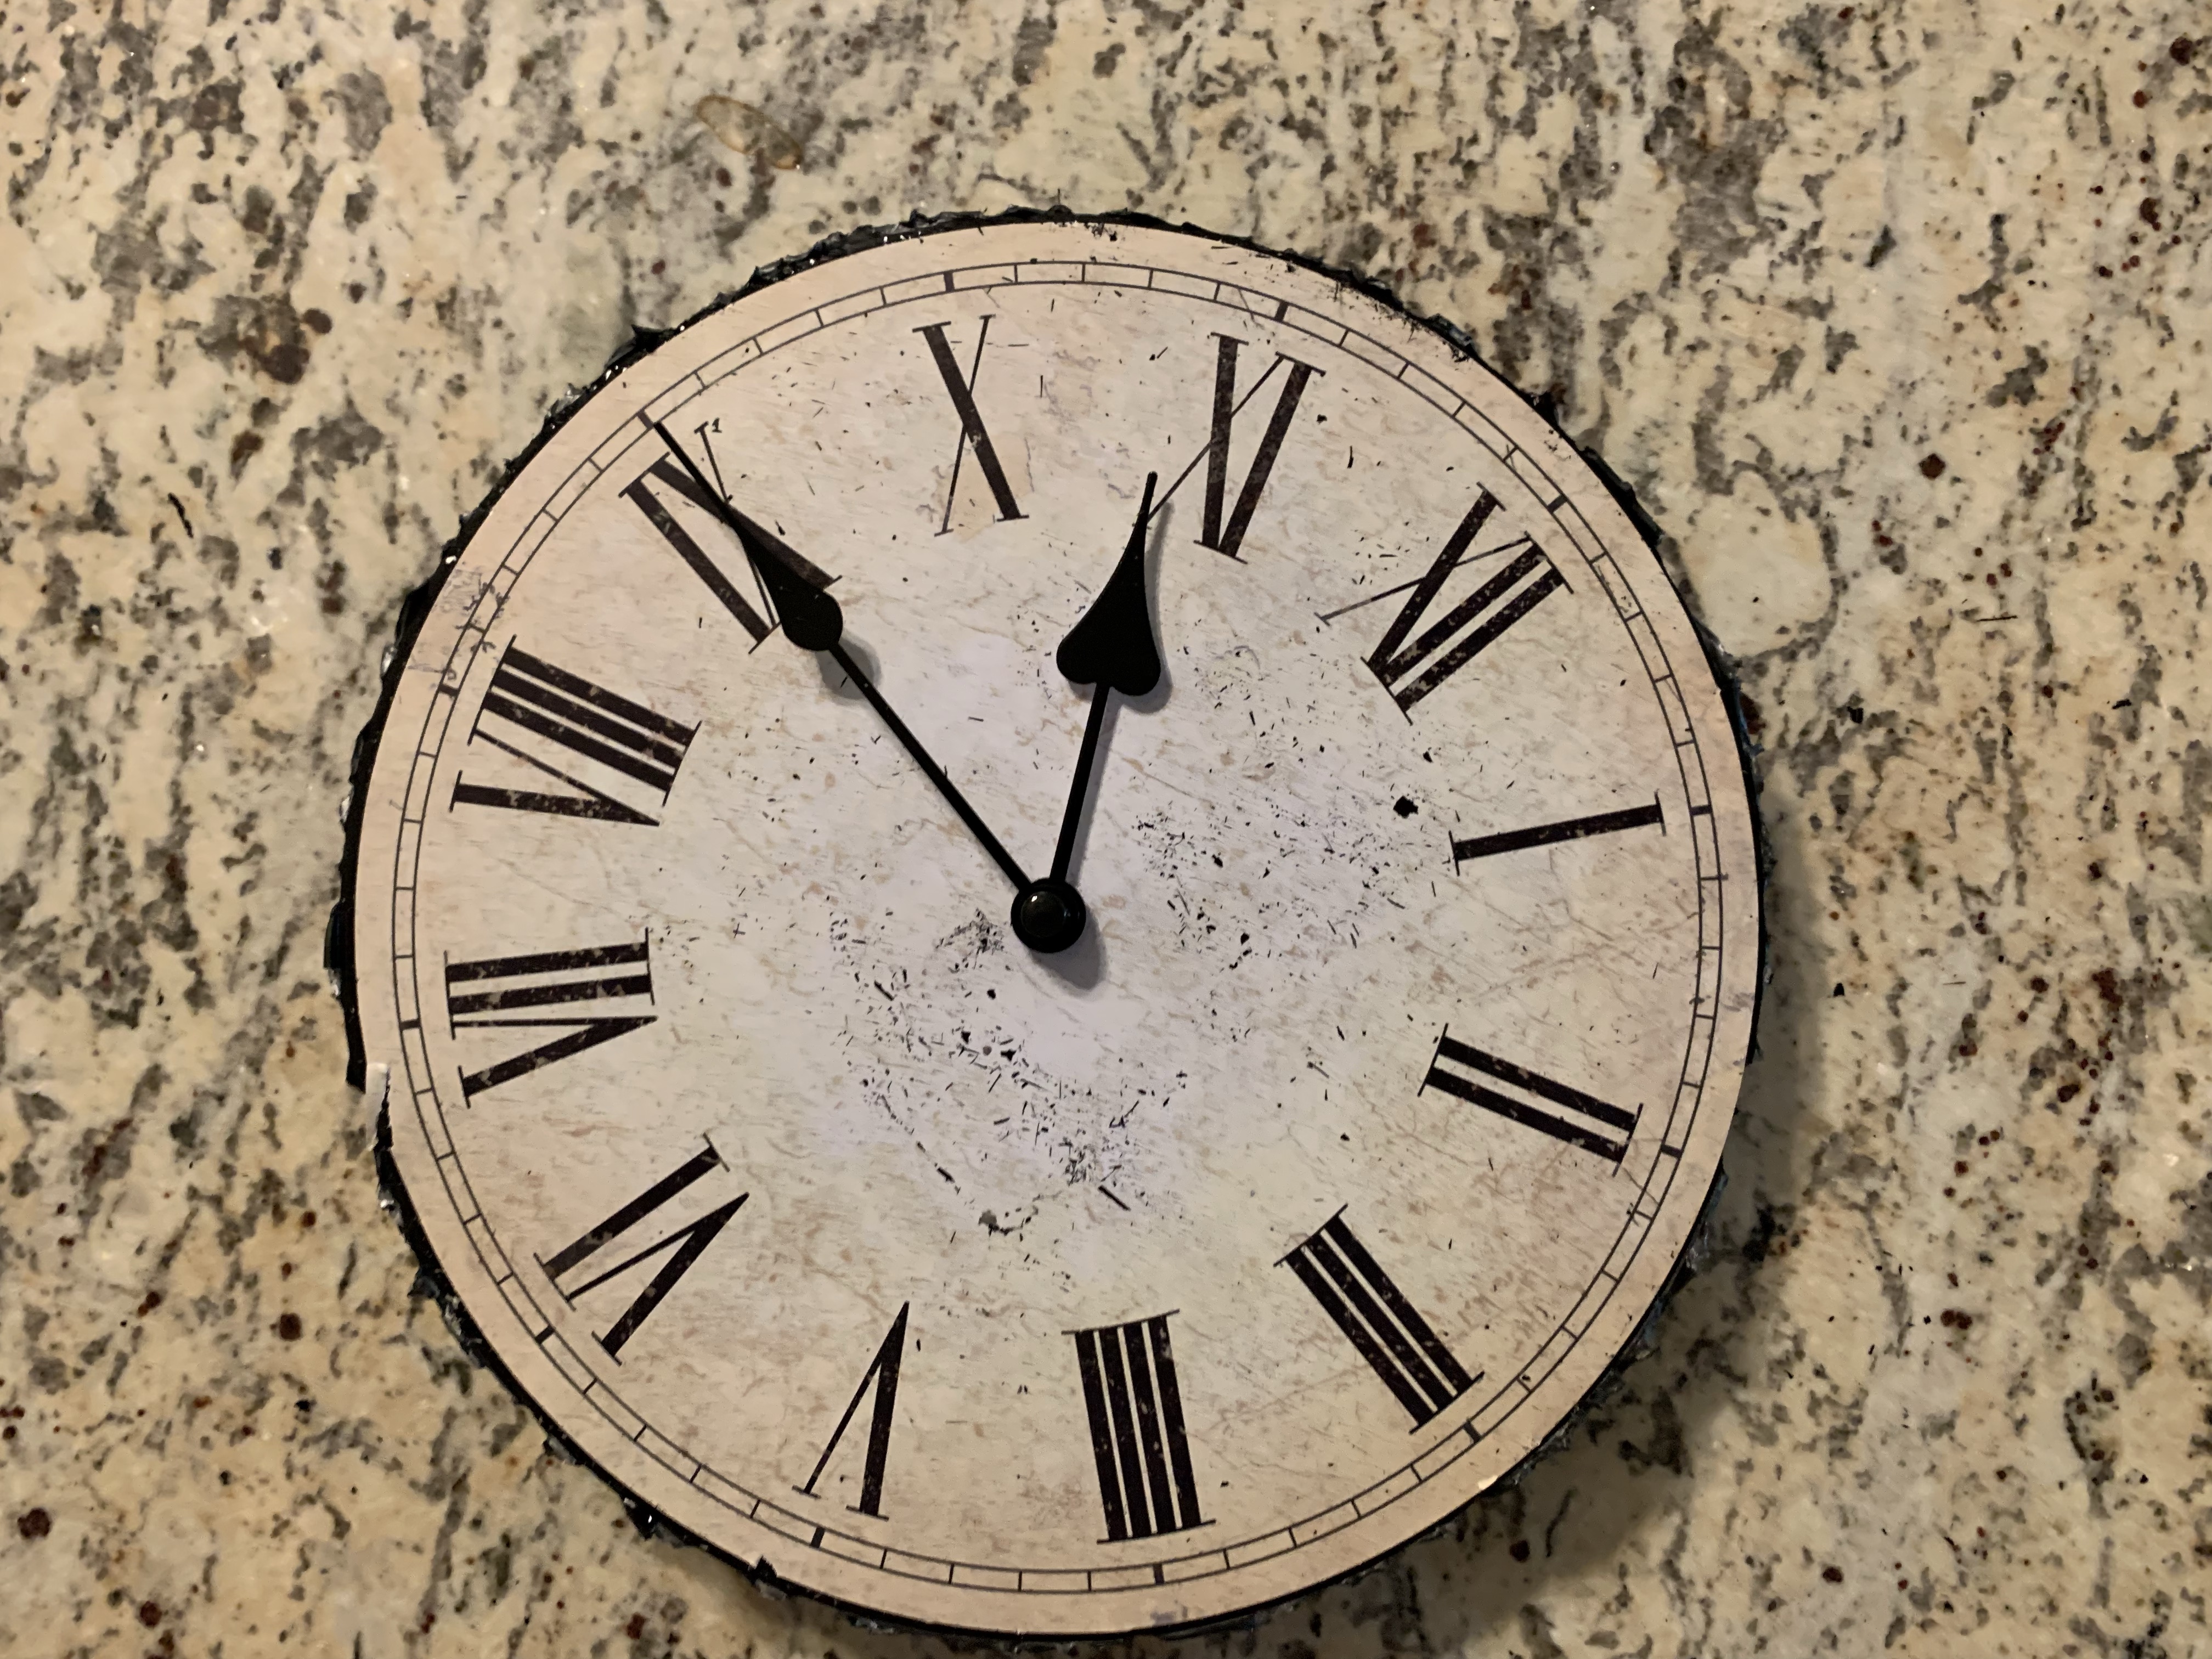
I found a cheap clock that I wanted to use for the clock face, but the clock face was glued onto the plastic, so I had to break off all the plastic bits surrounding the clock face. Then I cut the plastic with scissors to make it as smooth as possible.
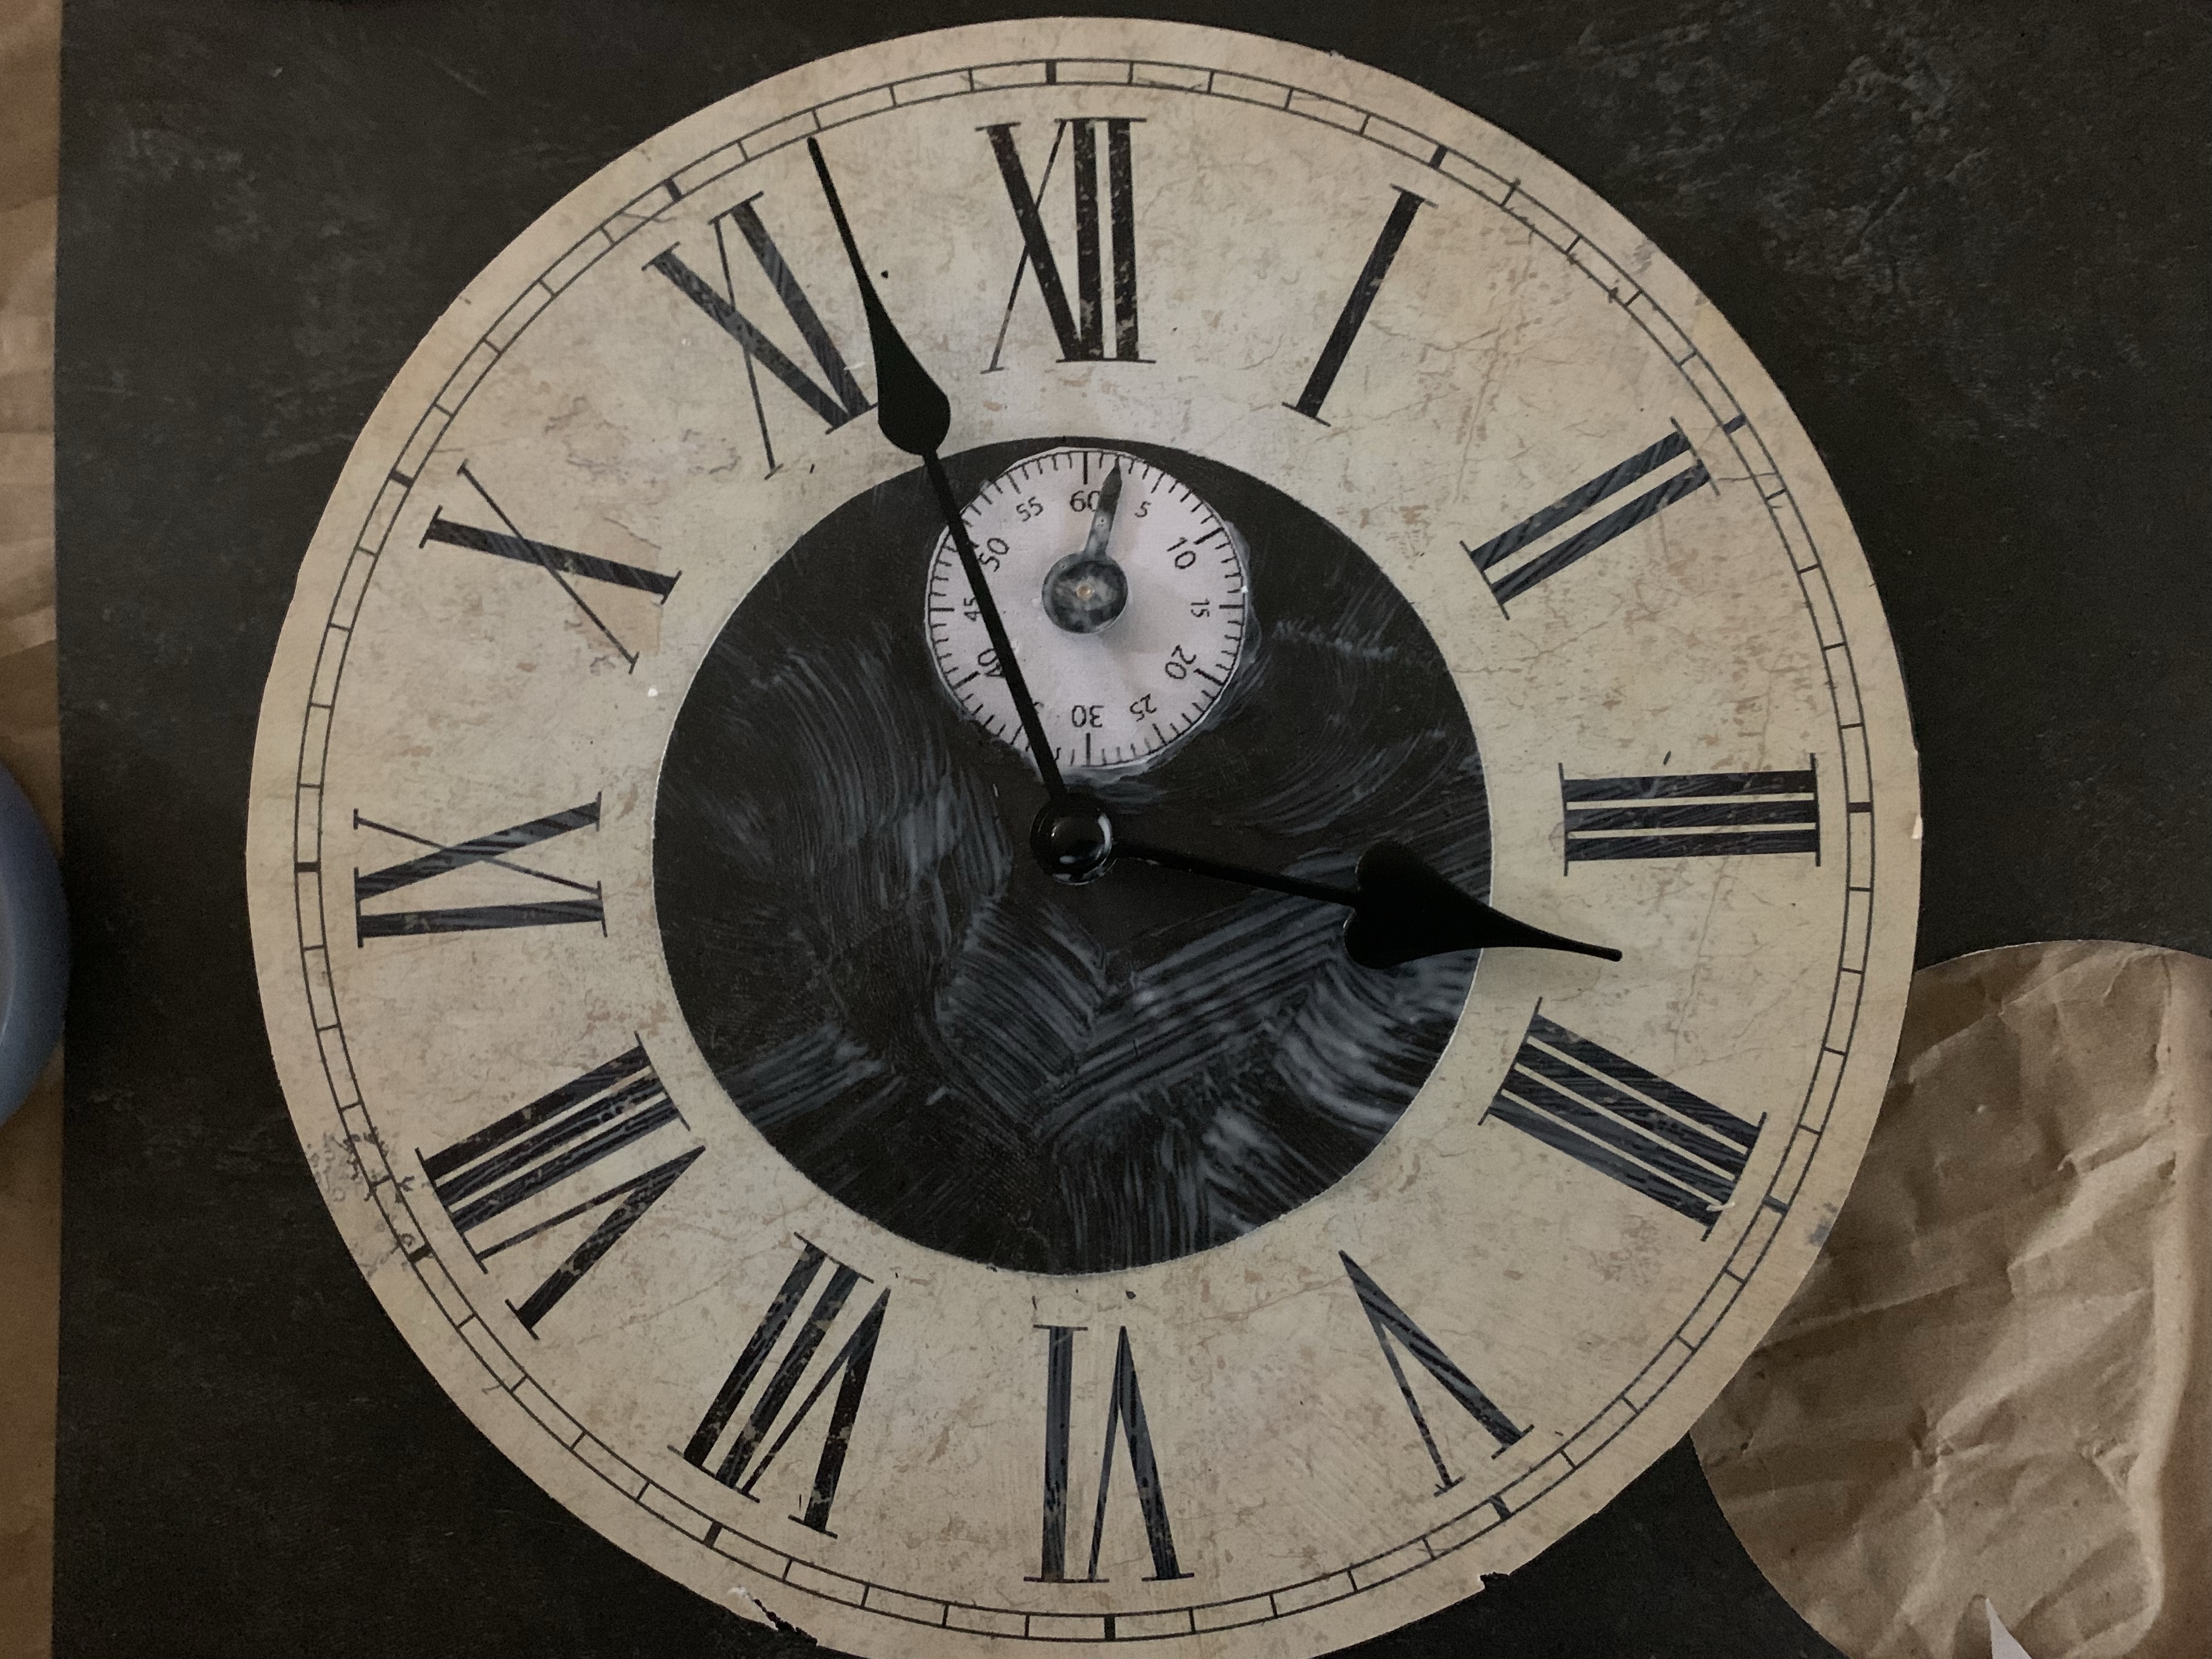
I found an image of a seconds dial online and printed that out. I cut the seconds hand from my clock hands kit to a shorter size. I cut the black marble paper in a circle to place on top of the clock face. The black circle was glued on top of the clock face and then the seconds dial was glued on top of that (under the XII). I used a glue gun to glue the seconds hand onto the seconds dial.
I glued the gold scrapbooking paper inside the wood box. Then I used the glue gun to glue the clock face into the wood box.
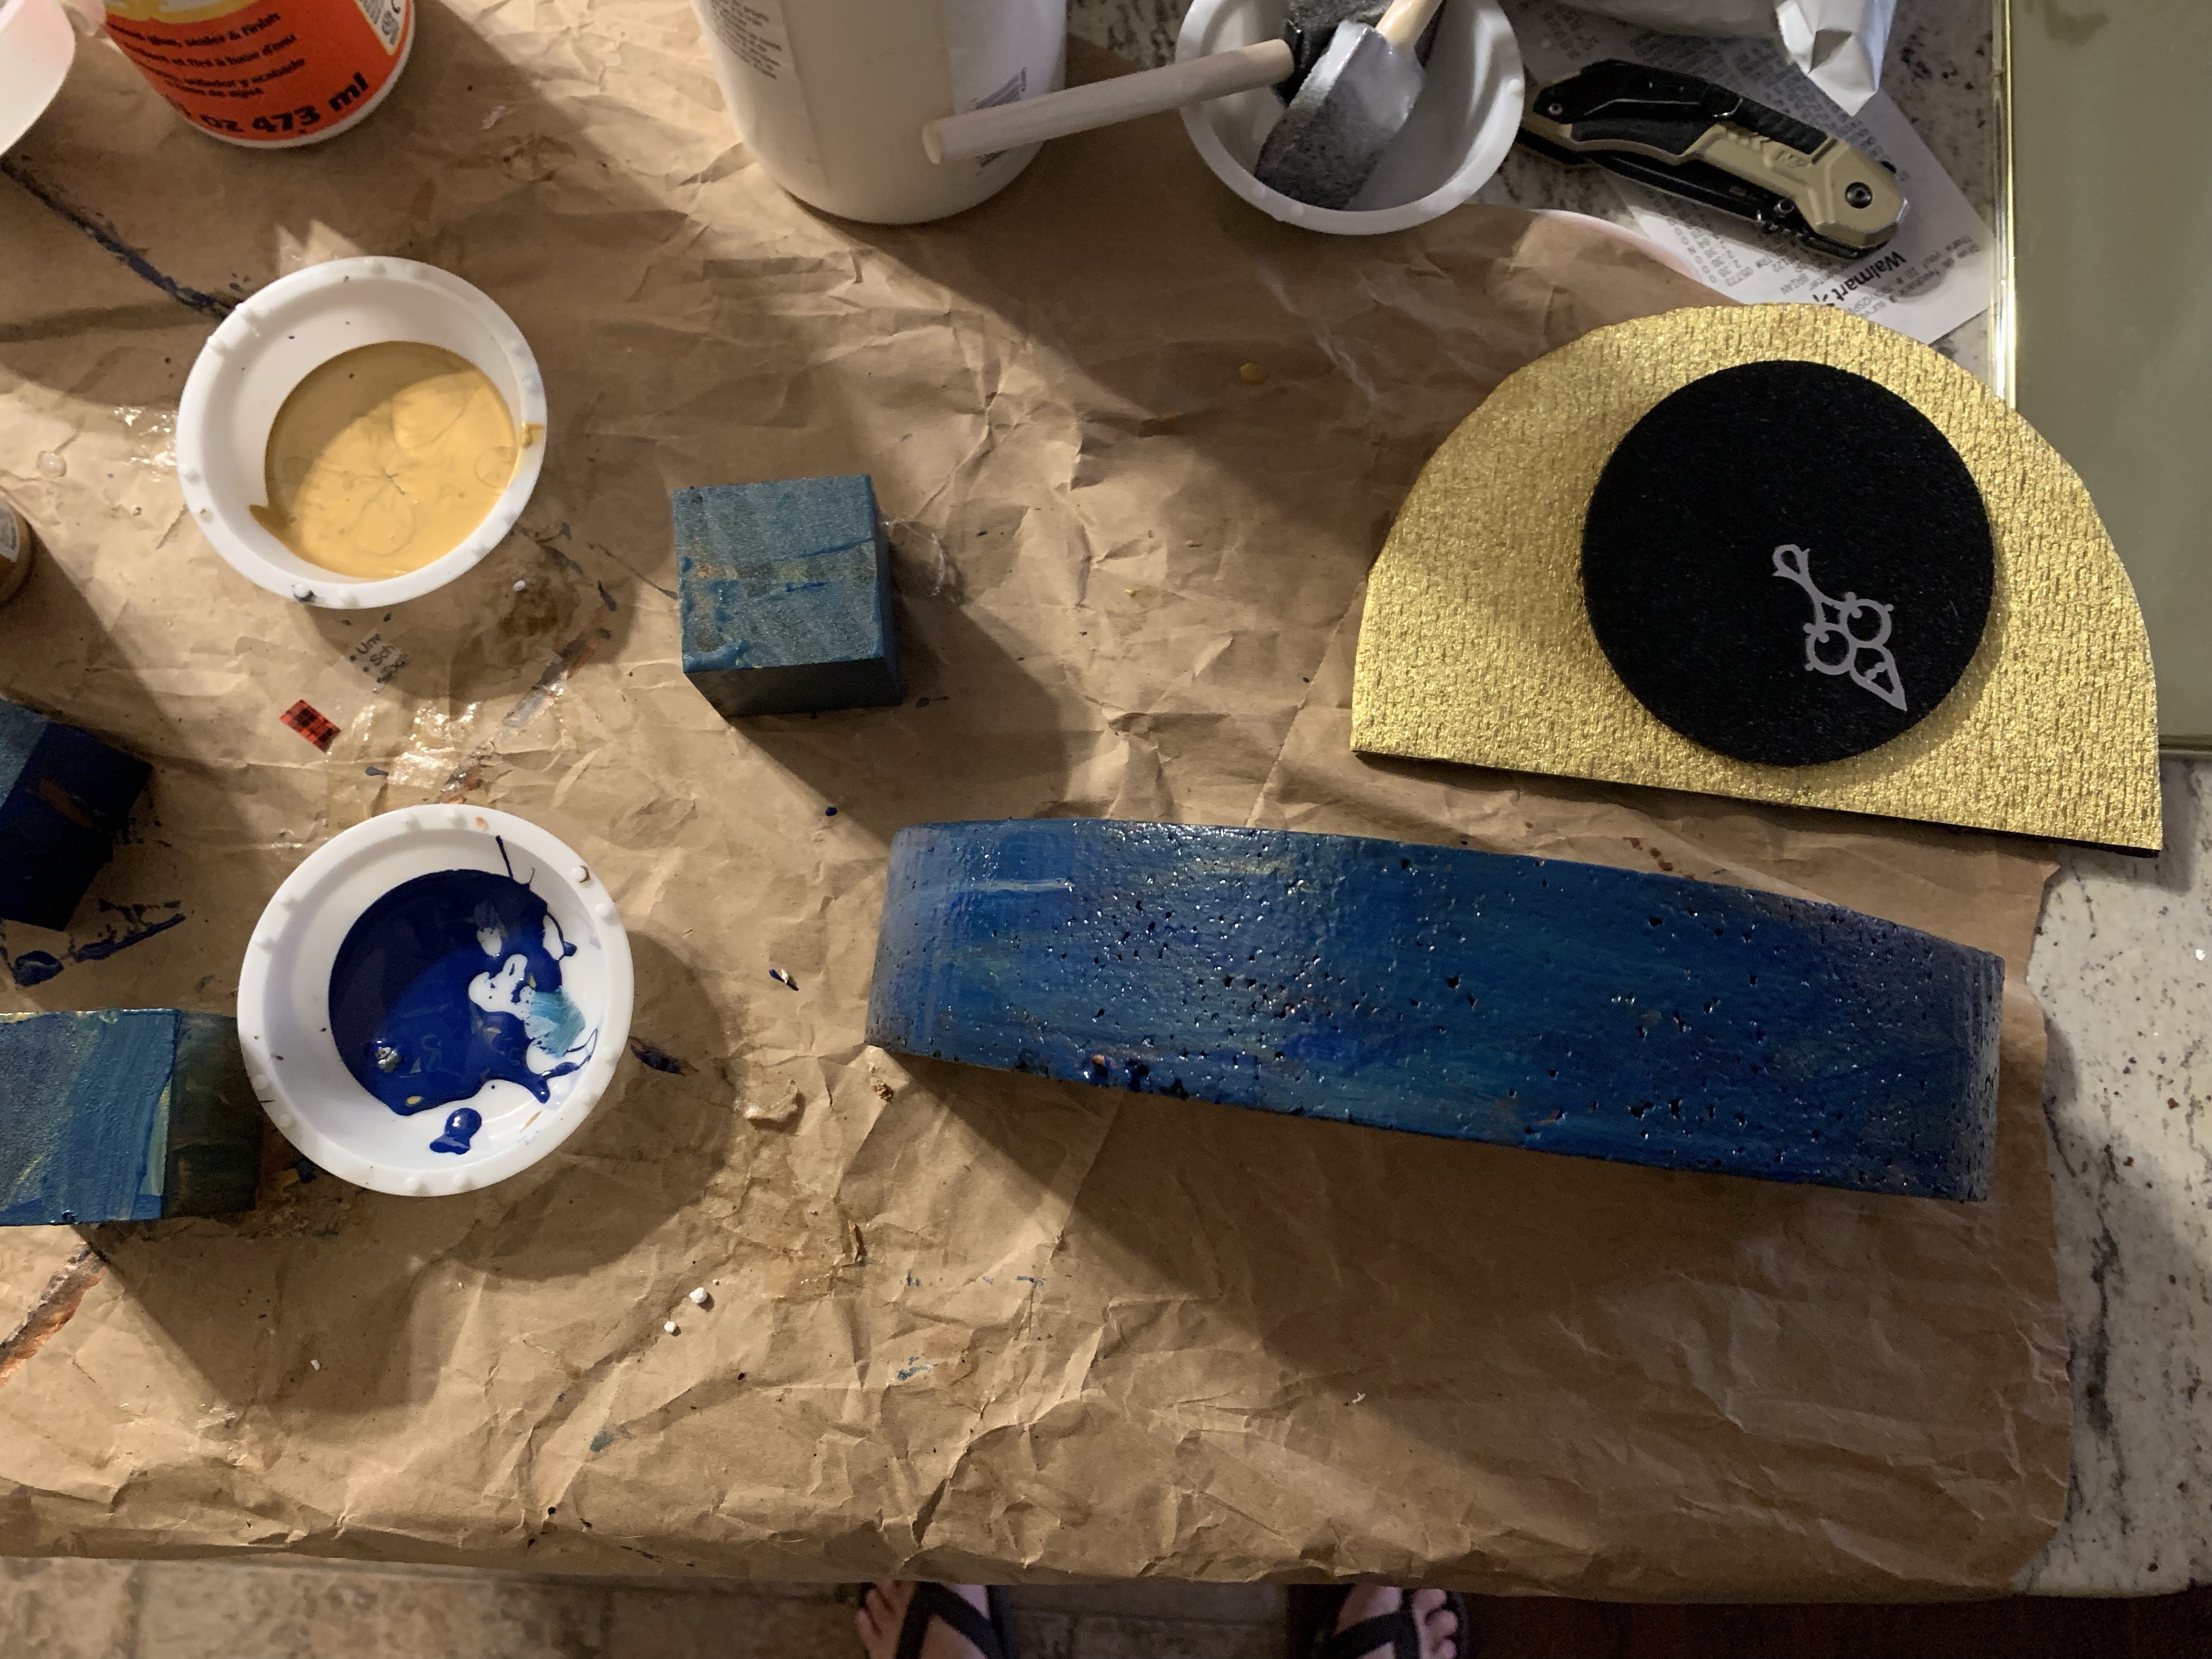
Next, I took the Styrofoam circle and cut it in half to have a half circle. The box was 12 x 12, so I got a 10″ diameter circle, so I’d have 2 extra inches at the top. I painted the Styrofoam the same way I painted the box, as well as the 3 wood blocks. At the same time I had a piece of card board that I cut to fit inside the half circle. I glued more gold scrapbooking paper to the cardboard. I took the cork coaster and painted it black The minutes hand from my clock hand set was glued on top of this. Then this was glued on top of the gold cardboard. Then the gold cardboard was glued to the Styrofoam with a glue gun. Now the whole thing was glued together, on top of the clock box, using a glue gun.
To make the Grandfather clock weights, I used toilet paper rolls and glued the gold wrap on top of them. I made four. I also bought an actual pendulum, so I didn’t make one, but as a back up I would have used another cork coaster and the gold wrap, if I had to make one.
I drilled holes in the bottom of the box so the weight and pendulum chains could hang through. I attached the chains, weights and the pendulum to the box. Next I glued the plexiglass on top of the block. I specifically purchased a 12 x 12 size so I wouldn’t have to cut it. Originally I wanted to crack or break it so I’d have the cracks in the glass, but the plexiglass was too strong. Probably best anyway because it probably would have been harder to glue that on if it were broken.
I used a sharpie to draw the cracks in the glass. Then I glued little spiders on the plexiglass. I tried to use a spray rubber to help protect the clock from the elements since it will be outside for a month. Unfortunately, despite the layers of paint and sealers that I had on the Styrofoam, it still started to melt a little when I applied the rubber spray.
I bought some shellac, so I will likely add more waterproofing before hanging up the decorations in October, but for now, the clock is done and is waiting to be hung on the tree.
It’s been two weeks since the 2022 Pittsburgh Creative Arts Festival wrapped up. It’s starting to be a bit exhausting going to all three days, but still lots of fun.
I started the festival on Thursday with volunteering again. I kind of enjoy it, I get to meet people and spend time at the festival without spending too much money. lol It also gave me time to complete the Sunseeker Pullover I was working on, so I could wear it on Friday. And I got some time on the floor to shop, and spend money. Thursday I wore Charles Voth’s Serengeti Tank and got a lot of compliments on it.
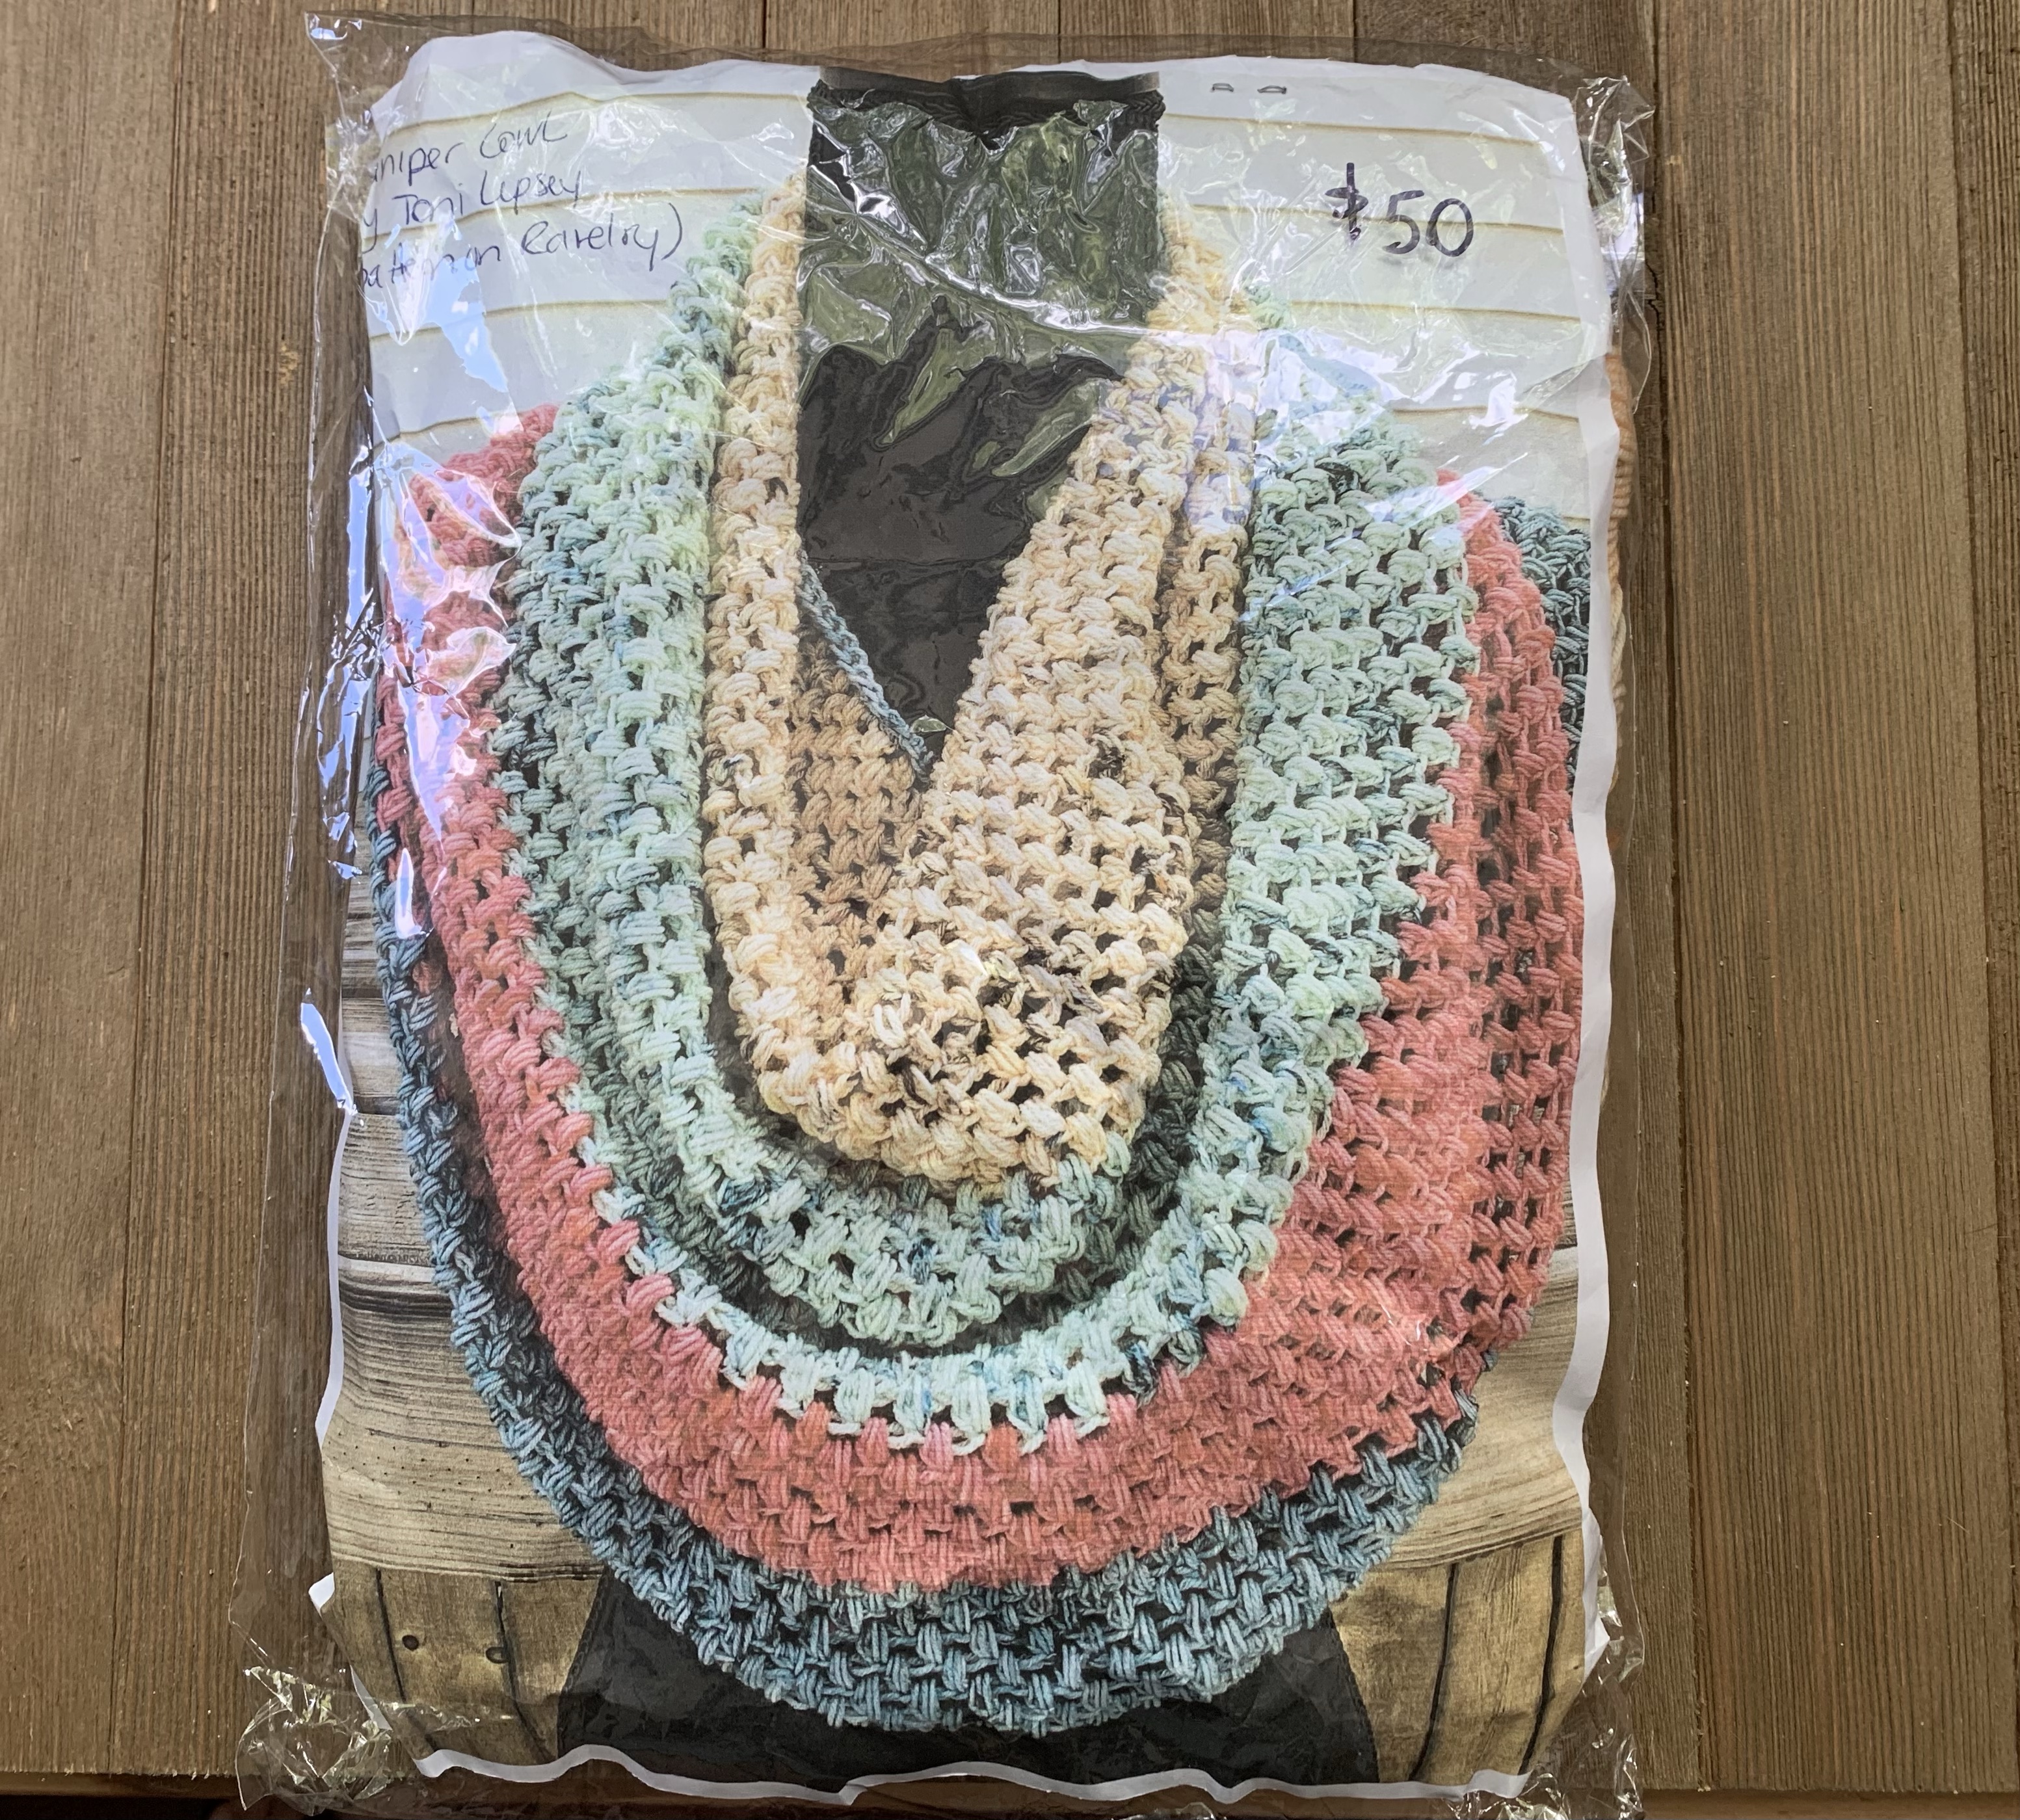
Mom came into town this year to attend on Friday and Saturday and we took four classes together. We started out with Tunisian Crochet for Absolute Beginners taught by Toni Lipsey! This was my third attempt at learning Tunisian crochet. I started off ok, I can do the simple stitch easy, then we switched to a honeycomb stitch. That’s when it all fell apart. I wanted to cry, I fell behind. I thought, this is the last time I’ll try Tunisian crochet. But I will keep trying. I bought Toni’s book and got it autographed. I also ordered a new set of hooks, so I want to try again on my own, with her book.
Friday afternoon we took Big & Bold Cables with Bonnie Barker. I was able to keep up in the cables class much better. I’ve done cables before, but getting those cables that go underneath are always challenging. Bonnie was funny, she took a break every hour to sing a funny crochet song on the guitar.
Saturday we started our day again with Toni Lipsey for Color Theory for Crocheters. I wore my Summertime Tee for Toni. Other students also wore some of her works as well. I still struggle with color theory, but she really helped to break down some of the ways to come up with a pallet for our projects. I’ve learned that I’m drawn to pinks and purples, with some blues. I like comforting colors, that make me feel calm and serene. It was a really great class, not just about colors and how to pick them, but how they make us feel and how we can try to expand and challenge our color choices.
We finished up the festival with a final class, Crochet Corner to Corner Graphgan for Beginners with Elaine Belfer Raucher. I’ve never done Corner to Corner (C2C) or graphgans before, but I wanted to try, especially to learn about color changes and bobbins. First we got a crash course on how to C2C, which was relatively easy to pick up. We also learned how to create the patterns on stitchfiddle. We’re making a little bunny and I plan to post about it once I finish it.
I always enjoy this festival every year and learn so much. I just want it to keep going and I hope we continue to get great teachers and creators.
Coming next, a post on the Sunseeker Pullover that I finished last week, once I get some good pictures of it. I’ll also post my C2C little sampler blanket. And right now I’m working on my Halloween decorations for the year, Stranger Things Season 4.
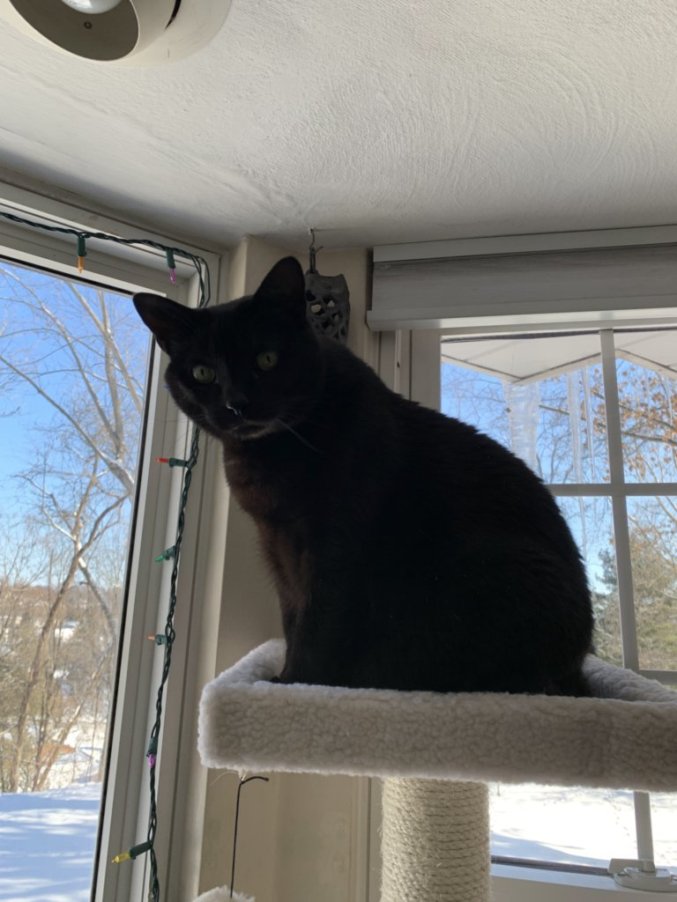
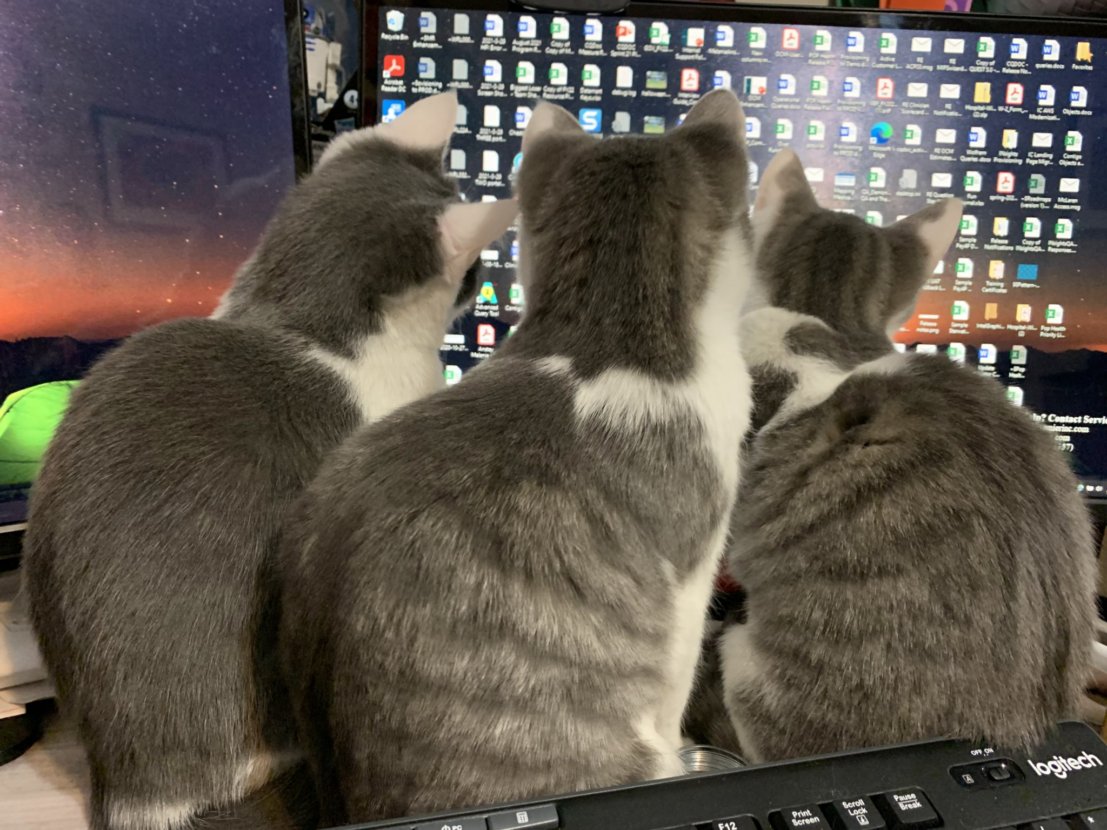
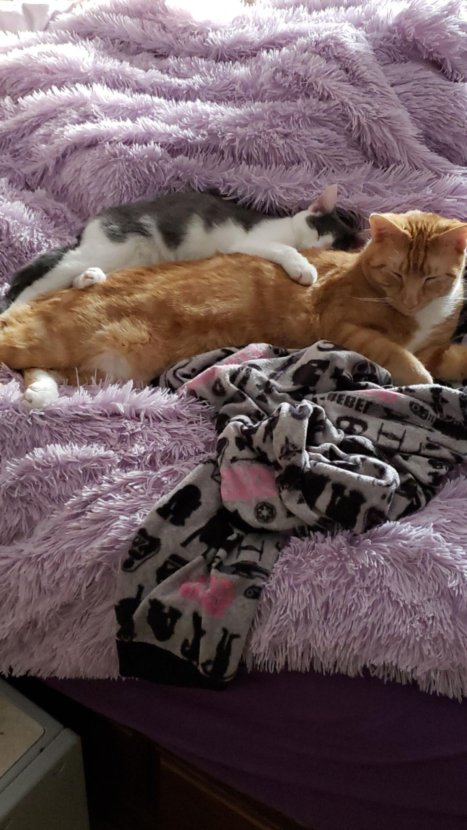
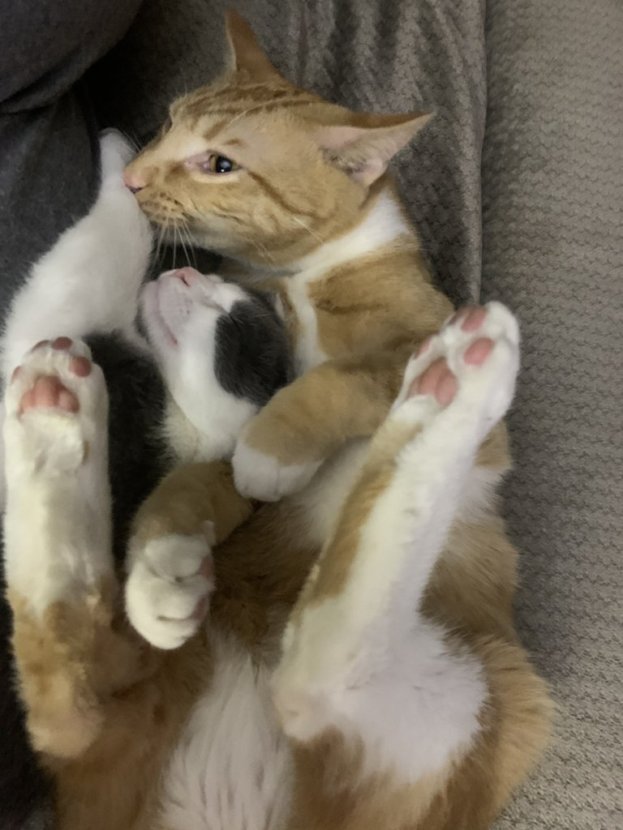
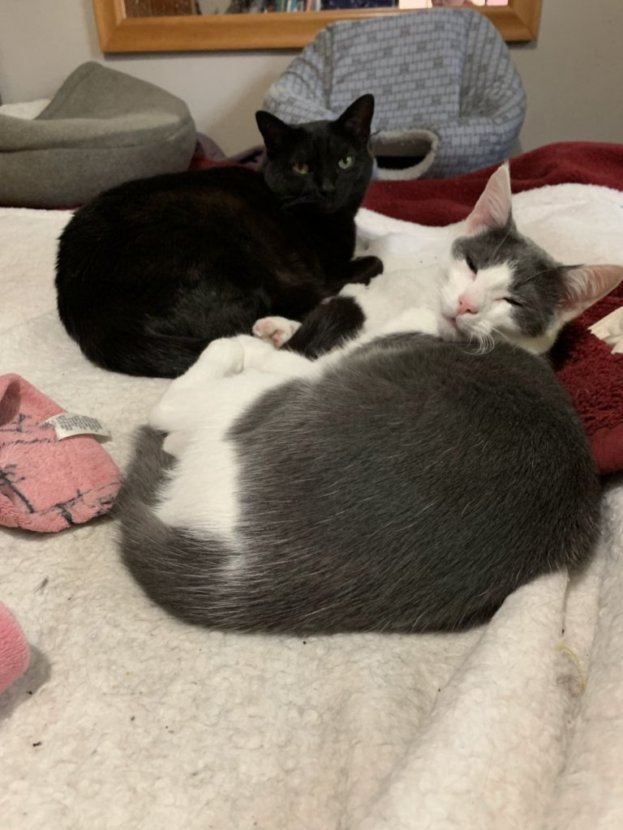
I’ve told the story of Georgie and how nothing worked out in the end. Tuna was sick and we just couldn’t get things to smooth out in the house. Well, Tuna passed away last December and soon after her passing we adopted 3 kittens. What are we crazy? Why would we adopt 3 kittens with all the cat turmoil in the house?
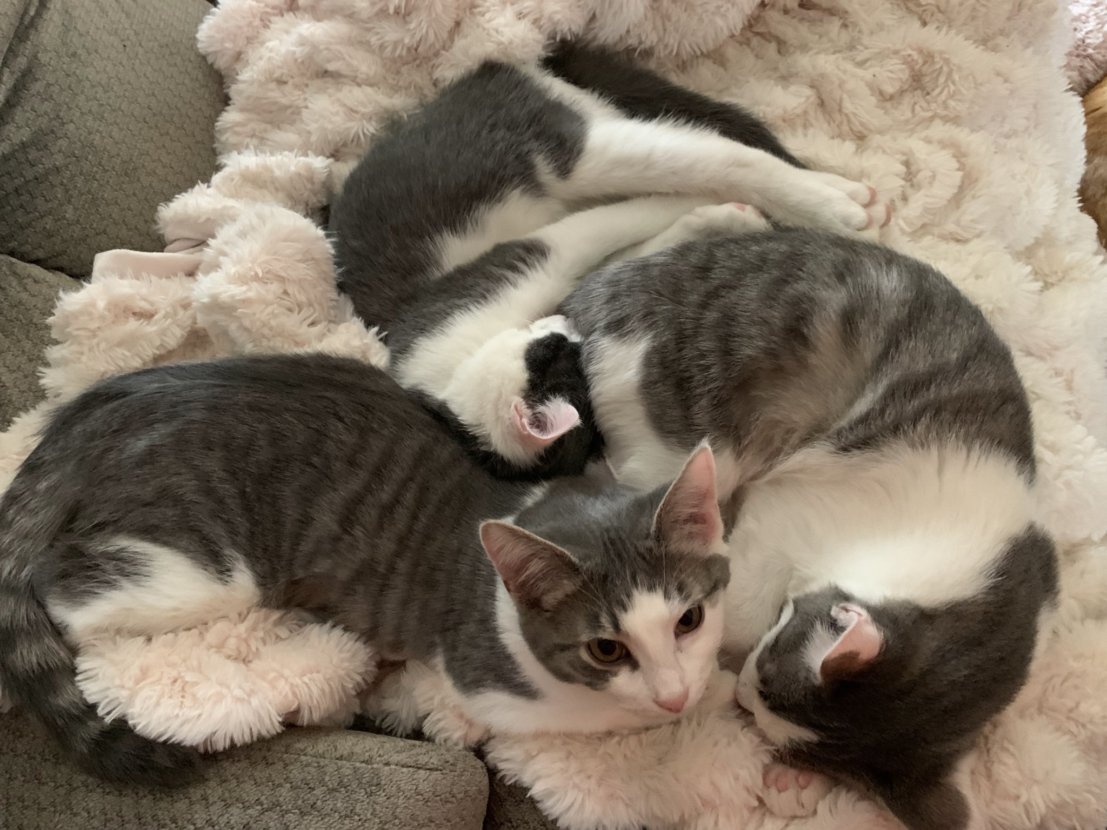
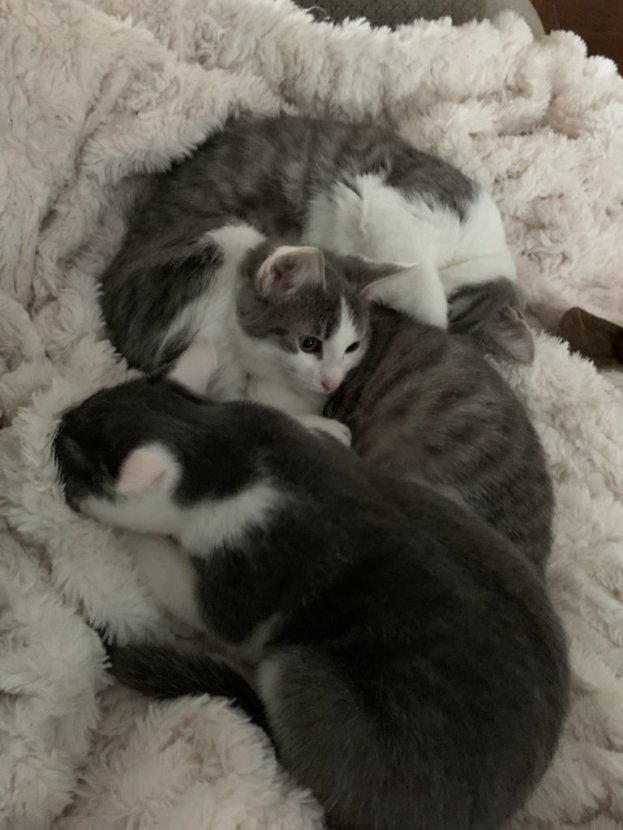
Well, to tell the truth, things were pretty settled in the house with Georgie. He had his side of the house and he seemed to be pretty happy and he loved us. Plus my husband and I always talked about getting 2 kittens when our cats passed because we figured we were older and this would be the last opportunity to adopt kittens. Notice I said we wanted to adopt 2 kittens? Well of course we came home with 3. We named them Jaina, Jacen, and Mara Jade (Star Wars names).
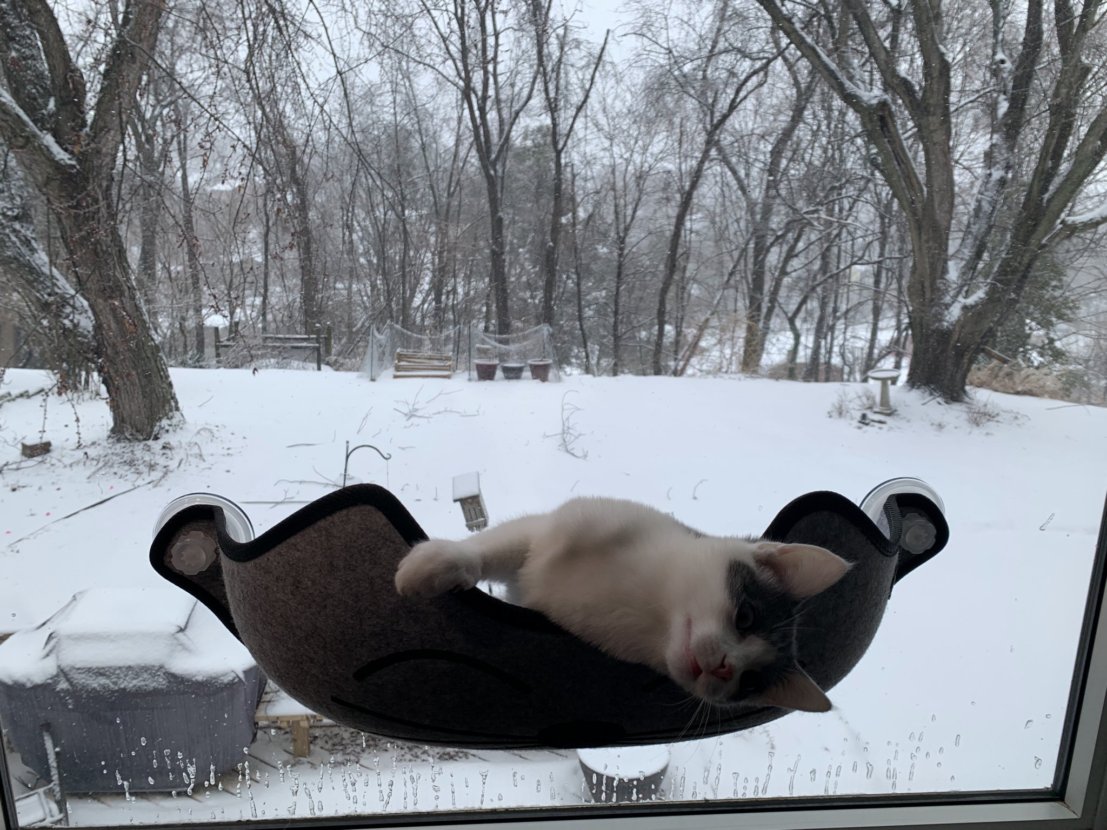
Jaina
Jacen
Mara Jade
We were going to adopt 2 little girls, but their brother was with them when we went to pick them up. He was a cutie pie, and the rescue said, want to adopt him too? No fee. Well this wasn’t really a rescue, more of a pet clinic/charity and sometimes they help cats find homes. They didn’t have anyone to adopt the little boy and they asked us if we wanted to adopt him also. Well if you ask me if I want a kitten, chances are I will say yes. My husband is the same way, and so we came home with three kittens.
Kittens are a lot of work, and three at the same time? It’s a bit insane. It was hard to keep the three of them separate in a room for a week. Finally they broke out and met Pumpkin and Nathan. Well, Jacen is what I call a big ball of love. He is fearless, and curious, and wants to meet everyone. It can be a bit scary as a cat mom to have him so innocent and naïve like that, but it worked out. Nathan was ok with him and so was Pumpkin. Soon after the girls introduced themselves and they all were really good with each other. So success!
Once the kittens were a little bit older, they were determined to jump the gate to Georgie’s side. Mostly Jacen, but Jaina tried too. We’d close the doors and rubberband the doors closed. Then they’d get stuck between the gate and the door. My husband and I were beside ourselves, we didn’t know what to do. I was so afraid that George might be aggressive with the kittens. We decided to introduce Jacen to George first. Jacen pranced in like he owned the room, like always, and instantly was getting a bath from George. They were fine. Mara Jade and George are ok, they’re not friends and not enemies. Jaina hisses at George all the time, or most of the time now. But they also did well overall. George was now integrated with the kittens, and the kittens would jump the gate whenever they wanted, so they owned the house.
After some time, George would break free at the gate and go run to eat the other cat’s food. He would run into Nathan at times and they were fine together! But he still had a bug up his butt about Pumpkin and would try to attack him. Pumpkin was old and dying of cancer at the time. So we were very protective of him. We thought, well if nothing else, once Pumpkin passes things will be ok.
Slowly over time we got to the point were we would let Georgie stay out in the Livingroom with us but he’d still sleep on our side of the house. He was getting better with Pumpkin over time and Pumpkin also started to stick up for himself as well. Then we got to the point where we’d leave the gate open at night. We kept Georgie behind the gate when we went out or when we travelled because we didn’t fully trust that things were good. But once we got back from vacation in July, the gate has pretty much been open the whole time. There was one recent scuffle with Nathan, George started to get worked up and a little too playful/aggressive (he was stalking Nathan), so we gave him a time out on the other side.
As for George’s peeing on the bed? It was practically over for about 6 months, but when we went away for a week in June, I came home to a puddle in the bed. So the tarps went back on the bed. He was really upset about us going away. The tarps stayed and he still had some accidents until we got back from vacation in July and since we’ve been home the peeing on the bed has stopped again.
Believe it or not, we are all one big happy family again. Unfortunately, we had to put Pumpkin to sleep this week. He was the last of our original six cats. Now we have 5 cats, all younger, so thankfully we won’t have to deal with loss for a long time now.
So this was the story of Georgie, and how this sweet, sensitive cat had a hard time integrating into a home with many cats, until one day, when this little kitten named Jacen, a big ball of love, came along and made friends with him. Now all the cats are living together peacefully and they lived happily ever after.
After finishing the Kichshaw Stroller Blanket pattern test, I continued to make additional baby gifts for my friend’s daughter, who is pregnant with her first child.
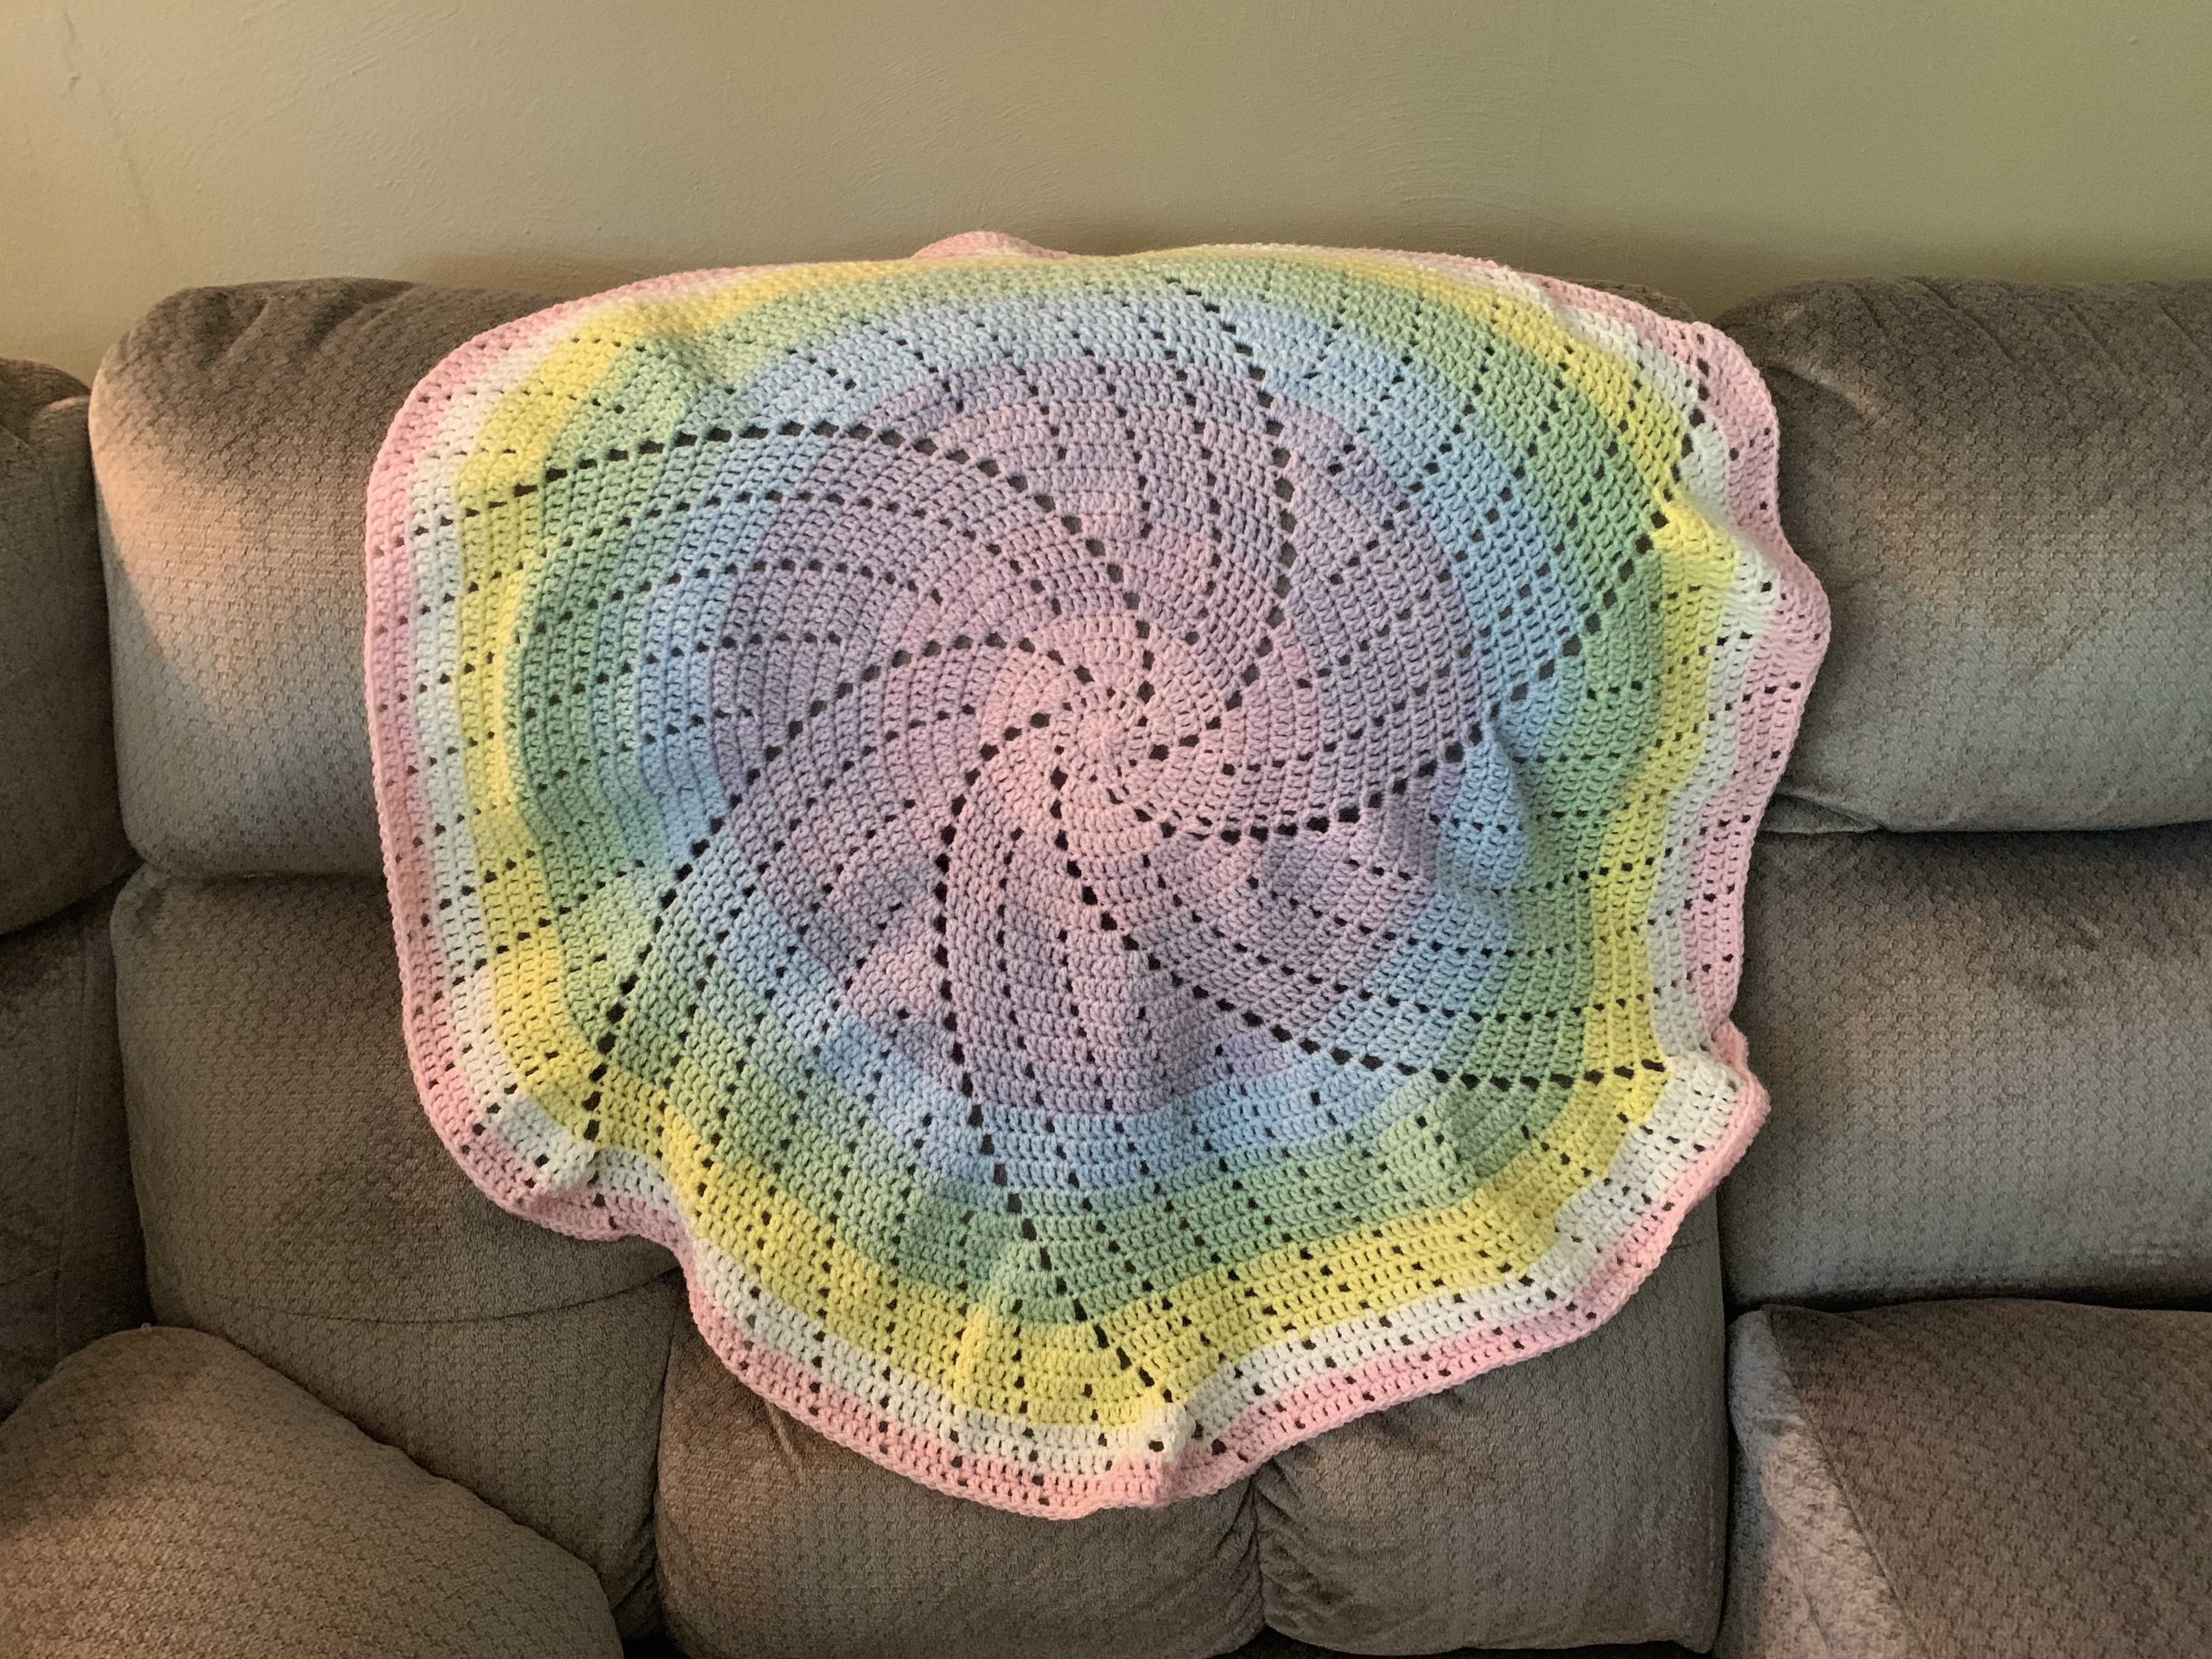
I had actually already completed a Spin Me Around blanket, before doing the stroller blanket. This pattern is free by Catherine Bligh. This is such a simple pattern that is very easy to pick up and just do mindlessly. For this blanket I used one ball of Lion Brand Mandala Baby in Diagon Alley colorway. I thought about extending it or putting a soft border on it, but I had to start the stroller blanket test and called it done.
Spin Me Around Blanket
After completing the stroller blanket I decided to make a teddy bear. I went back to my Edward’s Menagerie book by Kelly Lord and picked the Penelope the Bear pattern. I used up some stash yarn I had bought to make a teddy bear (Go Handmade Teddy and Go Handmade Couture), but it was a little difficult to crochet with so I added a base yarn (Lion Brand Comfy Cotton Blend) to make it easier to work with the fuzzy yarn. One other trick, I turned the crochet inside out for the bear, because it was fuzzier on the inside of the pieces. I just thought it made it look more like a teddy bear all soft and fuzzy.
This was the first time I used safety eyes and nose with one of the Edward’s Menagerie animals, but I wanted to make the face a little cuter, and I’m not great at make amigurumi faces. I also bought a pet collar bowtie, because I thought he needed a bowtie as well.
Penelope the Bear
Next I made a teddy bear hat and diaper cover, using the same yarn as the teddy bear. The Teddy Bear hat is a free pattern by Kristen McKay and the diaper cover was a free pattern by Jessica Cooper (although you could also pay for a pdf version of the pattern). I added a teddy bear tail to the diaper cover as well, using the same tail and Penelope the Bear. For the hat and diaper cover, I did not turn the crochet inside out, because I wanted the softest part against the babies skin, so you can see the base yarn more in these items.
At this point I really need to stop, because I could continue with these forever. I love making stuff for babies. I just hope the hat and diaper cover are big enough, especially the hat, it looks so small.


You must be logged in to post a comment.