Teaching Connie to Crochet

My mom taught me to crochet when I was a little girl, maybe 10, or so? Then in my 20s I picked up one of those learn to crochet kits to refresh my memory. I’ve been crocheting off and on through the years, currently on a two year stint after being inspired by Lucy Ravenscar’s Star Wars Crochet.

My friend Connie wanted to learn how to knit and she wanted to take a class together. I thought, sure sounds like fun. (My mom also taught me how to knit, but it never stuck. She even tried to teach me again last Thanksgiving, but it just doesn’t feel natural after years of crochet.) Anyway, Connie and I are also fans of Harry Potter, so I told her I could teach her how to make this Slytherin Scarf.

She came over and I started to teach her how to chain and how to single crochet (sc). I also taught her how to turn rows. Her grasp was really tight, so I told her to try to keep it loose. I was making my own Ravenclaw Scarf as well while she made her Slytherin Scarf. After a couple of hours I thought she was doing pretty good and we could pick up on changing colors.

Next day, she says she went on YouTube and found a way to hold the yarn that felt better to her. I guess my hold on my hook (claw) and my hold on my yarn (also claw, I guess) is different than what is used out there on YouTube. So she showed me what she learned and it really did help her a lot. She also learned how to change colors. I’m so glad that I was so good at teaching, that my student learned more on YouTube.

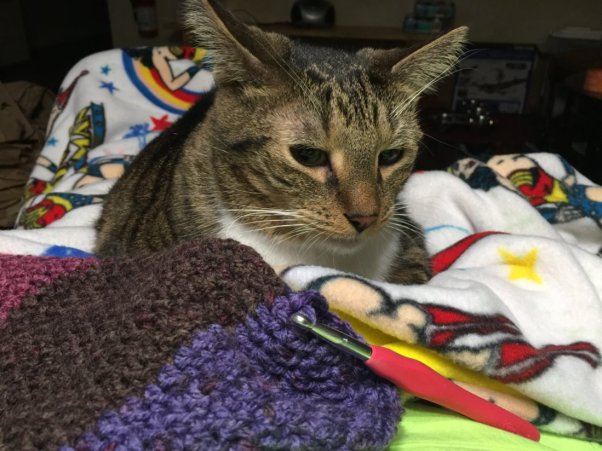
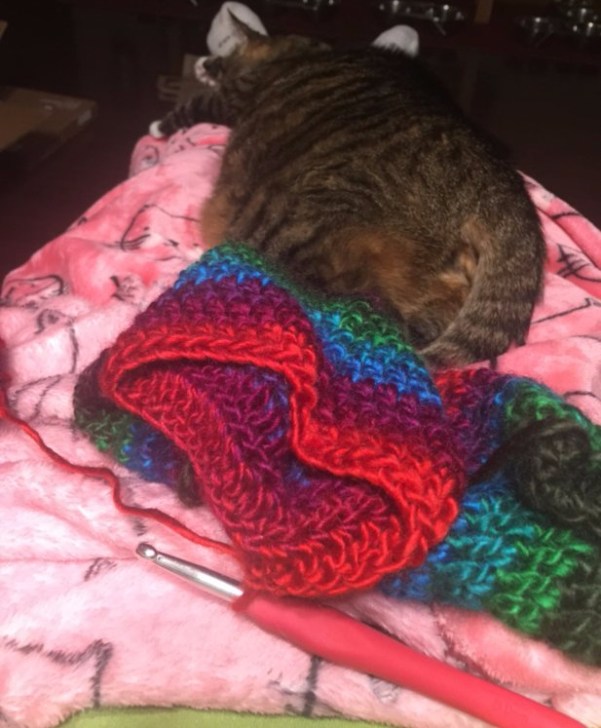
Connie ended up making this cute little scarf for her cat, Squeaky Bob. He is the chillest cat ever. He loves his little scarf. She also made a full sized scarf for herself.

Squeaky Bob and his Slytherin Scarf

She recently took a knitting class and has been knitting now. So, to summarize, my first crochet student learned more from YouTube videos and switched to knitting at the first opportunity. And my hook and yarn hold is all off. That is how great I am at being a crochet teacher. Lol

My Ravenclaw Scarf

Leg Warmers

I found this free pattern for colorful leg warmers on Pinterest by B. Hooked Crochet.  I thought these would look cute with some leggings or jeggings and would bring me back to my childhood in the 80’s.

Legwarmers5

Final leg warmers pulled up.

I started the pattern with Caron Cakes, because there is a sweater I want to make next that uses Caron Tea Cakes and I wanted the colorways to be similar.  I was doing pretty good with the pattern and I thought it was working out pretty well.  But my calves are a little larger than the pattern suggested, so I needed a few more stitches, it called for 35 and I tried 45.  Well a chain of 45 turned out to be way too large for me, plus the colors didn’t change often enough with the Caron Cakes, so I ended up buying the yarn that is used in the pattern, Lionbrand Landscapes.  I also ended up only doing a chain of 38 stitches and, while still a little loose on my calves, not bad.

I liked the Lionbrand Landscapes yarn.  It was so soft and easy to work with, which was funny because some people commented that they thought it was difficult to use.  Or more specifically, more difficult to pull apart.  I think as long as you yank gently, it’s pretty easy to pull apart if needed.

Anyway, this was a quick and easy pattern.  Once I got the right yarn and the right circumference, it only took me four days to make them.  I wore them to work today and got several compliments and requests to make them for others.  lol

Legwarmers2

Pumpkin cuddling while I work on my first version of the leg warmers.

Legwarmers3

Pumpkin cuddling with me while I work on the second version of the leg warmers.

Legwarmers4

Final leg warmers, slouchy style.

Rudolph the Red-nosed Reindeer

My husband and I were at Costco a few weeks ago and I found the Rudolph the Red-nosed Reindeer crochet kit by Kati Gálusz.  Too cute!  It has the supplies to make Rudolph and Santa.

Rudolph the Red Nosed Reindeer5

Rudolph the Red-nosed Reindeer crochet kit

Rudolph the Red Nosed Reindeer6

Kit comes with instructions to make Rudolph the Red-nosed Reindeer, Santa Claus, Mrs. Claus, Hermey, Sam the Snowman, and King Moonracer.

Rudolph the Red Nosed Reindeer7

Also includes instructions for Bumble the Abominable Snow Monster, Misfit Doll, Charlie-in-the-Box, Misfit Elephant, Yukon Cornelius, and Clarice.

Usually, I can finish one of these little characters in a couple of days, but I’ve been a little busy, so it took me a week.  These little guys could make cute Christmas tree ornaments.  Just tie a string loop to them and hang them from your tree.

The instructions were very clear.  I think my only complaint about these little kits are the eyes.  For some reason, the eyes in these little crochet kits are so difficult to get on.  But other than that, totally worth the money and fun to make.  This kit would make a cute Christmas gift for anyone that crochets, or could even be good for someone just learning.

I still need to make Santa, but I have a long project to-do list right now, so I’ll have to come back to him.  But now, I want to watch Rudolph the Red-nosed Reindeer.

Rudolph the Red Nosed Reindeer4

Sammy always wants to cuddle while I’m crocheting.

Rudolph the Red Nosed Reindeer3

Rudolph the Red-nosed Reindeer

Rudolph the Red Nosed Reindeer2Rudolph the Red Nosed Reindeer

Bridgeville Library Mini-Con

My friend had a table at the Bridgeville Library Mini-Con yesterday, so I decided to stop by.  There were a couple of craft tables there, including hers, Dawn’s Mystical Menagerie.  She sews bags and blankets and sells other mystical items.  I missed seeing her at the last Steel City Con, so I wanted to stop by and support her.

Dawns Mystical Menagerie

Dawn’s Mystical Menagerie photo by Dawn’s Mystical Menagerie

The other tables included Pickle bug Stitches, Grace DuhLee Designs, and Comfy Creations of Washington, PA.  I always like to support crafty ladies and I love to attend craft shows.  I have an appreciation for hand made items, I guess and the work that goes into them.  I bought a couple of star wars pillow cases from Pickle bug Stitches, a snitch from Grace DuhLee Designs, and a Wonder Woman blanket from Dawn’s Mystical Menagerie.

We were only there for a few minutes, but the mini-con was cute.  We were there for the costume fashion show, so it was cute to see the kids showing off their cosplay.

I also had a nice time talking with the crochet ladies.  I was talking to the one lady that was working on the elephant from the Rudolf the Red Nosed Reindeer crochet kit.  I had just finished Rudolf from the same kit that morning.  We also talked about Lucy Ravenscar’s Star Wars Crochet kit.  She was also a fan of that kit.  She also gave me a great tip!  For those little crochet books that come in the crochet kits, it can be difficult to keep the books open while you are crocheting.  She uses binder clips to hold the book open.  I usually have my phone holding the book open, but her tip may work a lot better.

Skull Scarf

I found this free skull scarf pattern on Pinterest by Amanda Pants.  There are actually a ton of various skull patterns on Pinterest for hats, gloves, scarves, etc., but I just loved this one.

SkullScarf2

Skull scarf #1 made w/ tc stitch and super long

The pattern is actually pretty easy.  The first one that I made, I admit, I was a little confused so I used a triple crochet (tc) instead of a double crochet (dc).  How could I make such a silly mistake?  I guess I had been doing a lot of British patterns at the time and I just upped the pattern from what I was reading.  Mt first attempt at this pattern came out really long as a result, which I love for scarves, so no probem.  And this yarn matched the color of my hair at the time, which was super fun.

SkullScarf

My scarf matches my hair!

I also bought some angora yarn to make some more.  I thought about making them to sell, but as I’ve said before, I get bored if I keep making the same thing over and over again.  So I only made one and kept them both versions of the scarves for myself.  This time I followed the pattern closer and made a smaller version of the scarf.  I love the angora yarn for this second scarf;  it’s the juxtaposition of soft pink angora yarn and skulls that amuses me.

SkullScarf4

Super sweet and soft angora yarn

SkullScarf5

Grrr. I’m a skull. But I’m also soft and fuzzy.

Project Graveyard – Stellar Patchwork Crochet Blanket

I found this Hufflepuff blanket pattern on Pinterest and I thought it would make a nice house warming gift for my co-worker and his fiance (both Hufflepuffs).  The pattern is labelled easy, and well it is easy in that it’s all single crochet (sc) stitch.  It also uses super bulky yarn, so I figured it would be quick AND easy.  But instead I found it to be confusing and frustrating.  This blanket is a royal pain in the ass.

While reading the instructions, I couldn’t for the life of me figure out how the color change was occurring between blocks.  I thought maybe the yarn was carried through or maybe it cut between blocks?  And that would really suck because I hate weaving in ends.  But this method just confused me.

I started this blanket several times; I just couldn’t figure it out until I found some online help on Ravelry.  I learned on there from other users that did the pattern that you need to keep eight balls of yarn going at the same time in order to change colors for each square.  I thought I had a pretty good system devised.  I balled all of my yarn and kept them in plastic Ziploc bags that were numbered (2 balls to a bag), so I could flip them over when I turned the pattern.  I saw other users used boxes to keep their yarn and other methods.  But overall, keeping that many balls of yarn going at once was a mess.

Project Graveyard

In the end, I think I’ll just pull this all out and make a zig-zag blanket instead.  It will be much easier.  But I’ll pick this blanket up a little later.  Maybe as a wedding gift?

Bride of Frankenstein

My Halloween theme this year was Bride of Frankenstein.  I’ve been working on this theme all year, so it was great to see it finally come to life.  Many of my props I’ve been posting over the past week, but there were plenty of decorations as well like the Mad Scientist Lab Combo and the Frankenstein and Bride of Frankenstein wall decals.

My costume I made following the Little Miss Monstrous Costume pin on Pinterest and I also tried another pin to erase my eyebrows.  I’m not great at makeup, but overall I think my makeup came out pretty decent.  Also, my friend did the eyebrows because I knew I would mess those up.

For the costume, I followed the directions for the drape and arm wraps.  The wig, I crocheted.  I also made some gloves to cover my hands as well.  If I were to do it all over again, I would not have used ace bandages for the arms wraps.  They were not comfortable and kept slipping all day.  I think I’d probably just make wraps from rags.  Perhaps using a cheap bed sheet?  But I do love the final costume.  This pin has also been re-pined from my board probably at least a hundred times by now.  I hope there were a lot of Brides of Frankenstein out there this year.  And yes, this costume is much better and more authentic than the one I saw at Target.

So, my cubicle won 1st place at work and my costume won 3rd place.  I’m very happy with my results.  And I have at least two more Halloween ideas in my head to keep me going for the next couple of years, although it would be pretty difficult (and expensive) to top this one.

Hopscotch Bunny

I came across some patterns by another designer, Irene Strange.  I tried the Hopscotch Bunny pattern.  This little bunny pattern is too cute!

At the time I was making these I was thinking about trying to build up an inventory and possibly start to sell at craft shows.  I ended up making several of these little bunnies, but in the end, they all ended up as gifts to people.  Unfortunately I can’t make the same thing over and over again.  I get too bored.

I loved this pattern though.  These bunnies were quick and easy to make.  I used the recommended yarn, Debbie Bliss Baby Cashmerino.  This yarn was great to work with, soft and smooth.

Ms Pac-Man Halloween

At my office, we have a Halloween pot luck every year.  I also have a coworker that I compete with for prizes.  She is very talented and creative, and I always use her as the bar that I have to reach.  Last Halloween I went with a Ms Pac-Man theme.

The idea came to me at work one day.  While walking around the cubicle pods and the hallways it made me think of a Pac-Man board.  So I started plotting out a Pac-Man board around the office in my mind.

I bought my Ms Pac-Man costume online, but I made many of the props.  I started with creating poster board Pac-Man, Ms Pac-Man and Ghosts to hang up around the office.  For the cherries, I bought two extra large round balloons and green balloon sticks that I taped together.  I also made some Pac-Man and ghost chocolate pops.  For the Pac-Man board around the office I bought a roll of heavy black paper and rolled it around the office.  I also used yellow poster board and construction paper to make the dots and power pellets.

I found this free Ms Pacman pattern to make a small crochet Ms Pacman.  I also found this other free ghost pattern.  One modification I made was to hot glue googly eyes on the ghosts instead of making the eyes out of felt.  I also created my own crochet Pacman board.  For my board I didn’t really plan it out  I did a simple single crochet square.  Then I sewed on the Pac-Man board pattern.  For the dots and power pellets I bought some jewels and glued them on.

Board

Crochet Ms Pac-Man Board

In the end, I won 1st Place for best costume!  Afterwards I immediately started planning for this year’s Halloween pot luck.

Star Wars Bounty Hunters

My husband is a Star Wars fan and loves the bounty hunters.  I decided to start making some additional crochet characters for him, in the same style as Lucy Collins.  I used her patterns to model my characters and changed up the color schemes.

I started with Bossk.  I found pictures of him online and of his action figure.  I used one of the regular sized characters from Star Wars crochet as my model, probably Han Solo.  For his head ridges, I added picots along his head.  I originally did his teeth in V shapes, but didn’t like them, so I replaced the teeth with just small stitches.  I thought it made his teeth look more jagged and razor sharp.  Overall I think he came out pretty good.  Bossk was a Valentine’s Day gift for my husband.

Bossk Head

Bossk’s Original Head with teeth

Bossk in progress

Bossk In Progress

Bossk

Completed Bossk

Next up I tried Dengar.  Again, I searched for pictures online to use to model him off of.   For his head wrap, I started with a hood and made a hat.  Then I made a long tail coming off the end of the hood, that I wrapped around his head.  He’s pretty cute.  He was a birthday present for my husband.

Dengar

Dengar

My latest bounty hunter was IG-88.  For IG-88, I used C3P0’s pattern as a template to work from.  He has really thin arms and legs, so I tried to reduce his leg and arm width and extend them, since he is tall.  I also extended his head to a point. When I finished he turned out to be almost twice as tall as Boba Fett.  Oops.  Oh well, I still like the way he turned out.  He was a Christmas present for my husband.

IG-88

IG-88

IG-88 and Bobba Fett

IG-88 Towers over Boba Fett

So I have three more to make for him: 4-LOM, Zuckuss, and Boba Fett.  I already made Boba Fett from the Star Wars Crochet kit, but he’s mine.  I’ll have to make a new one for my husband.  I think I may try 4-LOM next.  Need to figure out how I will make his bug eyes.